System Integration and Test
Best Practices for Upgrading Your Model
Upgrading your model each release allows you to integrate newer components and functionality. When you upgrade, you can:
Take advantage of new features.
Save time by replacing custom tools with built-in MATLAB® and Simulink® functionality.
Ensure continued compatibility with third-party tools.
Upgrading to the newest release also makes future upgrades easier to set up. Create a MATLAB script that calls and runs the Upgrade Advisor to perform regression testing, and generates reports for large projects or organization-wide upgrade efforts.
Testing
Testing allows you to check that the model functions as intended. Early testing helps identify errors, failures, and defects in the model and code. Simulink Test™ provides tools for creating, managing, and executing simulation-based tests for models and generated code to meet requirements. Simulink Test enables you to generate baseline data from previous runs and compares the data with the output of new tests. Additionally, you can compare data sets from different MATLAB versions. Follow these steps to create Model-In-Loop (MIL) tests using Simulink Test.
Creating and Managing a Test Harness in Simulink
Creating the Test Harness
Create the test harness that uses input sources for the system under test. For information, see Create a Test Harness (Simulink Test).
To test the subsystem, right-click on the StateMachine. To add the Simulink Test app options to the menu, point to Select Apps and click the Simulink Test button
 .
Then, in the Simulink Test app section, click the Add Test Harness button
.
Then, in the Simulink Test app section, click the Add Test Harness button
 .
.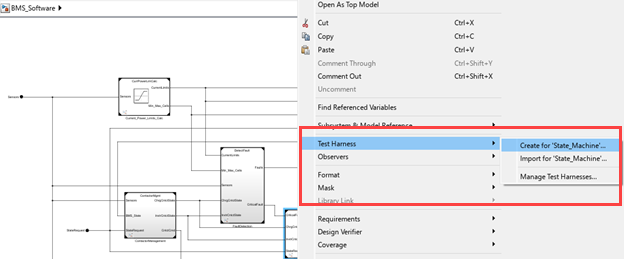
In the Create Test Harness dialog box, specify the inputs and outputs, and leave the other options at their default selections.
Click OK to create the test harness. The system will create the test harness model in
.slxformat and the metadata file in.xmlformat.
Setting Up Simulink Test
Open Simulink Test from the Apps tab, located under Model Verification, Validation, and Test.

Open Simulink Test Manager from the Tests tab.
Creating and Configuring Test Cases
Create a new test file, name it, and specify the location for saving the
.mldatxfile.Create test cases within the test file, setting the model under test and the test harness appropriately.
Map external inputs from a
.matfile to the test case in the input section.Configure the signal editor of the harness model to consider the scenario from the
.matfile.
Running and Analyzing Tests
Save and run the test case to verify the output.
Export test report if needed for analysis purpose.
Open and run Simulink Test for state machine model.
open('StateMachine_Test.mldatx');
Data Traceability
A data traceability file in Simulink serves the purpose of tracking and managing data throughout the
model development process. It actively links data elements within the
Simulink model to their corresponding requirements, design specifications,
and test cases. This ensures clarity and accountability by maintaining a clear
record of data flow and transformations. By using a data traceability file, you
can efficiently verify that the model meets all specified requirements and can
easily identify and address any inconsistencies or errors. The data traceability
file (.slmx file) links to the model.
Link the software architecture components to their respective Simulink models to establish traceability between artifacts from different development stages.
To ensure that each requirement is implemented within the architecture, we establish links from the requirements to the architecture. This process ensures data traceability, which helps identify any missing parts of the implementation or requirements.
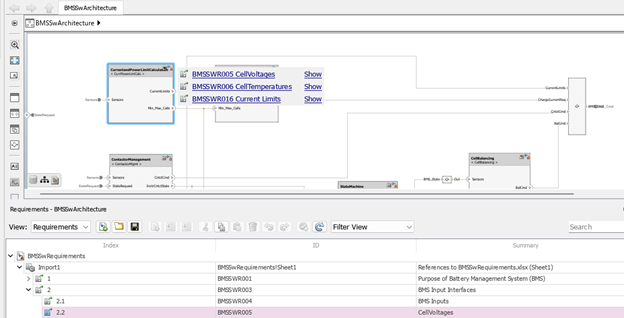
Link the architecture components to respective models.
Link the software requirements to the Simulink model.
Link the requirements to test.