Labeling Ground Truth for Object Detection
From the series: Perception
Quality ground truth data is crucial for developing algorithms for autonomous systems. To generate quality ground truth data, Sebastian Castro and Connell D'Souza demonstrate how to use the Ground Truth Labeler app to label images and video frames.
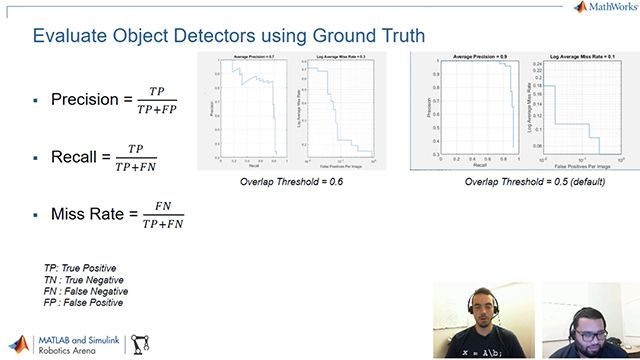
First, Sebastian and Connell introduce you to a few different types of object detectors. You will learn to differentiate between object detectors as well as discover the workflow involved in training object detectors using ground truth data.
Connell will then show you how to create ground truth from a short video clip and create a labeled dataset that can be used in MATLAB® or in other environments. Labeling can be automated using the built-in automation algorithms or by creating your own custom algorithms. You can also sync this data with other time-series data like LiDAR or radar data. Download all the files used in this video from MATLAB Central's File Exchange
Additional Resources:
Published: 17 Oct 2018
Hello, everyone, and welcome to the MATLAB and Simulink Robotics Arena. In today's episode, we'll start talking about using Ground Truth for object detection. So I have Connell with me. How's it going, Connell?
Hey, Sebastian. How's it going?
Doing pretty good. I'm excited to hear what you've got to say here. So this is the first part of a couple of videos on Ground Truth, and I think for this one, we're just going to talk about labeling what is known as Ground Truth. So what are we going to see today?
So today's agenda, we're going to do a quick overview of what object detectors are. What are we trying to achieve by creating these object detectors? And then we're going to talk a little bit about what Ground Truth is. And then we'll do a quick software demonstration to show you this tool called the Ground Truth Labeler App, which is part of the Automated Driving Systems Toolbox. And then, as usual, we do some key takeaways and Point you guys to resources to help you get started with your competitions.
So, without wasting any time, let's quickly jump into what object detectors are. So an object detector is basically a computer program that can help you identify different objects of interest in images. And this could be still images. It could be a stream of images.
It's a very common thing used in computer vision, especially with the whole autonomous systems trend going on. Your autonomous system needs to know what is in its surroundings. So the camera is definitely a vital part of that.
So for object detectors, we've got sort of three big types of object detectors. And the first one is the simple, classical computer vision object detectors. And those could be things like when you identify things based on colors. So color thresholding and blob analysis, that's what we like to call image segmentation object detectors.
And then you have the feature-based object detection, which is where you sort of feed in a particular feature and have the program identify that feature in a stream of images. And then it sort of scans and matches against the feature that you're trying to identify, and sort of gives you an-- tells you where in the image it is. Then you have the machine learning object detectors. And these employ machine learning classification techniques.
So for example, support vector machines are popularly used to classify different types of data. The way you would use a support vector machine for object detection is you would still use the classical computer vision to detect features, but then feed those features into your machine learning model that can help you classify if it's a car, or a pedestrian, or a stop sign, or things like that. And then the other one is the Viola-Jones algorithm, which is what-- so MATLAB calls-- MATLAB has algorithms for cascade object detectors, which are basically implementations of the Viola-Jones algorithm.
And then finally, this new trend that the whole world is sort of moving towards is deep learning. And you've got convolutional neural networks, and these convolutional neural networks are basically very, very deep machine learning models that can not only sort of classify features, but also identify the features for you.
Right. So it seems like, as we're moving towards having more complicated algorithms, we're kind of taking some of the things that we've done previously with classical computer vision, where you know exactly what your object looks like and you can put it into math, going all the way to deep learning now, where you're just learning everything automatically about what the object represents. And that's where learning comes in.
Yep. Yep. I think a good way to sort of differentiate between deep learning and machine learning is with machine learning, you're still feeding in features. You still have to extract the features in some form or the other. Whereas with deep learning, you have this black box that you just sort of feed in a bunch of images in the case of object detectors. And it'll not only learn the features that you want it to learn, but it will also be able to identify and classify them as well.
Right. And I guess that's why we're showing you this video, because for machine learning and deep learning, you need to tell your algorithm what is an object. And to do that, you need a lot of data.
Exactly. Exactly.
And so I guess that's where Ground Truth comes in. Right?
Yep. Exactly. So moving on to the next slide-- so again, as we said, with the machine learning and deep learning detectors, you have to train this computer program. You know? The computer program does not identify the features. You have to train it.
And the easiest way to train it, especially for images and video frames, is to manually label these video frames and tell your computer program where in the image it has to look. Or rather, where and what does it have to look for. So one of the ways to train object detectors is to use something called Ground Truth.
Now, the question arises, first of all, what is Ground Truth? And then secondly, how do we create it? Right? So Ground Truth is basically what we like to call the "ideal world," where you manually go into a stream of images or a video and you label objects of interest.
So, as you can see on the screen, we've got some cars labeled. And now my computer program knows that I'm trying to teach it to identify cars. And it also gives the location of the cars in the image.
So, without wasting too much time, we're just going to jump into MATLAB and show you how you can label Ground Truth and how you can generate Ground Truth using a tool that we have called the Ground Truth Labeler App. So switching over to MATLAB, as we discussed earlier in this video, we have a sample video. And based on this sample video, we're going to try and teach a computer program to identify a buoy. So I'm just going to first show you what the video is like.
And you can see it's a pretty-- it's a fairly short video. It's about 10 or 12 seconds long. And as you can see, this-- so this video is from a competition called Roboboat where you have a boat going through a course, and it can see a red buoy and a green buoy. So again, a fairly short video clip.
Without wasting too much time, I'm just going to jump into the Ground Truth Labeler App. Now, the Ground Truth Labeler App is-- it's a MATLAB app. It was released a few releases ago as part of the Automated Driving Systems Toolbox. So you can either find it up here in the Apps tab, or by typing in "Ground Truth Labeler" into the Command window.
So I'm just going to run this real quick. Once you open up the Ground Truth Labeler App, this is what the interface looks like. On the left-hand side, you have the Label Definitions. Now, remember. You are trying to tell this computer program what you're trying to identify. Right? So you have to give it a label.
And then you also have things like a Scene Label. So if the video frame or the images that you're trying to label is on a sunny day, or it's an overcast day, or things of that, you can label the scene. The way to start, you have to load your data source. Right?
So if you go under the Load options, you can see there are a couple of different data sources that you can load in. You can load in videos or image sequences, and then you can also load in a custom reader, which is-- again, you can take a look at our documentation as to how you can do that. But I'm just going to go and choose the Video option for now because we have a video clip.
And let me just go in real quick and grab this video. So I'm just going to hit Play and, as you can see, it'll step through the video. The video is not too long. It's about 17 and 1/2 seconds.
Yeah. And that's not too much data. But I can imagine with all the frames that you have in any video, this is still a lot of individual frames that you have to go and label. Yeah.
Correct. Correct. No, you're absolutely-- and again-- I mean, this is-- the rule of thumb with deep learning and machine learning is the more data you have, the better it gets.
Right.
Not taking into account overfitting. But for sure, the more data you have, the better it is. So let's get started. So the first thing that I need to do is-- I'm trying to label as much as I can within this video. Right?
So say I want to detect the red buoys. I'm going to go ahead and create a new label. And the moment I hit on that, it opens up this small, little pop-up. And I can just give it the name-- let's call it "Big Red Buoy."
And, as you can see, there are a few different types of labels that we can choose. So you have the Rectangle, the Line, or the Pixel label. I'm just going to choose the rectangle for now because it works. But I can show you some other ones later.
And once I hit OK, I see that this Big Red Buoy has been created here. Now, I can also add attributes to it or create sub-labels. So, for example, I could say, oh, I want to just label big buoys versus small buoys, and then have sub-labels as red and green. Again, it really depends on your preference. I'm just going to go with it like this.
As Sebastian mentioned earlier, there are quite a lot of frames in here that you need to label. So you obviously don't want to do that manually, because that's going to take a long time. This app offers you a few automation algorithms that you can use, and I'm going to show you one of them real quick. I'm going to show you a couple of them, actually.
So the first thing I want to do is I don't want to use the automation algorithms on the entire video at one time, because that's probably not going to be very good. So I'm going to select a small section of this video. So let's say I choose the first 4 and 1/2 seconds.
If I go up to the Algorithms tab up here, I can see four built-in algorithms, and then also the option to add your own algorithms. To learn more about how you can add your own algorithms, I highly recommend going to the Documentation page, because you don't have to stick with the four algorithms that we provide. The first one that I'm going to choose is the Point Tracker algorithm, and we can see how this works.
So the moment I click on the Point Tracker, I see this Automate button that lights up. And let me go ahead and click this guy real quick. And you can see the icons at the top have changed.
Also, on the right-hand side, I've got a list of steps that I can take to use this algorithm. So I'm just going to dive into it really quick. I'm going to select the Big Red Buoy and click and drag to label the object of interest in my video frame.
So now I have this Big Red Buoy labeled here. Now, labeling this for subsequent frames is as simple as hitting the Run button. So I hit the Run button and I see that it's using this Point Tracker algorithm, and it's tracking it fairly well.
And now what I can do is I can go back and check how well the algorithm has done. So I can step through different frames. I can see that, OK, it's tracking it fairly well. So once I'm happy with this, I just hit the Accept button. And now when we go back to the video, I see that I've already-- I already have a few frames labeled.
So the idea here is that, instead of going through every frame manually, you're using some of these built-in automated algorithms to try get some of that labeling in the way, because--
Correct. Correct. Yep.
I guess it's-- at the end of the day, it becomes a little bit more efficient to have kind of an initial guess of all the labels. And then you just go in and modify the ones that are wrong, or--
Yep. Yep.
--not as accurate, rather than having to just go and do them all manually, one-by-one.
Correct. Think about it when you scale this up to deep learning, you need upwards of thousands of images. You can't sit and label that-- you can't sit and label those many frames manually.
Right.
So this does help cut a significant amount of time when you're labeling Ground Truth. The next thing that I'm going to do is I'm going to create another label. So I'm going to create a label for the Big Green Buoy. And let me just name this as "Big Green Buoy."
And again, I'm going to choose the Rectangle type again. But again, you can also choose the other types depending on what works better for you. I'm just going to go and look for where these green buoys are.
OK, so I can see the green buoy at the back there, so I'm going to go and label this as the "Big Green Buoy." Now I'm going to try and use one of the other automation algorithms that we have. So I'm going to choose the Temporal Interpolator.
And again, I can select this buoy-- I can select this label and then click on the Automate button. And as the name suggests, it's an interpolation operation. Right? So you have to sort of label a bunch of subsequent frames.
So I've got this one labeled. I'm going to fast-forward into the video a little bit more. And let's say I label this one here, and then jump a few more frames ahead and label this one again.
Now, part of the reason why I chose the interpolator algorithm here is because if you see this green buoy, it's not always in the field of vision. It sort of hops in and hops out every now and then. So this one's just a more efficient algorithm for this green buoy. But let's hit Run and see how well this does.
As you can see, it's tracking it fairly well. That was the last frame labeled, so it's not going to label any more after that. So I'm just going to choose Accept. And once I go back to the video here, we can see how many frames we've actually labeled in the span of a few minutes.
Right. So it seems like the difference there was that in the first automation, you just kind of picked an object and let the algorithm track.
Correct.
Whereas in the other one, you picked a couple of key frames, and you tried to kind of--
Correct. Correct.
Well, as its name says, you're interpolating between them.
Exactly. Exactly.
Cool.
That's exactly what I'm doing. Yeah. And the other thing that I can do is I can also-- once I've labeled them, I can go back and re-change my labels. So say, for example, in this frame, I feel like the box is a little too big around the object. So I can go and adjust this.
And I can also save the session so I don't have to do all of this labeling in one shot. I can save the session, come back to it whenever I want to later. I can just choose the Save As, and you can give it a name. Let's just call it "Demo."
And once we hit Save, we go back to the current folder, we will see this saved as a MAT-file over there. In the interest of time, I already have a label session ready. So I'm just going to go and open up another instance of this app with that pre-labeled session just to show you how it looks like once it's all completely labeled.
As can see, now I have a completely-labeled 17-second video clip. And we can just play through this to see. And again, this has all been done using the automation algorithms in there.
I did make a few adjustments after the automation algorithms completed running. But for the most part, it took me maybe 15 minutes to get this video labeled. Cool.
OK. So now you have the fully-labeled set of data. I know one of the things that's actually very useful for machine learning is that you want to make sure that you have enough data that represents all the different classes or types of objects that you want to label.
Correct.
So is there a way to just kind of get an overview of a--
Yeah. Yeah. So it's good that you mentioned that, because we've got this View Label Summary button here. And if I click on this, it pulls up a plot that has all the labels in there.
So I'm just going to adjust the real estate on my screen for a little bit. But basically, what happens is if I scroll back, you can see the number of labels in each frame based on the time. And if I hit the Play button, it also tracks the number of labels on the plot on the right, as well as looking at the frame and the time which it is in the video.
Right. And in this case--
Yeah.
--it seems that all the scene labels are sunny. But you can imagine that if you were training to different conditions, like if you had a sunny and a night condition--
Correct.
--then you could actually use that scene label to either train for day versus night, or to even filter your data by that scene label.
Absolutely. Another sort of important-- another important problem with automated driving is, what happens when cars go into tunnels or under bridges and things like that? You can label those scenes that way.
So you can say, OK, before it's going into the tunnel, it's sunny. And then once it goes in, it's dark. Things like that. So there's a lot of flexibility with what you can do with these.
Now that we have the labels, how do we actually use them in MATLAB? Right? So if I go into the Export Labels button, I see a couple of options.
So I can either export them to a MAT-file or to the workspace. I'm just going to choose to export them to the workspace. And it'll ask me to give it a name, so I'm just going to keep the default for now. And if I go back into MATLAB, I see that it's created this gTruth Ground Truth data object. It's a special MATLAB data object that holds Ground Truth data.
So when I open up this Ground Truth data object, I have these three properties. One is the Data Source. If I click on this, I see that it's got the video location and the timestamp.
I could go into the Label Definitions, and this looks familiar. We labeled a Big Red Buoy, a Big Green Buoy, and the sunny scene labels. And finally, you have the Label Data. Now, this is the actual bounding box.
Right.
So, for example, for every video frame that we've labeled something, you have bounding box coordinates for the Big Red Buoy and the Big Green Buoy labels, as well as the scene labels. And this also has the time series data on the side. So this data can be taken outside MATLAB and used in deep learning training environments like TensorFlow, or Keras, and stuff like that. So again, whatever you're doing here is not only restricted to MATLAB. You can take this data and you can use this in other environments as well.
That said, if you stay tuned for the second part of this video, we'll show you how to use this data from within MATLAB to train a detector.
Correct. Yep. Yep. All right, so let's go back to the presentation real quick, and then we can just do some key takeaways.
All right, so to do a quick recap on creating Ground Truth, now we know that the Ground Truth is the desired output. So we have to manually label that in images. And it's what we like to call the "ideal world."
So here's a screenshot of the app on another data set that I used a while ago. Now, Ground Truth can be used for two different things. It can be used for training object detectors, as well as evaluating object detectors. And again, tune in for part 2 of this mini-video series, and we can-- I'll show you how to do that there.
Finally, some key takeaways. We spoke about the different methods of object detection. The classical computer vision methods, the machine learning and deep learning methods. We showed you how to automate image labeling using the Ground Truth Labeler App.
Again, we have a couple of other tools that also do this known as the image Labeler and the Video Labeler Apps. Those two reside within the Computer Vision Systems Toolbox. Another important thing with this Ground Truth Labeler App is the fact that you can sync this with other time series data like LiDAR or radar.
There is a driving connector API that you can use, and I'm going to pop a link into the Resources section where you can take a look at how you could open up, say, camera data and LiDAR data or camera data and radar data from a particular run, and label both those or view both of those simultaneously. And then the most important thing, what I feel that you should take away from this, is the fact that you can use this label data outside of MATLAB. So you're not restricted to the MATLAB environment after this.
All right, Connell. So thanks for running us all through how to create Ground Truth from a data source. In this case, a video.
As always, feel free to reach out to us either via email or Facebook, and take a look at our other resources here. Thank you.