Resolve Conflicts in Architecture Models Using Three-Way Merge
This example shows how to use the System Composer Three-Way Merge Tool to investigate and resolve conflicts in System Composer™ architecture models in a project. You can view and merge the System Composer architecture model differences in the resulting report.
The Merge tool automatically merges non-conflicting changes before you open the merge report. This example demonstrates how to:
Review the automatic merge choices.
Apply your desired edits to the target file.
Decide how to resolve any remaining differences.
After you resolve the conflicts, you can commit the resolved architecture model to source control.
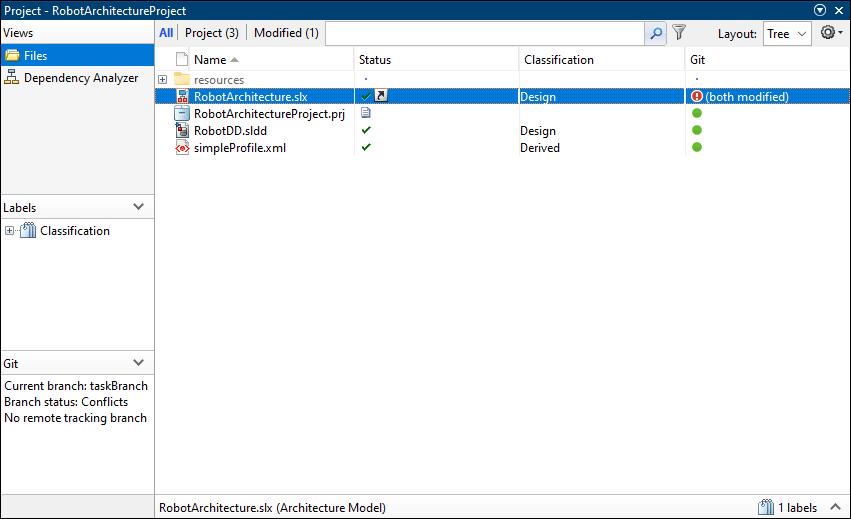
Open System Composer Three-Way Merge Tool
In the Project panel, look for conflicted files. The RobotArchitecture file shows a red warning icon in the source control column, which indicates a conflict.
To see a detailed report of conflicts, in the Source Control panel, in the Modified Files section, right-click the RobotArchitecture/RobotArchitecture.slx file and select View Conflicts.

Review Changes and Conflicts in Architecture Model
The example project, RobotArchitectureProject, is under Git™ source control. When you attempt to merge the changes of a colleague on the main Git branch into your taskBranch, the operation results in conflicts.
To resolve the conflicts using the Three-Way Merge Tool, examine your local file (Mine, in this example, the taskBranch branch), the conflicting revision (Theirs, in this example, the main branch), and the common ancestor of these two files (Base).
Theirs — A colleague, working on the
mainbranch, added a new stereotype to the profile and updated the query used in theComponent Viewview.Mine — You updated added Simulink® behavior to the
Motioncomponent and updated the query used in theComponent Viewview in thetaskBranchbranch.
The System Composer Three-Way Merge Tool opens three panes at the top.
The Mine pane displays the changes you made. In this example, the pane is called taskBranch.
The Theirs pane displays the changes your colleague made. In this example, the pane is called main.
The Base pane displays the common ancestor version.
The tool automatically resolves differences when possible and opens a Target pane. The Target pane contains a copy of your changes from the taskBranch branch and automatic merges. Review the automatic merge choices, edit if desired, and decide how to resolve any remaining conflicts.
In this example, to resolve conflicts in the RobotArchitecture file, resolve conflicts in the Component View view.
Resolve Conflicts in RobotArchitecture
Examine the Three-Way Merge report for the RobotArchitecture architecture model.
The summary table in the bottom right corner shows that the tool automatically merged 125 changes. The table also shows that two unresolved conflicts in the report require attention.
In the report, the tool colors unresolved conflicts in red. The tool also colors automatically resolved differences with the color of the corresponding revision.
Examine and resolve the first difference that requires attention. The tool selects the first difference when it opens.
The tool selects the Component View row. In the Target pane, in the details table, the tool marks the Color and Component Selection Query properties as conflicts.
In this example, the report shows that your colleague changed the color to
purple, which conflicts with the color you added,green. You can use the provided option buttons next to the difference to select which color to keep in the target file.After selecting an option button, you can see that the summary table shows that one unresolved conflict remains.
Resolve the conflict with the Component Selection Query property.
In this example, the report shows that your colleague changed the query to
HasStereotype(IsStereotypeDerivedFrom('CriticalProcess')), which conflicts with the query you added,HasStereotype(IsStereotypeDerivedFrom('simpleProfile.sysComponent')).By default, in the Target pane, the tool selects the change you made in taskBranch. Suppose you want to keep the default selection. In the pane, click the conflict icon in the Component Selection Query row and click Mark as Resolved.

The tool updates the row color from red to blue to indicate that the target file now contains the taskBranch change.
Examine the summary table. The table now shows that you resolved all the changes.

Before you save the merge results, you can review and adjust all automatic merge choices. To save the target file with all your merge choices and mark the conflicted file as resolved in the source control tool, click Accept & Close.
Perform Last Checks
When you resolve conflicts in model files, the Git status in the Files and Source Control panels now show the model files as Modified.

Before you commit the resolved model files to source control, perform a final review by comparing the merge changes against the current branch. You should always qualify merged models by verifying simulation results or running tests.
See Also
System Composer Three-Way Merge Tool | System Composer Comparison Tool | Resolve Conflicts in Project Using Simulink Three-Way Merge