Use the Model Explorer with Stateflow Objects
View Stateflow Objects in the Model Explorer
You can use one of these methods for opening the Model Explorer:
In the Modeling tab, select Model Explorer.
Right-click an empty area in the chart and select Explore.
The Model Explorer appears something like this:
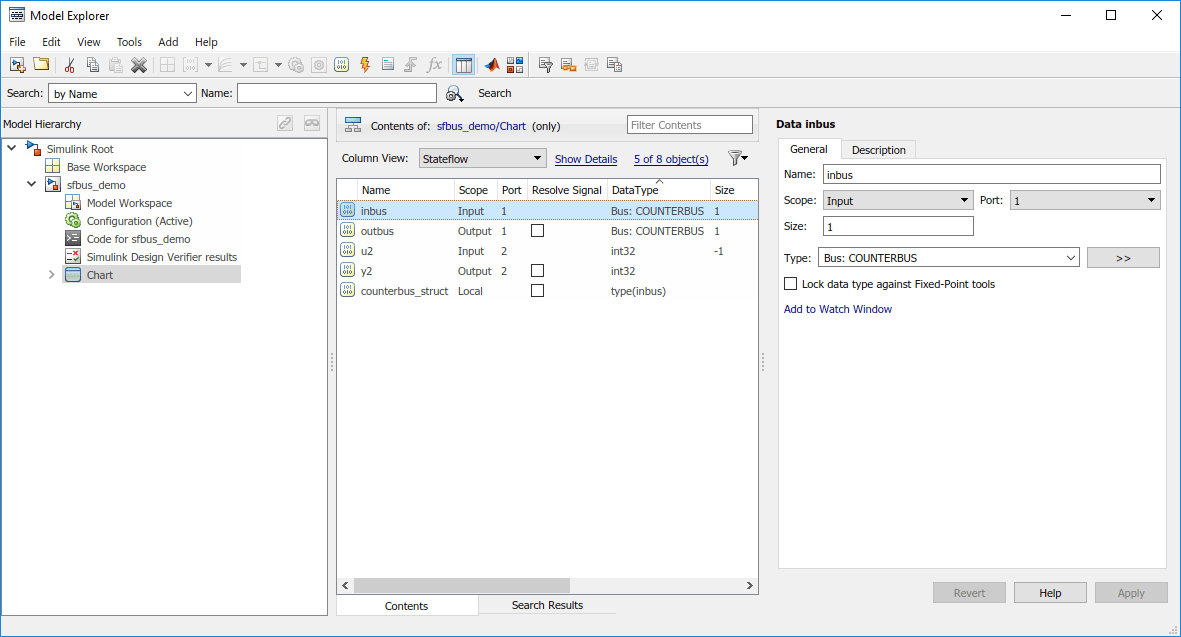
The main window has two panes: a Model Hierarchy pane on the left and a Contents pane on the right. When you open the Model Explorer, the Stateflow® object you are editing appears highlighted in the Model Hierarchy pane and its objects appear in the Contents pane. This example shows how the Model Explorer appears when opened from the chart.
The Model Hierarchy pane displays the elements of all loaded Simulink® models, which includes Stateflow charts. A preceding plus (+) character for an object indicates that you can expand the display of its child objects by double-clicking the entry or by clicking the plus (+). A preceding minus (-) character for an object indicates that it has no child objects.
Clicking an entry in the Model Hierarchy pane selects that
entry and displays its child objects in the Contents pane. A
hypertext link to the currently selected object in the Model
Hierarchy pane appears after the Contents of:
label at the top of the Contents pane. Click this link to
display that object in its native editor. In the preceding example, clicking the
link sfbus_demo/Chart displays the contents of the chart in its
editor.
Each type of object, whether in the Model Hierarchy or Contents pane, appears with an adjacent icon. Subcharted objects (states, boxes, or graphical functions) appear altered with shading.
The display of child objects in the Contents pane includes properties for each object, most of which are directly editable. You can also access the properties dialog box for an object from the Model Explorer. See Set Properties for Chart Objects in the Model Explorer for more details.
Edit Chart Objects in the Model Explorer
To edit a chart object that appears in the Model Hierarchy pane of the Model Explorer:
Right-click the object.
Select Open from the context menu.
The selected object appears highlighted in the chart.
Rename Objects in the Model Explorer
To rename a chart object in the Model Explorer:
Right-click the object row in the Contents pane of the Model Explorer and select Rename.
The name of the selected object appears in a text edit box.
Change the name of the object and click outside the edit box.
Set Properties for Chart Objects in the Model Explorer
To change the property of an object in the Contents pane of the Model Explorer:
In the Contents pane, click in the row of the displayed object.
Click an individual entry for a property column in the highlighted row.
For text properties, such as the Name property, a text editing field with the current text value overlays the displayed value. Edit the field and press the Enter key or click anywhere outside the edit field to apply the changes.
For properties with enumerated entries, such as the Scope, Trigger, or Type properties, select from a drop-down combo box that overlays the displayed value.
For Boolean properties (properties that are set on or off), select or clear the box that appears in place of the displayed value.
To set all the properties for an object displayed in the Model Hierarchy or Contents pane of the Model Explorer:
Right-click the object and select Properties.
The properties dialog box for the object appears.
Edit the appropriate properties and click Apply or OK.
To display the properties dialog box dynamically for the selected object in the Model Hierarchy or Contents pane of the Model Explorer:
Select View > Show Dialog Pane.
The properties dialog box for the selected object appears in the far right pane of the Model Explorer.
Move and Copy Data and Events in the Model Explorer
Note
If you move an object to a level in the hierarchy that does not support the Scope property for that object, the Scope automatically changes to Local.
To move data and event objects to another parent:
Select the data or event to move in the Contents pane of the Model Explorer.
You can select a contiguous block of items by highlighting the first (or last) item in the block and then using Shift + click for highlighting the last (or first) item.
Click and drag the highlighted objects from the Contents pane to a new location in the Model Hierarchy pane to change its parent.
A shadow copy of the selected objects accompanies the mouse cursor during dragging. If no parent is chosen or the parent chosen is the current parent, the mouse cursor changes to an X enclosed in a circle, indicating an invalid choice.
To cut or copy the selected data or event:
Select the event or data to cut or copy in the Contents pane of the Model Explorer.
In the Model Explorer, select Edit > Cut or Edit > Copy.
If you select Cut, the selected items are deleted and then copied to the clipboard for copying elsewhere. If you select Copy, the selected items are left unchanged.
You can also right-click a single selection and select Cut or Copy from the context menu. The Model Explorer also uses the keyboard equivalents of Ctrl+X (Cut) and Ctrl+C (Copy) on a computer running the UNIX® or Windows® operating system.
Select a new parent object in the Model Hierarchy pane of the Model Explorer.
Select Edit > Paste. The cut items appear in the Contents pane of the Model Explorer.
You can also paste the cut items by right-clicking an empty part of the Contents pane and selecting Paste from the context menu. The Model Explorer also uses the keyboard equivalent of Ctrl+V (Paste) on a computer running the UNIX or Windows operating system.
Change the Port Order of Input and Output Data and Events
Input data, output data, input events, and output events each have numerical sequences of port index numbers. You can change the order of indexing for event or data objects with a scope of Input or Output in the Contents pane of the Model Explorer as follows:
Select one of the input or output data or event objects.
Click the Port property for the object.
Enter a new value for the Port property for the object.
The remaining objects in the affected sequence are automatically assigned a new value for their Port property.
Delete Data and Events in the Model Explorer
Delete data and event objects in the Contents pane of the Model Explorer as follows:
Select the object.
Press the Delete key.
You can also select Edit > Cut or Ctrl+X from the keyboard to delete an object.