Manage Users and Groups
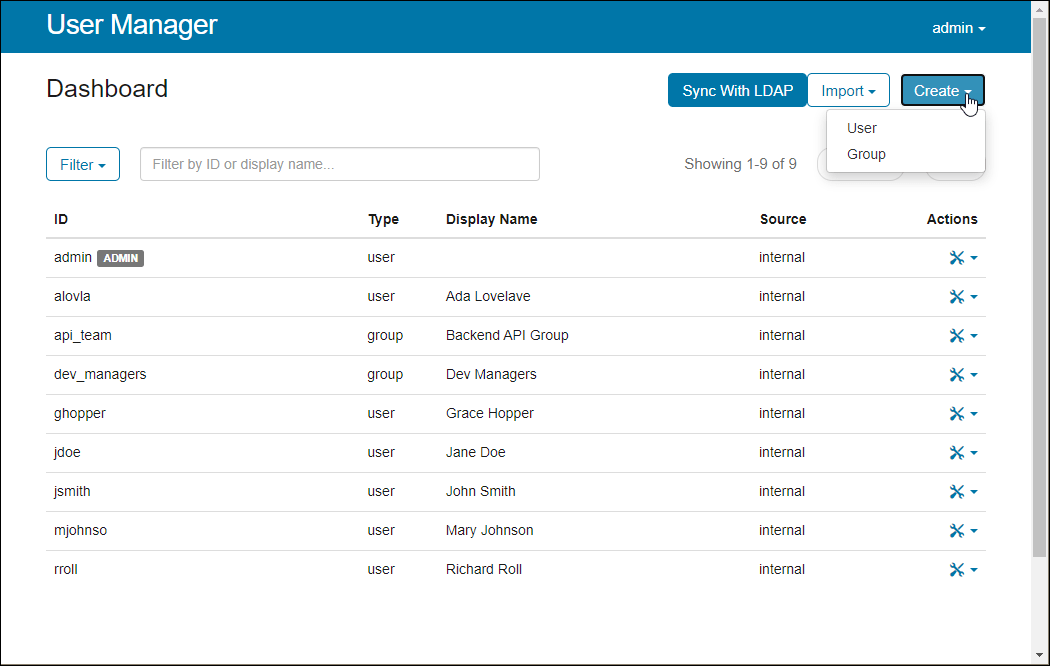
Once the User Manager service is running, click Manage users to open the User Manager interface. The interface shows all the users and groups that are stored in the User Manager database.
If you are prompted to log into the interface, use the login credentials of one of the users that you specified in the Administrator sign-in IDs field. Only these users can open the User Manager interface and manage users. See General User Manager Settings.
Create, Edit, or Remove Users and Groups
To create, edit, or remove custom users and groups and to view information about LDAP users and groups, such as group memberships, use the User Manager interface. When you connect the User Manager to an LDAP server, the User Manager copies to its database the user and group entries returned by the LDAP server based on your LDAP filters. The User Manager does not make any changes to the entries on the LDAP server.
This table describes the different operations that you can perform on users and groups (identities), depending on whether the identities are custom entries in the User Manager database or whether the identities are from an LDAP server.
| Operation | Custom Identity | LDAP Identity |
|---|---|---|
| Create User Manager administrator |
|
|
| Remove User Manager administrator |
| To remove a User Manager administrator, remove the username from the Administrator sign-in IDs field, save your changes, then restart the apps. The ADMIN label no longer appears next to the user ID in the User Manager interface. To remove the user completely from the database, contact your LDAP administrator. |
| Create user |
|
|
| Create group |
|
|
| Edit or delete users and groups |
|
|
| Update user password | Click the icon in the Actions column and select Change Password | To change the password of an LDAP user, contact your LDAP administrator. After the LDAP administrator makes the changes, click Sync With LDAP to update the User Manager database. You cannot change the password of an LDAP user from the User Manager interface. |
Import Users from LDIF File
To add users from an LDAP server to the User Manager database without connecting to that LDAP server, export the user to an LDAP Data Interchange Format (LDIF) file and import the users from that file. An LDIF file is a text file that stores user accounts and other LDAP directory data. To import the users:
From the User Manager interface, click Import > LDIF.
Fill out the fields in the LDIF Import form. Contact your LDAP administrator to obtain the relevant values for the Object Class field and the fields in the Source attributes section from the LDIF file.
Field Description File Select the LDIF file from which you want to import users. When you click Choose File, you can browse files on the machine where you opened the User Manager interface. This might be a different machine from the machine where you installed Polyspace Access.
Object class Specify the object class attribute for the entries that you want to import, for instance,
organizationalPerson. Typically, you use this attribute to determine which other attributes are associated with an LDAP entry.Polyspace does not use the Object class attribute to check the validity of other attributes.
Ignore duplicates When you select this option, Polyspace does not import a user from the LDIF file if a user with the same ID (username) already exists in the User Manager database. When you deselect this option, the import fails if duplicate entries exist. Ignore invalid entries When you select this option, Polyspace ignores invalid entries. Entries are invalid if they have missing attributes, use an unsupported password hash, or are duplicates of existing entries. When you select this option, the Ignore duplicates option is also selected. When you deselect this option, the import fails if there are invalid entries. ID attribute Specify the username attribute for the entries that you want to import, for instance, uid. Typically, the username is a unique identifier.Display name attribute Specify the display name attribute for the entries that you want to import, for instance, cn. Typically, the display name is the first and last name of the user. The display name might not be unique within an organization.Email attribute Specify the email attribute for the entries that you want to import, for instance, mail.Password attribute Specify the password attribute for the entries that you want to import, for instance, userpassword. The User Manager LDIF import supports only plain text passwords.Image URI attribute Specify the image attribute for the entries that you want to import, for instance, jpegPhoto. This attribute is optional.
For example, to import users from this LDIF file:
Fill out these entries.
| Entry | Value |
|---|---|
| Object class | inetOrgPerson |
| ID attribute | uid |
| Display name attribute | cn |
| Email attribute | mail |
| Password attribute | userPassword |
Sort Users and Groups in User Manager Interface
To manage large sets of users and groups, sort the identities by using the Filter button and the text filter.
Click Filter and clear a filter to hide the corresponding users and groups. For example, if you clear Group, you do not see any group in the list of identities.
You can filter users by:
Type — Show or hide only users or groups.
Source — Show or hide only custom identities (internal) or identities imported from the LDAP server.
Uniqueness — Show or hide only identities that are unique or identities that override a duplicate LDAP identity.
An identity overrides a duplicate identity when you import identities from LDAP, and one of the LDAP identities has the same ID as a custom identity in the User Manager database. The custom identity overrides the LDAP identity and you see the OVERRIDES label in the Source column.
Use the text field to filter identities by ID or by display name.
When you use the text filter, the text must match the ID or display name from the start of the string. For instance, if you type
Smithin the search filter, this entry matches userSmith Johnson, but does not match userJohn Smith.
Update List of Polyspace Access Users and Groups
When the Polyspace Access Web Server service starts, Polyspace Access populates its list of users and groups from the User Manager database. You can select from only this list when you assign analysis findings to users or when you set user and group roles while managing permissions for a project or folder.
After you start the Polyspace Access Web Server service, if you add or remove a user or group from the User Manager database, Polyspace Access updates the list of users and groups whenever you log into the Polyspace Access web interface. If you are already logged in, Polyspace Access updates the list of users and groups when you refresh your web browser.
If you remove a user or group from the User Manager database and that user or group has an assigned Polyspace Access role, Polyspace does not remove that user or group from its list of users and groups when you log into or refresh the web interface, even if you restart the Polyspace Access Web Server service.
To remove users or groups that have assigned roles from Polyspace Access:
Click Restart Apps in the Cluster Dashboard.
In a web browser, enter the URL that you use to open the Polyspace Access web interface and append
/identities/list/removedto the URL, for example,https://access-machine.company.com:9443/identities/list/removed. See Open the Polyspace Access Web Interface.You must be logged in as a user who has administrator privileges. To set a user as administrator, see General User Manager Settings.
Select the usernames that you want to remove from Polyspace Access and click Confirm clean-up. To select multiple users, press the Ctrl key. To return to the Polyspace Access interface, click the back button in your web browser.