Build Custom Linux Image for IP Core
This example shows how to set up a build environment and create a Linux® image for an IP core for the Digilent Zybo™ Z7-10 Zynq® board by using the MathWorks® build system. You can use the same process to create the Linux image for other AMD® and Altera® SoC platforms.
The example shows how to:
Build a Linux image for supported reference designs.
Build a custom Linux image for AMD and Altera SoC platforms supported by the MathWorks Build System.
The MathWorks Build System is a tool that generates custom Linux images by using cross-compilation. The MathWorks build system automates the generation of system images for various platforms by wrapping the buildroot in pre- and post-processing scripts. The build system uses scripts that take the target board, platform, or image description file as an input and output a complete system image.For more information, see MathWorks Build System on GitHub.
Requirements
Debian®-9 Linux operating system (OS).
The Xilinx® Vivado® Design Suite. Use a version listed in the HDL Language Support and Supported Third-Party Tools and Hardware.
MathWorks build system.
Digilent Zybo Z7-10 Zynq development board and accessory kit.
Buildroot packages. You can install the buildroot packages by using this
sudocommand:
sudo apt install <package_name_1> <package_name_2> ... <package_name_N>
Install Debian-9 Linux Operating System
To run this example, you must install a Debian-9 Linux operating system. If you already have Debian-9 Linux OS installed, skip this step.
To install Debian-9 OS:
Download the Debian-9 CD image ISO file. See Debian-9 Download on the Debian website. Download the
debian-9.13.0-amd64-netinst.isofile.Install Debian-9 by using the ISO file. During installation, in the Configure the package manager step, set Debian archive mirror country to
enter information manuallyand click Continue.Set Debian archive mirror hostname to
archive.debian.organd Debian archive mirror directory to/debian/. Click Continue to complete installation process. Ignore the error message that says"security.debian.org could not be accessed as there are no security updates for debian Lenny".

Set Up Cross Compiler
To set up the cross compiler, install the Python packages and Linaro ARM toolchain on your Linux machine. To download the Linaro Toolchain tarball files from the Linaro repository for AMD targets, see Linaro Binaries on the Linaro website.
To set up the compiler for AARCH32 Xilinx Zynq platforms:
Download the
gcc-linaro-6.3.1-2017.02-x86_64_arm-linux-gnueabihf.tar.xzfile.Extract the tarball and copy the
arm-linux-gnueabihf, bin, include, lib, libexec,andsharefolders to the/opt/linaro/aarch32-6.3.1-2017.02folder on your Linux machine.
To set up the compiler for AARCH64 Xilinx ZynqUltraScale+ platforms:
Download the
gcc-linaro-6.3.1-2017.02-x86_64_aarch64-linux-gnu.tar.xzfile.Extract the tarball and copy the
aarch64-linux-gnu, bin, include, lib, libexec,andsharefolders to the/opt/linaro/aarch64-6.3.1-2017.02folder on your Linux machine.
To set up the compiler for Altera SoC platforms:
Download the Altera SoC Embedded Design. See SoC FPGA Embedded Development Suite on the Altera website.
Extract the contents into
/opt/intelFPGA/17.0path.Because the cross-compiler is a 32-bit x86 executable and the operating system is 64-bit, you also need to install these architecture-specific libraries:
sudp dpkg-add-architecture i386
sudo apt-get update
sudo apt-get install libc6:i386 libstdc++6:i386 zlib1g:i386
To avoid cross-compilation issues, extract the binaries into the correct paths and enable executable permissions for the buildroot.
Build Linux Image for Reference Designs Supported by MathWorks
This section explains how to build the linux image for reference designs for the Xilinx Zynq, Xilinx ZynqUltraScale+, and Altera SoC platforms.
First, generate a Linux image:
1. Clone the MathWorks buildroot repository by running this command:
git clone https://github.com/mathworks/buildroot.git
2. Check out the mathworks_buildroot branch.
git checkout mathworks_buildroot
3. Build Linux SD card image for the specific board by using a Python® build script command. The command you use depends on the platform you generate the Linux image for.
a. To generate the Linux image for Zynq platforms, run:
>> ./build.py -p zynq -b <board_name> --brconfig BR2_TOOLCHAIN_EXTERNAL_PATH='/opt/linaro/aarch32-6.3.1-2017.02'
b. To generate the Linux image for Zynq UltraScale+ platforms, run:
>> ./build.py -p zynqmp -b <board_name> --brconfig BR2_TOOLCHAIN_EXTERNAL_PATH='/opt/linaro/aarch64-6.3.1-2017.02' --brconfig BR2_PACKAGE_XILINX_BOOTLOADER_BOOTGEN_PATH="<vivado_installation_path>/bin/bootgen“
c. To generate the Linux image for Altera SoC platforms, run:
>> ./build.py -p socfpga -b <board_name> --brconfig BR2_TOOLCHAIN_EXTERNAL_PATH='/opt/intelFPGA/17.0/embedded/ds-5/sw/gcc/' --brconfig BR2_PACKAGE_UBOOT_ALTERA_EDS_INSTALLATION='/opt/intelFPGA/17.0/embedded'
The script generates a ZIP file with the name <board_name>_sdcard_linux_<build_date>.zip in the /buildroot/output/<board_name>_linux_linaro/images folder. To view the content of the image file, extract the <board_name>_sdcard_linux_<build_date>.zip file. The board_name and build_date are the name of your hardware board and build date, respectively. To load the generated Linux image on the target, see Load Linux Image into SD Card.
The Linux image includes device tree source (DTS) files in the buildroot directory. These files are either platform-independent or platform-specific. You can find them in these locations:
Common, platform-independent DTS:
buildroot/board/mathworks/common/dtsPlatform-specific DTS:
buildroot/board/mathworks/<platform_name>/dtsBoard-specific DTS:
buildroot/board/mathworks/<platform_name>/boards/<board_name>
Build Custom Linux Image for AMD and Altera SoC Platforms
Next, build the custom Linux image by setting up the necessary tools, loading the hand-off and bootloader files to the buildroot directory, building the image using a Python script, and loading the image to the SD card.
Generate Hand-off and Bootloader Files
Before you begin the build process, you must generate hand-off files and bootloader files by using the Xilinx Vivado and AMD Vitis® tools.
To generate the hand-off files, create a reference design by using the Xilinx Vivado project. Follow the steps in the Create and Export a Custom Reference Design by Using Xilinx Vivado section in Define Custom Board and Reference Design for AMD Workflow. When you create a reference design, the Xilinx Vivado project exports the settings for the Zynq processing system IP, such as the address mapping for the memory and peripherals.
For more information on creating custom reference design for ZynqUltraScale+ platforms, see Define Custom Board and Reference Design for Zynq Ultrascale+ MPSoC Workflow. For Altera SoC platforms, see Define Custom Board and Reference Design for Intel Workflow.
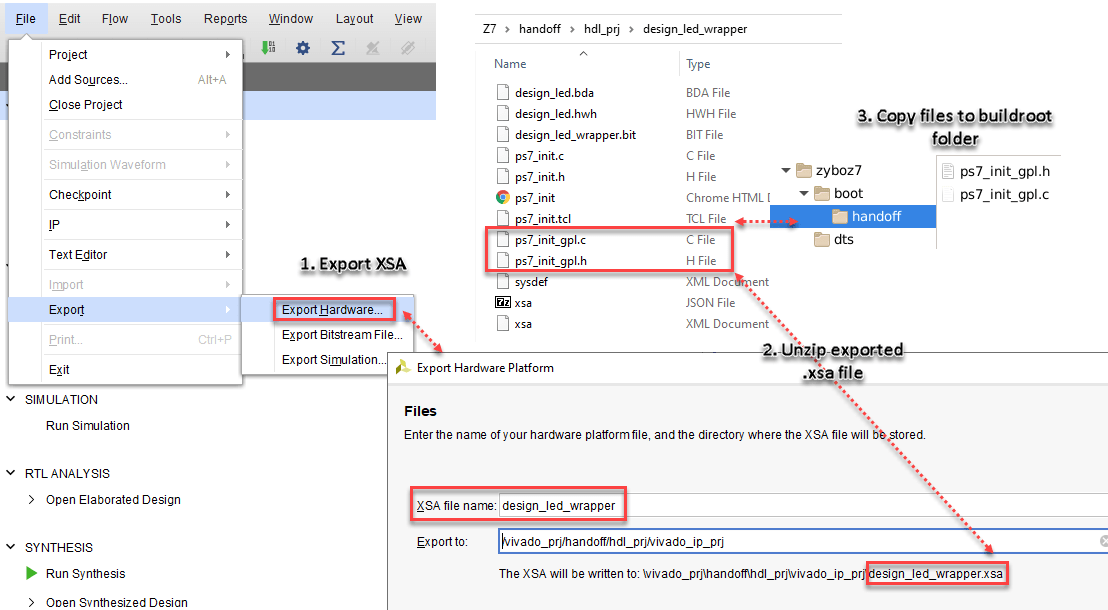
After you create the reference design, export the hardware platform from the Vivado block design and extract the header files from the Xilinx source archive (XSA) file by following these steps:
In the Vivado tool, open the block design. On the File tab, select Export > Export Hardware. The Export Hardware Platform window opens.
In the Export Hardware Platform window, enter the XSA file name and export path. Click Next. Xilinx Vivado tool populates the export path with <XSA File Name>
.xsa. For more information, see Export Hardware.Extract the processor-configured header files from the XSA file. To extract the header files, navigate to the exported XSA file path in MATLAB®, and use the
unzipfunction with your XSA file name. For example:
unzip <XSA File Name>.xsa
For Zynq UltraScale+ platforms, in addition to the header files, you must also generate these bootloader files:
fsbl.elfpmufw.elfpmufw.bin
Generate these files by creating a platform project in AMD Vitis IDE. For more information, see Creating a Platform Project Using Vitis IDE.
Clone MathWorks Buildroot Repository
Next, clone the MathWorks buildroot repository and check out the branch.
1. Clone the MathWorks buildroot repository by running this command:
git clone https://github.com/mathworks/buildroot.git
2. Checkout the mathworks_buildroot branch.
git checkout mathworks_buildroot
Transfer Hand-Off and Bootloader Files into Buildroot Directory
Next, transfer the hand-off and bootloader files to the buildroot directory. The process depends on the target platform.
To transfer the files for Xilinx Zynq platforms:
Copy the generated
ps7_init_gpl.candps7_init_gpl.hhand-off files to thebuildroot/board/mathworks/zynq/boards/<board_name>/boot/handofffolder.Replace and copy the bitstream file (
.bit) in thebuildroot/board/mathworks/zynq/boards/<board_name>/bootfolder.
To transfer the files for Xilinx Zynq UltraScale+ platforms:
Copy the generated
psu_init_gpl.candpsu_init_gpl.hfiles to thebuildroot/board/mathworks/zynqmp/boards/<board_name>/boot/handofffolder.Copy the
fsbl.elf, pmufw.elf,andpmufw.binbootloader files to thebuildroot/board/mathworks/zynqmp/boards/<board_name>/bootfolder.Copy bitstream file (
.bit) to thebuildroot/board/mathworks/zynqmp/boards/<board_name>/bootfolder.
To transfer the files for Altera SoC platforms:
Copy the generated
emif.xmlandhps.xmlhand-off files to thebuildroot/board/mathworks/socfpga/boards/<board_name>/handoff/handofffolder.Copy the bitstream files (
.rbf) to thebuildroot/board/mathworks/socfpga/boards/<board_name>/bootfolder.
Update the catalog.xml file in the buildroot/board/mathworks/<platform_name>/boards/<board_name> folder to include the bitstream files and device tree source files as an application.
Customize the Buildroot Directory
Optionally, perform these customizations before running the build script:
Customize the device tree source files: Modify or add reference nodes in the device tree source files based on your custom reference design. For the location of these files, see the Build Linux Image for Reference Designs Supported by MathWorks section.
Include user specific kernel drivers: Add the kernel drivers as
FRAGfiles in thebuildroot/board/mathworks/<platform_name>/kernel-fragsfolder in your buildroot setup.Add user-specific packages to the root file system: Create a separate folder for each package under
buildroot/packagefolder in your buildroot directory.
Run Build Script
Build the Linux image for the board by using a Python® build script command:
To generate the Linux image for Xilinx Zynq platforms, enter:
>> ./build.py -p zynq -b <board_name> --brconfig BR2_TOOLCHAIN_EXTERNAL_PATH='/opt/linaro/aarch32-6.3.1-2017.02'
To generate the Linux image for Xilinx Zynq UltraScale+ platforms, enter:
>> ./build.py -p zynqmp -b <board_name> --brconfig BR2_TOOLCHAIN_EXTERNAL_PATH='/opt/linaro/aarch64-6.3.1-2017.02' --brconfig BR2_PACKAGE_XILINX_BOOTLOADER_BOOTGEN_PATH="<vivado_installation_path>/bin/bootgen“
To generate the Linux image for Altera SoC platforms, enter:
>> ./build.py -p socfpga -b <board_name> --brconfig BR2_TOOLCHAIN_EXTERNAL_PATH='/opt/intelFPGA/17.0/embedded/ds-5/sw/gcc/' --brconfig BR2_PACKAGE_UBOOT_ALTERA_EDS_INSTALLATION='/opt/intelFPGA/17.0/embedded'
The script generates a ZIP file with the name <board_name>_sdcard_linux_<build_date>.zip in the /buildroot/output/<board_name>_linux_linaro/images folder. To view the content of the image file, extract the <board_name>_sdcard_linux_<build_date>.zip file. The board_name and build_date are the name of your hardware board and build date, respectively.
Load Linux Image into SD Card
Copy the contents of the ZIP folder into the SD card and insert the SD card into the target platform. Set the board to SD boot mode by using appropriate jumper switches. For more information about Zybo Z7-10 board connections, see Define Custom Board and Reference Design for AMD Workflow.
When you turn on the board, the PuTTY™ console displays a successful boot login. This message indicates that the Linux image loaded on the hardware board.

For Altera SoC platforms, after you extract the ZIP file, you can see the IMG file. You need to use Win32DiskImager or balenaEtcher to flash the SD card with the IMG file. After SD card flash is successful, insert it on the target and power on the board. he board boots up successfully.
See Also
HDL Language Support and Supported Third-Party Tools and Hardware
Topics
- Define Custom Board and Reference Design for AMD Workflow
- Get Started with IP Core Generation from Simulink Model