Simulate RoadRunner Scenarios with Actors Modeled in MATLAB and View in Unreal Engine 3D Viewer
You can use the sim3d.scenario.ActorBehavior class to define a custom RoadRunner actor behavior that enables 3D visualization in Unreal Engine® 3D Viewer. The 3D Viewer window opens when you start simulation and runs along
with RoadRunner Scenario.
The sim3d.scenario.ActorBehavior class also reduces the amount of code
required to set up a cosimulation with MATLAB®.
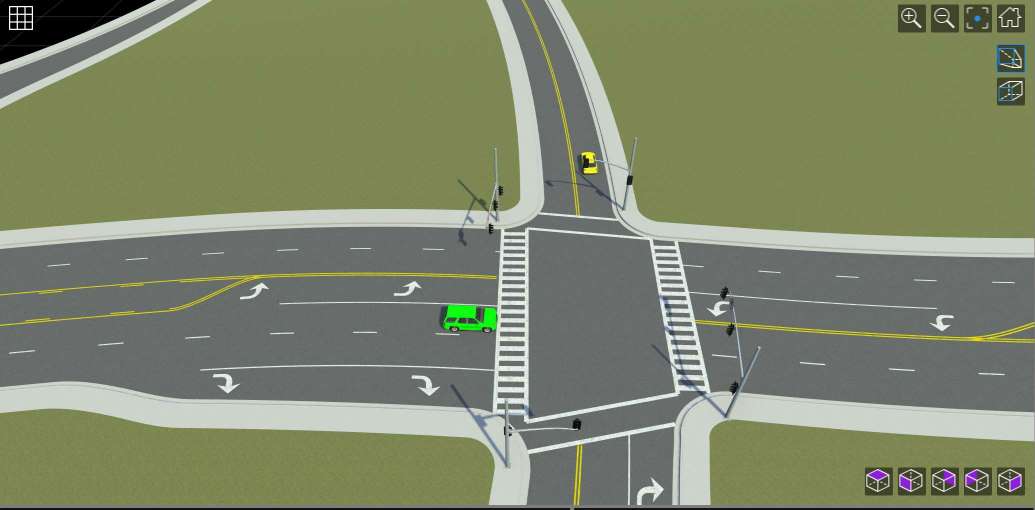
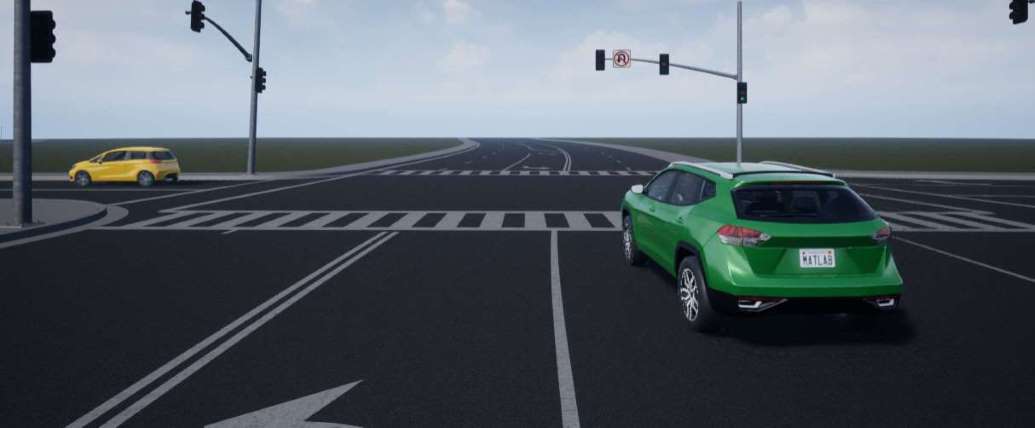
These images show the same example scenario in RoadRunner and the Unreal Engine 3D Viewer.


These examples assume that you have:
A RoadRunner license, and the product is installed. For more information, see Install and Activate RoadRunner (RoadRunner).
A RoadRunner Scenario license, and the product is installed.
A Simulink® 3D Animation™ license, and the product is installed.
A RoadRunner project folder named
MyRoadRunnerProject. For more information, see RoadRunner Project and Scene System (RoadRunner).
Build Custom Actor Behavior for 3D Visualization
Straight Line Actor Behavior
In this example, you create a custom behavior,
Sim3dEgoVehicle1.m, as a MATLAB class file. In this behavior, the code reads the initial pose and
velocity of an actor and updates them to make the actor follow a straight line at
constant velocity.
 MATLAB Code for Custom Straight Line Behavior with 3D
Visualization
In the custom behavior:
This code creates a subclass,
Sim3dEgoVehicle1, of thesim3d.scenario.ActorBehaviorclass.classdef Sim3dEgoVehicle1 < sim3d.scenario.ActorBehaviorThis code specifies the algorithm to run at each simulation time step.
function onSimulationStep(self, event)This code updates the X and Y translation of the actor using the velocity of the actor and the step size to move the actor at constant velocity.
self.Actor.Translation(1,1) = self.Actor.Translation(1,1) + ...
    self.Velocity(1) * self.getSampleTimeImpl.SampleTime;
self.Actor.Translation(1,2) = self.Actor.Translation(1,2) + ...
    self.Velocity(2) * self.getSampleTimeImpl.SampleTime;
This code calls the
stepfunction to update the position of the actor in the 3D visualization. The arguments specify, in order, the new X position, Y position, and yaw (rotation in the XY plane) of the actor.self.Actor.step(self.Actor.Translation(1,1), ... self.Actor.Translation(1,2), ... self.Actor.Rotation(1,3));
This code updates the pose of the RoadRunner actor. The
transform2matrixfunction converts the translation, rotation, and scale vectors into the four-by-four pose matrix format used by RoadRunner.self.Pose = self.transform2matrix(self.Actor.Translation, ... self.Actor.Rotation, self.Actor.Scale);
Actor with Custom Camera
In this example, you create a custom behavior that creates a
sim3d.Actor object with a box-shaped body and attaches a camera
to this actor. An image from the camera displays in a MATLAB figure at each simulation time step.
 MATLAB Code for Custom Camera Behavior
In the custom behavior:
This code creates a subclass
Sim3dEgoVehicle2ofsim3d.scenario.ActorBehaviorwith an additional property,Camera.classdef Sim3dEgoVehicle2 < sim3d.scenario.ActorBehavior % Sim3dEgoVehicle2 implements an ego vehicle behavior using sim3d % Copyright 2023 The MathWorks, Inc. properties Camera = [] end
This code defines the algorithm to run at the start of simulation.
methods(Access = protected)
    function onSimulationStart(self, actorSimulation)
This code creates a new actor in the 3D visualization and sets its position and orientation to match the RoadRunner actor.
% Create a vehicle
[translation, rotation, scale] = self.matrix2transform(self.Pose);
self.Actor = sim3d.Actor("ActorName", self.Name, ...
    "Translation", translation, ...
    "Rotation", rotation, ...
    "Scale", scale);

self.Actor.Mobility = sim3d.utils.MobilityTypes.Movable;
self.World.add(self.Actor);
This code gets the bounding box of the RoadRunner actor and creates a box-shaped body for the 3D actor.
actorModel = event.get('ActorModel');
            box = actorModel.getAttribute("BoundingBox");
            if startsWith(version, "23.2")
                boxMax = box.max;
                boxMin = box.min;
            elseif startsWith(version, "24.1")
                boxMax = box.Max;
                boxMin = box.Min;
            else
                boxMax = box.Max;
                boxMin = box.Min;
            end
            body = sim3d.Actor('ActorName', actorName + "_Body", ...
                "Translation", [0, 0, (boxMax(3) - boxMin(3))/2]);
            body.createShape('box', ...
                [boxMax(2) - boxMin(2), ...
                boxMax(1) - boxMin(1), ...
                boxMax(3) - boxMin(3)]);
            color = actorModel.getAttribute("PaintColor");
This code sets the color of the actor based on the RoadRunner actor color and adds the actor to the 3D world.
color = self.ActorModel.getAttribute("PaintColor");
body.Color = [color.r, color.g, color.b]/255.0;

self.World.add(body, self.Actor);
This code creates a custom camera object, configures its position and orientation, and adds it as a child of the actor. This process attaches the camera to the moving actor in the 3D world.
% Create a camera
self.Camera = sim3d.sensors.IdealCamera(...
    "ActorName", self.Name + "_Camera1", ...
    "ImageSize", [768, 1024], ...
    "HorizontalFieldOfView", 60);

self.Camera.Translation = [0.3, 0, 1.5];
self.Camera.Rotation = [0, -pi/12, 0];

self.World.add(self.Camera, self.Actor);
This code specifies the algorithm to run at each simulation time step.
function onSimulationStep(self, actorSimulation)This code reads from the custom camera and displays the view in a MATLAB figure.
% Read the camera and ...
sceneImage = self.Camera.read();
imshow(sceneImage);
This code updates the position of the actor in the 3D world to follow a straight line at its initial velocity.
% ... compute and update the vehicle position
self.Actor.Translation(1,1) = self.Actor.Translation(1,1) + ...
    self.Velocity(1) * self.getSampleTimeImpl.SampleTime;
self.Actor.Translation(1,2) = self.Actor.Translation(1,2) + ...
    self.Velocity(2) * self.getSampleTimeImpl.SampleTime;
This code updates the position of the actor in the RoadRunner simulation using the
transform2matrixutility function.self.Pose = self.transform2matrix(self.Actor.Translation, ... self.Actor.Rotation, self.Actor.Scale);
Associate Actor Behavior in RoadRunner
This section describes how to associate any custom behavior to your actor and how to start co-simulation. For a more detailed explanation, see Connect MATLAB and RoadRunner to Control and Analyze Simulations and Simulate RoadRunner Scenarios with Actors Modeled in MATLAB.
In your RoadRunner scenario, select the Library Browser and then the
Behaviorsfolder.To create a new behavior, right-click an empty space in the list of behaviors, pause on New, then select Behavior. Enter a name for your new behavior, such as
MyNewBehavior. This animation shows how to complete these steps.
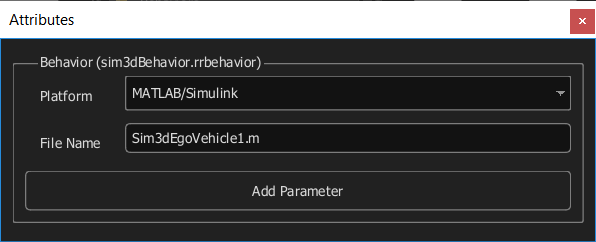
On the Attributes pane, set Platform to
MATLAB/Simulink. For the File Name, use the location of yoursim3d.scenario.ActorBehaviorfileSim3dEgoVehicle1.m, orSim3dEgoVehicle2.m.If your actor behavior file is in your working folder, you can enter the name of your file together with its extension
.m, for example,Sim3dEgoVehicle1.m.You can also use the full path to enter the location of your file, for example,
MyLocation\Sim3dEgoVehicle1.m.

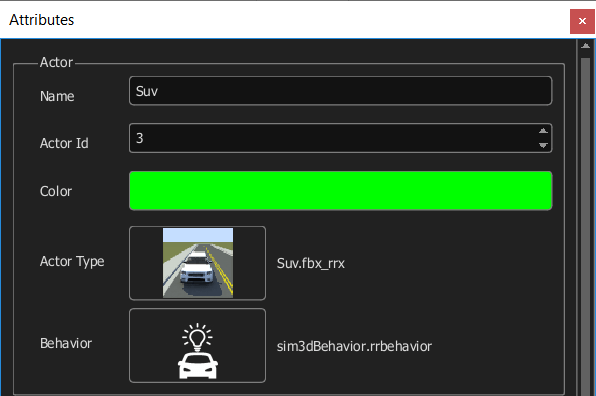
For example, add a new
Suvactor to your scenarioMyExampleScenario. For more information on adding a new vehicle, see Add Vehicles (RoadRunner Scenario).To associate the
sim3d.scenario.ActorBehaviorbehavior with a RoadRunner actor, selectSuv. Then, in the Attributes section, in the Behavior box, add your new behavior toCompactCarby clicking and dragging the behavior icon to the box.
Save your scenario.
Close RoadRunner and reopen it from MATLAB using this command. Replace
MyRoadRunnerProjectwith the path to your RoadRunner project.rrApp = roadrunner('MyProjectLocation');Open the scenario
MyExampleScenario.openScenario(rrApp, 'MyExampleScenario');Get the simulation object to control simulation from MATLAB.
rrSim = createSimulation(rrApp);
Start the simulation from the command line.
set(rrSim, 'SimulationCommand', 'Start');
For more information about simulating your scenario in RoadRunner or controlling a scenario simulation using MATLAB, see Overview of Simulating RoadRunner Scenarios with MATLAB and Simulink.
Visualize Your Scenario Simulation in 3D with an Observer
You can view your existing scenarios in the Unreal Engine 3D Viewer by attaching a sim3d.scenario.Viewer observer
to your simulation. This action enables Unreal Engine 3D visualization of your simulation independent of how you define actor
behaviors.
This code defines an observer template called Sim3dScenarioViewer.
Attaching this object then starting simulation opens the Unreal Engine 3D Viewer.
Note
If you define an actor behavior using
sim3d.scenario.ActorBehavior, you do not need to attach an
observer to visualize your scenario simulation in Unreal Engine 3D Viewer.
 MATLAB Code for Observer Template
To add this object as an observer:
Follow steps seven through nine in Associate Actor Behavior in RoadRunner to create a simulation object.
Use this code to add
Sim3dScenarioViewerto the simulation as an observer.addObserver(rrSim, "Sim3dScenarioViewer", "Sim3dScenarioViewer");
Here, the first instance of
"Sim3dScenarioViewer"specifies a name for the observer, and the second instance specifies the class name. For more information, seeaddObserver.Follow step ten in Associate Actor Behavior in RoadRunner to start the simulation. The Unreal Engine 3D Viewer window opens and shows the simulation.
See Also
Connect MATLAB and RoadRunner to Control and Analyze Simulations | sim3d.scenario.ActorBehavior | Overview of Simulating RoadRunner Scenarios with MATLAB and Simulink