Analog Input Subsystem
Function of the Analog Input Subsystem
Many data acquisition hardware devices contain one or more subsystems that convert (digitize) real-world sensor signals into numbers your computer can read. Such devices are called analog input subsystems (AI subsystems, A/D converters, or ADCs). After the real-world signal is digitized, you can analyze it, store it in system memory, or store it to a disk file.
The function of the analog input subsystem is to sample and quantize the analog signal using one or more channels. You can think of a channel as a path through which the sensor signal travels. Typical analog input subsystems have eight or 16 input channels available to you. After data is sampled and quantized, it must be transferred to system memory.
Analog signals are continuous in time and in amplitude (within predefined limits). Sampling takes a “snapshot” of the signal at discrete times, while quantization divides the voltage (or current) value into discrete amplitudes.
Sampling
Sampling takes a snapshot of the sensor signal at discrete times. For most applications, the time interval between samples is kept constant (for example, sample every millisecond) unless externally clocked.
For most digital converters, sampling is performed by a sample and hold (S/H) circuit. An S/H circuit usually consists of a signal buffer followed by an electronic switch connected to a capacitor. The operation of an S/H circuit follows these steps:
At a given sampling instant, the switch connects the buffer and capacitor to an input.
The capacitor is charged to the input voltage.
The charge is held until the A/D converter digitizes the signal.
For multiple channels connected (multiplexed) to one A/D converter, the previous steps are repeated for each input channel.
The entire process is repeated for the next sampling instant.
A multiplexer, S/H circuit, and A/D converter are illustrated in the next section.
Hardware can be divided into two main categories based on how signals are sampled: scanning hardware, which samples input signals sequentially, and simultaneous sample and hold (SS/H) hardware, which samples all signals at the same time. These two types of hardware are discussed below.
Scanning Hardware
Scanning hardware samples a single input signal, converts that signal to a digital value, and then repeats the process for every input channel used. In other words, each input channel is sampled sequentially. A scan occurs when each input in a group is sampled once.
As shown below, most data acquisition devices have one A/D converter that is multiplexed to multiple input channels.

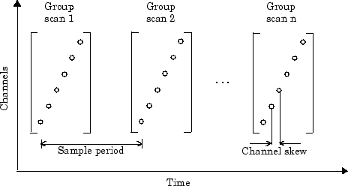
Therefore, if you use multiple channels, those channels cannot be sampled simultaneously and a time gap exists between consecutive sampled channels. This time gap is called the channel skew. You can think of the channel skew as the time it takes the analog input subsystem to sample a single channel.
Additionally, the maximum sampling rate your hardware is rated at typically applies for one channel. Therefore, the maximum sampling rate per channel is given by the formula:
Typically, you can achieve this maximum rate only under ideal conditions. In practice, the sampling rate depends on several characteristics of the analog input subsystem including the settling time and the gain, as well as the channel skew. The following diagram shows the sample period and channel skew for a multichannel configuration using scanning hardware.

If you cannot tolerate channel skew in your application, you must use hardware that allows simultaneous sampling of all channels. Simultaneous sample and hold hardware is discussed in the next section.
Simultaneous Sample and Hold Hardware
Simultaneous sample and hold (SS/H) hardware samples all input signals at the same time and holds the values until the A/D converter digitizes all the signals. For high-end systems, there can be a separate A/D converter for each input channel.
For example, suppose you need to simultaneously measure the acceleration of multiple accelerometers to determine the vibration of some device under test. To do this, you must use SS/H hardware because it does not have a channel skew. In general, you might need to use SS/H hardware if your sensor signal changes significantly in a time that is less than the channel skew, or if you need to use a transfer function or perform a frequency domain correlation.
The following diagram shows sample period for a multichannel configuration using SS/H hardware. Note that there is no channel skew.

Quantization
As discussed in the previous section, sampling takes a snapshot of the input signal at an instant of time. When the snapshot is taken, the sampled analog signal must be converted from a voltage value to a binary number that the computer can read. The conversion from an infinitely precise amplitude to a binary number is called quantization.
During quantization, the A/D converter uses a finite number of evenly spaced values to represent the analog signal. The number of different values is determined by the number of bits used for the conversion. Most modern converters use 12 or 16 bits. Typically, the converter selects the digital value that is closest to the actual sampled value.
The figure below shows a 1 Hz sine wave quantized by a 3 bit A/D converter.

The number of quantized values is given by 23 = 8, the largest representable value is given by 111 = 22 + 21 + 20 = 7.0, and the smallest representable value is given by 000 = 0.0.
Quantization Error
There is always some error associated with the quantization of a continuous signal. Ideally, the maximum quantization error is ±0.5 least significant bits (LSBs), and over the full input range, the average quantization error is zero.
As shown below, the quantization error for the previous sine wave is calculated by subtracting the actual signal from the quantized signal.

Input Range and Polarity
The input range of the analog input subsystem is the span of input values for which a conversion is valid. You can change the input range by selecting a different gain value. For example, National Instruments™ AT-MIO-16E-1 board has eight gain values ranging from 0.5 to 100. Many boards include a programmable gain amplifier that allows you to change the device gain through software.
When an input signal exceeds the valid input range of the converter, an overrange condition occurs. In this case, most devices saturate to the largest representable value, and the converted data is almost definitely incorrect. The gain setting affects the precision of your measurement — the higher (lower) the gain value, the lower (higher) the precision. Refer to How Are Range, Gain, and Measurement Precision Related? for more information about how input range, gain, and precision are related to each other.
An analog input subsystem can typically convert both unipolar signals and bipolar signals. A unipolar signal contains only positive values and zero, while a bipolar signal contains positive values, negative values, and zero.
Unipolar and bipolar signals are depicted below. Refer to the figure in Quantization for an example of a unipolar signal.

In many cases, the signal polarity is a fixed characteristic of the sensor and you must configure the input range to match this polarity.
As you can see, it is crucial to understand the range of signals expected from your sensor so that you can configure the input range of the analog input subsystem to maximize resolution and minimize the chance of an overrange condition.
How Are Acquired Samples Clocked?
Samples are acquired from an analog input subsystem at a specific rate by a clock. Like any timing system, data acquisition clocks are characterized their resolution and accuracy. Timing resolution is defined as the smallest time interval that you can accurately measure. The timing accuracy is affected by clock jitter. Jitter arises when a clock produces slightly different values for a given time interval.
For any data acquisition system, there are typically three clock sources that you can use: the onboard data acquisition clock, the computer clock, or an external clock. Data Acquisition Toolbox™ software supports all of these clock sources, depending on the requirements of your hardware.
Onboard Clock. The onboard clock is typically a timer chip on the hardware board that is programmed to generate a pulse stream at the desired rate. The onboard clock generally has high accuracy and low jitter compared to the computer clock. You should always use the onboard clock when the sampling rate is high, and when you require a fixed time interval between samples. The onboard clock is referred to as the internal clock in this guide.
Computer Clock. The computer (PC) clock is used for boards that do not possess an onboard clock. The computer clock is less accurate and has more jitter than the onboard clock, and is generally limited to sampling rates below 500 Hz. The computer clock is referred to as the software clock in this guide.
External Clock. An external clock is often used when the sampling rate is low and not constant. For example, an external clock source is often used in automotive applications where samples are acquired as a function of crank angle.
Channel Configuration
You can configure input channels in one of these two ways:
Differential
Single-ended
Your choice of input channel configuration might depend on whether the input signal is floating or grounded.
A floating signal uses an isolated ground reference and is not connected to the building ground. As a result, the input signal and hardware device are not connected to a common reference, which can cause the input signal to exceed the valid range of the hardware device. To circumvent this problem, you must connect the signal to the onboard ground of the device. Examples of floating signal sources include ungrounded thermocouples and battery devices.
A grounded signal is connected to the building ground. As a result, the input signal and hardware device are connected to a common reference. Examples of grounded signal sources include nonisolated instrument outputs and devices that are connected to the building power system.
Note
For more information about channel configuration, refer to your hardware documentation.
Differential Inputs
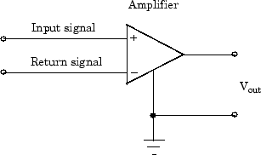
When you configure your hardware for differential input, there are two signal wires associated with each input signal — one for the input signal and one for the reference (return) signal. The measurement is the difference in voltage between the two wires, which helps reduce noise and any voltage that is common to both wires.
As shown below, the input signal is connected to the positive amplifier socket (labeled +) and the return signal is connected to the negative amplifier socket (labeled -). The amplifier has a third connector that allows these signals to be referenced to ground.

National Instruments recommends that you use differential inputs under any of these conditions:
The input signal is low level (less than 1 volt).
The leads connecting the signal are greater than 10 feet.
The input signal requires a separate ground-reference point or return signal.
The signal leads travel through a noisy environment.
Single-Ended Inputs
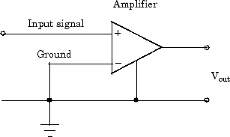
When you configure your hardware for single-ended input, there is one signal wire associated with each input signal, and each input signal is connected to the same ground. Single-ended measurements are more susceptible to noise than differential measurements because of differences in the signal paths.
As shown below, the input signal is connected to the positive amplifier socket (labeled +) and the ground is connected to the negative amplifier socket (labeled -).

National Instruments suggests that you can use single-ended inputs under any of these conditions:
The input signal is high level (greater than 1 volt).
The leads connecting the signal are less than 10 feet.
The input signal can share a common reference point with other signals.
You should use differential input connectors for any input signal that does not meet the preceding conditions. You can configure many National Instruments boards for two different types of single-ended connections:
Referenced single-ended (RSE) connection
The RSE configuration is used for floating signal sources. In this case, the hardware device itself provides the reference ground for the input signal.
Nonreferenced single-ended (NRSE) connection
The NRSE input configuration is used for grounded signal sources. In this case, the input signal provides its own reference ground and the hardware device should not supply one.
Refer to your National Instruments hardware documentation for more information about RSE and NRSE connections.
Transferring Data from Hardware to System Memory
The transfer of acquired data from the hardware to system memory follows these steps:
Acquired data is stored in the hardware's first-in first-out (FIFO) buffer.
Data is transferred from the FIFO buffer to system memory using interrupts or DMA.
These steps happen automatically. Typically, all that's required from you is some initial configuration of the hardware device when it is installed.
FIFO Buffer
The FIFO buffer is used to temporarily store acquired data. The data is temporarily stored until it can be transferred to system memory. The process of transferring data into and out of an analog input FIFO buffer is given below:
The FIFO buffer stores newly acquired samples at a constant sampling rate.
Before the FIFO buffer is filled, the software starts removing the samples. For example, an interrupt is generated when the FIFO is half full, and signals the software to extract the samples as quickly as possible.
Because servicing interrupts or programming the DMA controller can take up to a few milliseconds, additional data is stored in the FIFO for future retrieval. For a larger FIFO buffer, longer latencies can be tolerated.
The samples are transferred to system memory via the system bus (for example, PCI bus or AT bus). After the samples are transferred, the software is free to perform other tasks until the next interrupt occurs. For example, the data can be processed or saved to a disk file. As long as the average rates of storing and extracting data are equal, acquired data will not be missed and your application should run smoothly.
Interrupts
The slowest but most common method to move acquired data to system memory is for the board to generate an interrupt request (IRQ) signal. This signal can be generated when one sample is acquired or when multiple samples are acquired. The process of transferring data to system memory via interrupts is given below:
When data is ready for transfer, the CPU stops whatever it is doing and runs a special interrupt handler routine that saves the current machine registers, and then sets them to access the board.
The data is extracted from the board and placed into system memory.
The saved machine registers are restored, and the CPU returns to the original interrupted process.
The actual data move is fairly quick, but there is a lot of overhead time spent saving, setting up, and restoring the register information. Therefore, depending on your specific system, transferring data by interrupts might not be a good choice when the sampling rate is greater than around 5 kHz.
DMA
Direct memory access (DMA) is a system whereby samples are automatically stored in system memory while the processor does something else. The process of transferring data via DMA is given below:
When data is ready for transfer, the board directs the system DMA controller to put it into in system memory as soon as possible.
As soon as the CPU is able (which is usually very quickly), it stops interacting with the data acquisition hardware and the DMA controller moves the data directly into memory.
The DMA controller gets ready for the next sample by pointing to the next open memory location.
The previous steps are repeated indefinitely, with data going to each open memory location in a continuously circulating buffer. No interaction between the CPU and the board is needed.
Your computer supports several different DMA channels. Depending on your application, you can use one or more of these channels, For example, simultaneous input and output with a sound card requires one DMA channel for the input and another DMA channel for the output.