Online Teaching with MATLAB and Simulink: From Instructors to Students – Distributing Files Through an LMS Using MATLAB Drive
From the series: Online Teaching with MATLAB and Simulink
Learn how instructors and students can share files using MATLAB Drive™ folder links distributed through a Learning Management System (LMS). To begin a project based in MATLAB®, instructors can give students access to starter files, such as datasets, images, functions, and templates, directly within MATLAB. Students can then access the links in the LMS, copy files to their own MATLAB Drive, and work with the files immediately in MATLAB, MATLAB Online™, or MATLAB Mobile™.
Published: 14 Oct 2020
- For this demonstration, I will be showing you how you can share files from an instructor to students using MATLAB Drive shared folder links, distributed through your LMS. You may want to do something like this when giving starter files to students to help them begin projects based on MATLAB, and you have a few datasets, images, functions, and templates that you want all students to have access to directly within MATLAB.
- I’m using Canvas as my LMS for this demonstration, but most LMS platforms can accomplish the same tasks for you with a little modification. All you need to know how to do is share links with your students and allow your students to share links back with you for assignments. Let’s get started.
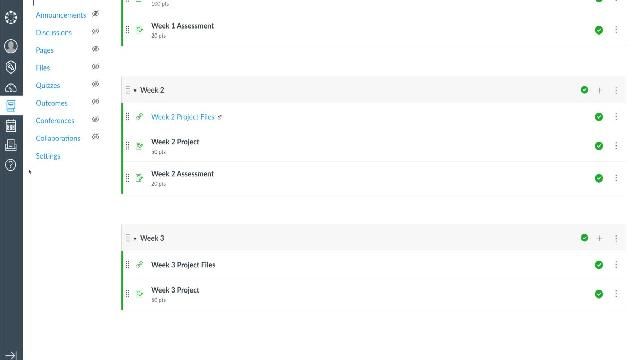
- You can organize your MATLAB based projects by week, topic, or any other method that works for your course content. For this example, we are organizing our content by week. You can see that we already have files, projects, and assignments given to students for Weeks 1 and 2. We are going to add a new project and assessment for Week 3.
- Within your list of activities, tasks, or modules, add a new container for this group of activities. Here, I have an empty container here called “Week 3”
- Inside the Week 3 container, I am going to add a new item. It’s going to be an external URL, since I am going to provide students with a link to download some starter files for their MATLAB Project using MATLAB Drive. Let’s call it “Week 3 Project Files.”
- In another browser tab, I already have MATLAB Drive open. I’ve been collecting the datasets, Live Scripts, functions, and starter templates for the students to use for their Week 3 project here. I’ve also been keeping these files in a subfolder called “Week 3 Project Files.” It’s a good idea to organize the files you plan to share with students using a folder tree that mirrors your modules in the LMS.
- I’m going to right click the Week 3 Project Files folder and choose Share, then Create Link. On this pop-up, I am going to Create a view-only link. That way, all the students will see a copy of the files, but they won’t be able to make any changes to them without first making a copy to their own MATLAB Drive folders. Once I have created my link, I am going to copy the link to the clipboard, and return to my LMS.
- Simply paste the URL to the MATLAB Drive shared folder, and click “Add Item”. The Week 3 Project Files Item is now in the list of Modules for week three. Note that the link isn’t published or visible to students just yet. I’ll wait to publish it until after I have detailed the assignment and instructions for students to submit their projects.
- Now I’m ready to set up an assignment for students so that they can submit a MATLAB Drive link back to me when they are done with their project. In this case, their MATLAB Drive link will be to a folder that contains all of their project files, functions, datasets, and anything else that they need to make their MATLAB or Simulink project run. They can also submit a link to a folder that a group of students collaborated on.
- I’m going to add a new Item to Week 3. This time, the type will be Assignment. I’m going to create a new Assignment, and give it the name “Week 3 Project.” Now I click on the name of the assignment and then click Edit to change some of the settings.
- In the description of the assignment, I might want to be clear and give some instructions to the students that I want them to complete their assignment by giving me a link to their MATLAB Drive folder. I may also want them to comment on the project, reflect on the work, and maybe tell me about which student in their group worked on which aspect of the project, if this is a group assignment. I set the number of points possible for this project, let’s say 50. This is also a Project type assignment, so I will add it to the Assignment Group “Projects”. You may decide to organize your Projects differently or give this a different name, that’s up to you.
- Under submission type, we are going to choose “Online” and then “Website URL.” This means that when student submit their assignment, they will be prompted to provide a URL as their submission. I’m going to leave the rest of the settings alone, since for this demo each student will be submitting their own work. Lastly, I am going to click Save.
- Now, I’m going to go back to my list of Modules, and you’ll see the Week 3 Project Files Link and Week 3 Project Assignment ready to go. The last step is to publish each of these items so that students can see them, download the files, and get started on their projects.
- I happen to have open a separate browser, and I am logged into the LMS as a Student User. When I view the list of modules as a student, I can see the link to the Week 3 Project Files. I’m going to click on it, and open the link in a new window.
- In a separate window, I am now prompted to accept the link from my instructor. When I accept this link, the folder is now added to my personal MATLAB Drive folder, and is immediately available in MATLAB Online, MATLAB Mobile, or in MATLAB on my desktop if I am syncing using the MATLAB desktop connector. From MATLAB Drive I can preview the files, or open them directly in MATLAB Online.
- As a best practice, students should save a copy of these files to a separate folder so that they can start to make edits and work on their projects in a folder that they will eventually share back to the instructor for their assignment submission. In this case, I will simply right click the folder I received from the instructor, and make a copy called Week 3 Project Submission. That’s where I’ll work on my project from here on.
- And that’s it! The students now have access to the started files for this week’s project. In a separate video we will cover students uploading their completed projects and using the built in assignment collection tools in your LMS to review their submissions and assign grades using a rubric.


