Moisture Sensor Using HTTP POST Requests to Channel
This example shows how to post multiple fields of data to a ThingSpeak™ channel from a device that wakes from deep sleep. You read a soil moisture sensor and post the value to a ThingSpeak channel. The HTTP POST request is executed by writing to a communication client without a separate library. Directly writing the HTTP request to the wireless network client can offer increased flexibility and speed over the ThingSpeak Communication Library.
Supported Hardware
ESP8266-12
NodeMCU ESP8266-12
Arduino® with Ethernet or wireless connection (with some code adjustments)
In this example, the onboard ADC reads a moisture sensor and posts the value and the elapsed time to two fields of a ThingSpeak channel. You can modify the POST to fill up to eight fields with data.
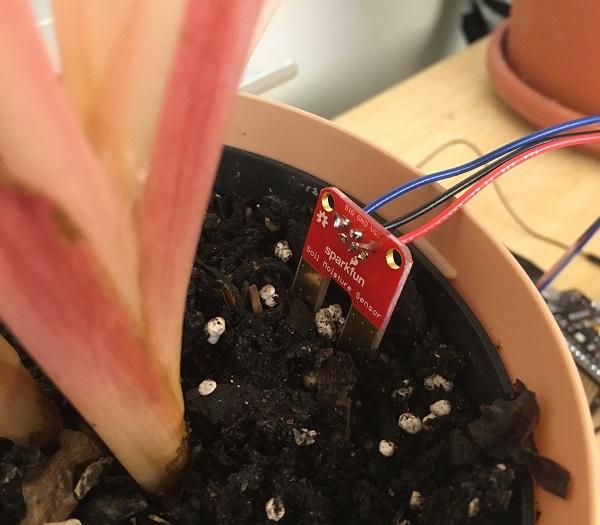
This image shows an office plant with a moisture sensor wired to a NodeMCU ESP8266-12. The NodeMCU provides a wireless network connection. The moisture sensor is powered by a data pin on the board, which limits the time the sensor power is on. This design reduces power and extends the life of the sensor. In between measurements, the whole device is put into deep-sleep mode to save power. Once data is posted to the channel, you can set up reactions to the data. For example, you can set the React app to notify you that the moisture level is low.
Prerequisites
1) Create a ThingSpeak channel, as shown in Collect Data in a New Channel.
2) On the Channel Settings tab, enable field 1. You can provide an informative field name such as Moisture Value.
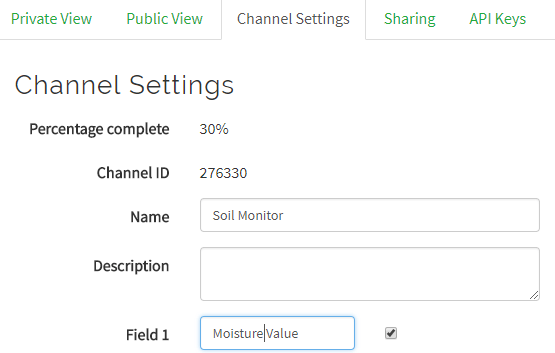
3) Note the write API key from the API Keys tab. You need this value in the code used for programming your device. For additional information, see Configure Accounts and Channels and Channel Properties.
Required Hardware
ESP8266-based board or Arduino board with internet connection (NodeMCU ESP8266-12E used for this demonstration)
Soil moisture sensor (for example, the Sparkfun Moisture Sensor)
Jumper wires (at least 4)
USB cable

Schematic and Connections
1) Connect VCC of the moisture sensor to pin D7 on the NodeMCU.
2) Connect the sensor Gnd to the NodeMCU ground.
3) Connect the sensor Sig pin to NodeMCU pin A0.
4) Connect the NodeMCU Rst pin to NodeMCU pin D0, to enable wake up from deep sleep.

Program Your Device
1) Download the latest Arduino IDE.
2) Add the ESP8266 Board Package.
a) Enter https://arduino.esp8266.com/stable/package_esp8266com_index.json into Additional Board Manager URLs under File > Preferences.
b) Choose Tools > Boards > Board Manager. Search for ESP8266 in the search bar and install the package.
3) Select the appropriate port and board in the Arduino IDE. The hardware used to generate this example used the Node MCU 1.0 (ESP 8266–12E) option.
4) Create the application: Open a new window in the Arduino IDE and save the file. Add the code provided in the Code section. Be sure to edit the wireless network information and API key in the code.
5) After you successfully upload your program, you can monitor the output using the serial monitor or your channel view page.
Code
1) Include the ESP8266WiFi library and initialize variables for hardware and data collection. Edit the network information and write API key in your code.
#include <ESP8266WiFi.h>

// Network information.
#define WIFI_NAME "YOUR_WIFI_NAME"
#define PASSWORD "WIFI_PASSWORD"

// Hardware information.
#define SENSOR_POWER 13                            // Connect the power for the soil sensor here.
#define SOIL_PIN A0                                // Connect the sensor output pin here.
#define TIMEOUT  5000                              // Timeout for server response.
#define SLEEP_TIME_SECONDS 1800

// ThingSpeak information.
#define NUM_FIELDS 2                               // To update more fields, increase this number and add a field label below.
#define SOIL_MOISTURE_FIELD 1                      // ThingSpeak field for soil moisture measurement.
#define ELAPSED_TIME_FIELD 2                       // ThingSpeak field for elapsed time from startup.
#define THING_SPEAK_ADDRESS "api.thingspeak.com"
String writeAPIKey="XXXXXXXXXXXXXXXX";             // Change this to the write API key for your channel.

// Global variables.
int numMeasure = 5;                                // Number of measurements to average.
int ADCValue = 0;                                  // Moisture sensor reading.

WiFiClient client;
2) In the setup function, start the serial monitor, connect to the wireless network, and initialize the device pins that you use.
// Put your setup code here, to run once:
void setup()
{
    Serial.begin( 115200 );   // You may need to adjust the speed depending on your hardware.
    connectWifi();
    pinMode( SENSOR_POWER , OUTPUT );
    digitalWrite( SENSOR_POWER , LOW );   // Set to LOW so no power is flowing through the sensor.
}
3) In the main loop, read the soil monitor and store it in the data array. POST the data to ThingSpeak, and then put the device in low-power mode.
// Put your main code here, to run repeatedly:
void loop()
{
    // Write to successive fields in your channel by filling fieldData with up to 8 values.
    String fieldData[ NUM_FIELDS ];

    // You can write to multiple fields by storing data in the fieldData[] array, and changing numFields.
    // Write the moisture data to field 1.
    fieldData[ SOIL_MOISTURE_FIELD ] = String( readSoil( numMeasure ) );
    Serial.print( "Soil Moisture = " );
    Serial.println( fieldData[ SOIL_MOISTURE_FIELD ] );

    // Write the elapsed time from startup to Field 2.
    fieldData[ ELAPSED_TIME_FIELD ] = String( millis() );

    HTTPPost( NUM_FIELDS , fieldData );

    delay( 1000 );
    Serial.print( "Goodnight for "+String( SLEEP_TIME_SECONDS ) + " Seconds" );
    ESP.deepSleep( SLEEP_TIME_SECONDS * 1000000 );
    // If you disable sleep mode, add delay so you don't post to ThingSpeak too often.
    // delay( 20000 );
}
4) Use the readSoil function to provide power to the sensor, and then read the voltage at the output using the ADC. Turn off the power after measurement.
// This function reads the soil moisture sensor numAve times and returns the average.
long readSoil(int numAve)
{
  long ADCValue = 0;

  for ( int i = 0; i < numAve; i++ ) {
    digitalWrite( SENSOR_POWER, HIGH );  // Turn power to device on.
    delay(10);    // Wait 10 milliseconds for sensor to settle.
    ADCValue += analogRead( SOIL_PIN );     // Read the value from sensor.
    digitalWrite( SENSOR_POWER, LOW );   // Turn power to device off.
  }

  ADCValue = ADCValue / numAve;
  return ADCValue;                    // Return the moisture value.
}
5) Connect your device to the wireless network using the connectWiFi function.
// Connect to the local Wi-Fi network
int connectWifi()
{

    while (WiFi.status() != WL_CONNECTED) {
        WiFi.begin( WIFI_NAME , PASSWORD );
        Serial.println( "Connecting to Wi-Fi" );
        delay( 2500 );
    }
    Serial.println( "Connected" );  // Inform the serial monitor.
}
6) Build the data string to post to your channel. Connect to ThingSpeak, and use the Wi-Fi® client to complete an HTTP POST.
// This function builds the data string for posting to ThingSpeak
    // and provides the correct format for the wifi client to communicate with ThingSpeak.
    // It posts numFields worth of data entries, and takes the
    // data from the fieldData parameter passed to it.

int HTTPPost( int numFields , String fieldData[] ){

    if (client.connect( THING_SPEAK_ADDRESS , 80 )){

       // Build the postData string.
       // If you have multiple fields, make sure the sting does not exceed 1440 characters.
       String postData= "api_key=" + writeAPIKey ;
       for ( int fieldNumber = 1; fieldNumber < numFields+1; fieldNumber++ ){
            String fieldName = "field" + String( fieldNumber );
            postData += "&" + fieldName + "=" + fieldData[ fieldNumber ];

            }

        // POST data via HTTP.
        Serial.println( "Connecting to ThingSpeak for update..." );
        Serial.println();

        client.println( "POST /update HTTP/1.1" );
        client.println( "Host: api.thingspeak.com" );
        client.println( "Connection: close" );
        client.println( "Content-Type: application/x-www-form-urlencoded" );
        client.println( "Content-Length: " + String( postData.length() ) );
        client.println();
        client.println( postData );

        Serial.println( postData );

        String answer=getResponse();
        Serial.println( answer );
    }
    else
    {
      Serial.println ( "Connection Failed" );
    }

}
7) Wait for and receive the response from the server using getResponse.
// Wait for a response from the server indicating availability,
// and then collect the response and build it into a string.

String getResponse(){
  String response;
  long startTime = millis();

  delay( 200 );
  while ( client.available() < 1 && (( millis() - startTime ) < TIMEOUT ) ){
        delay( 5 );
  }

  if( client.available() > 0 ){ // Get response from server.
     char charIn;
     do {
         charIn = client.read(); // Read a char from the buffer.
         response += charIn;     // Append the char to the string response.
        } while ( client.available() > 0 );
    }
  client.stop();

  return response;
}
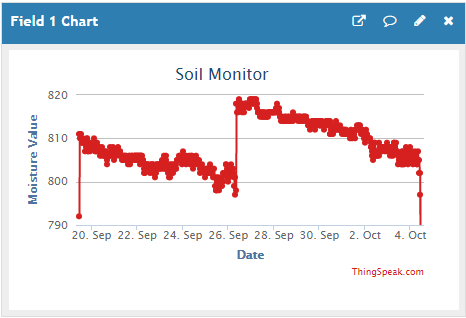
You can determine the useful range of values by monitoring your channel over wet and dry cycles. The number read by the ADC and posted to your channel is proportional to the voltage, and thus proportional to the soil moisture. The values vary depending on the temperature, humidity, and soil type. Once you know the values for dry soil, you can use the React app to generate a notification that it is time to water the plant. For more information on setting up React, see React App.