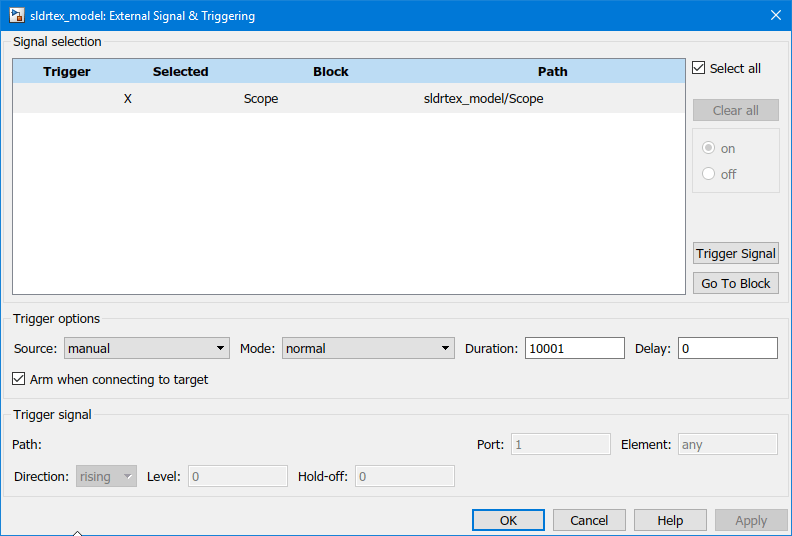
Set Run in Kernel Mode Properties for Logging to Workspace
Data is saved to the MATLAB® workspace through a Simulink® Scope block. Set signal and triggering properties only when you are running a Simulink Desktop Real-Time™ real-time application. If you are running a Connected IO mode or accelerator mode simulation, you can skip this procedure.
After you create a Simulink model and add a Scope block, you can enter the signal and triggering properties for logging to the MATLAB workspace.
This procedure uses the model sldrtex_model. To open this model, in
the MATLAB Command Window, type:
openExample('sldrtex_model')The steps in this procedure assume that you have already loaded that model and have completed the steps in Set Scope Parameters for Logging to Workspace.
In the Simulink Editor, on the Desktop Real-Time tab, click Prepare > Control Panel.
In the External Mode Control Panel, click the Signal & Triggering button.
Click the Select all button. From the
Sourcelist, selectmanual. From theModelist, selectnormal.The
Xunder Signal selection designates that a signal has been tagged for data collection, andTdesignates that the signal has been tagged as a trigger signal.In the Duration field, enter the number of sample points in a data buffer. Enter a Duration value equal to the total number of sample points that you must collect for a run. For example, if you have a sample rate of 1000 samples/second and a stop time of 10 seconds, enter:
10001
Set the time axis for Simulink Scope blocks equal to the sample interval (in seconds) times the number of points in each data buffer. This setting displays one buffer of data across the entire Simulink Scope plot.
Clear the Limit data points to last check box. See Set Scope Parameters for Logging to Workspace.
For more information, see External Mode Simulation with TCP/IP or Serial Communication (Simulink Coder).

Click OK.
In the External Signal & Triggering dialog box, click the OK button for the changes you made to take effect. You do not have to rebuild your real-time application.