Create, Manage, and Merge Git Branches
You are collaborating on files that are under Git™ source control. First, you create a local branch to make changes. Then, you merge the changes into the main branch. If you have not yet cloned a Git repository, see Clone Git Repository in MATLAB.
To open an example repository under Git source control, use the Copy Command button.
Create Branch
To create a local branch in your Git repository, follow these steps:
1. Open the Branch Manager. In the Files or Project panel, right-click the white space and select Source Control > Branch Manager. Alternatively, you can open the Branch Manager ![]() from the Source Control panel
from the Source Control panel  . If the Source Control icon is not in the sidebar, click the Open more panels button
 ![]() and select the Source Control panel.
and select the Source Control panel.
2. In the Branch Manager toolstrip, click New Branch.
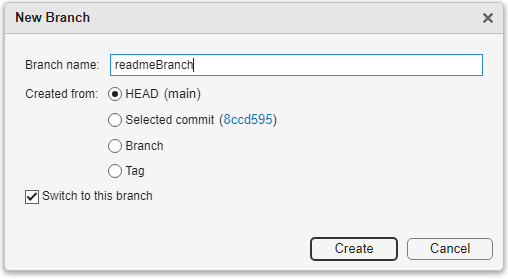
3. In the New Branch dialog box, specify the name of the branch you want to create and click Create. By default, the Branch Manager creates a new branch from the head of the current branch and switches to it.
You can specify the starting point of this branch. You can enter a tag, a branch name, or a commit ID, for example, 8ccd595. If you do not want to switch automatically to the branch after creating it, clear the Switch to this branch check box. To switch to the branch later, see Manage Branches.
Tip: You can inspect information about each commit node including the author, date, commit message, and changed files in the pane on the right of the Branch Manager. For more information, see Navigate, Find, and Filter Git Commit Graph.
Make Local Changes in Branch
To work on files in a branch, use the Files or the Project panel. For example, in the Files panel, open the README.md file and add the line "Contact example@mailinglist.com". The source control status of modified files changes from green to blue. The Source Control panel also lists the modified files in the Modified Files section.

When you finish making local changes to your files, commit the modified files to your repository. In the Source Control panel, click Commit. In the Commit Changes dialog box, enter the commit message and click Commit. Alternatively, in the Files or Project panel, right-click in the white space and select Source Control > Commit.
You can also review, discard, or stash the modified files. For more information, see Review and Commit Modified Files to Git.
Merge Branches
To merge the readmeBranch branch into the main branch, follow these steps:
1. Switch to the main branch. In the Branch Manager toolstrip, in the Current Branch section, select main branch from the list.
2. In the Branch Manager toolstrip, click Merge.

3. In the Merge into Current Branch dialog box, select the readmeBranch branch from the available local branches and click Merge. You can also merge from a commit ID or a tag.
If the merge does not result in conflicts, push local changes to share your changes with others. For more information, see Push to Git Remote.
If the branch merge causes a conflict, a dialog box reports that automatic merge is not successful. Resolve the conflicts before you push your changes to the remote repository. For more information, see Resolve Git Conflicts.
Tip: You can configure MATLAB® to prompt you about unsaved changes before performing source control actions such as commit, merge, and branch switch. For more information, see Configure Source Control Settings.
Manage Branches
This table describes the actions that you can take to manage branches in your local Git repository using the Branch Manager.
Action | Procedure |
|---|---|
Switch to branch | To work on files in a branch, you must first switch to the branch. In the Branch Manager toolstrip, in the Current Branch section, select the branch from the list. |
Compare branches | In the Branch Manager, you can compare file changes between two revisions, including revisions in different branches. Hold the Ctrl key and select the two revisions. Then, inspect the pane on the right. For more information, see Compare Files Between Commits or Branches. |
Rebase branch | In the Branch Manager toolstrip, click Rebase. Alternatively, in the left pane, in the Branches section, right-click the name of the branch you want to rebase and select Rebase onto |
Create worktree for branch | In the Branch Manager, in the left pane, in the Branches section, right-click the branch you want to associate with the worktree and select New Worktree. For more information, see Create and Manage Git Worktrees. |
Delete branch | In the Branch Manager, in the left pane, in the Branches section, right-click the name of the branch you want to delete and select Delete Branch. |
Discard all changes on branch | To remove all local changes in a branch, in the Source Control panel, click the More source control options button |
See Also
Tools
Functions
gitrepo|gitclone|createBranch|switchBranch|fetch|merge|push