Develop Obstacle Detection Robot Using ToF Sensor with Raspberry Pi
This example shows how to use the Simulink® Support Package for Raspberry Pi® Hardware to interface a VL53L0X Time of Flight (ToF) sensor with the Raspberry Pi hardware to develop an obstacle detection robot.
The VL53L0X ToF sensor is mounted on the pan-tilt module that pans its vicinity from 0 to 180 degrees. The robot moves forward if there is no obstacle in front of the robot. The robot stops when the distance to the obstacle is 0.3m or less.
Prerequisites
For more information on how to use the Simulink Support Package for Raspberry Pi Hardware to run a Simulink model on your Raspberry Pi hardware, see Get Started with Simulink Support Package for Raspberry Pi Hardware.
For more information on how to use the driver blocks for commonly used robotics sensors, see Get Started with Sensors for Robotics Applications Using Raspberry Pi and Simulink Online.
For more information on how to use the Simulink Support Package for Raspberry Pi Hardware to drive motors, see Get Started with Motor Drives for Robotics Applications Using Raspberry Pi and Simulink.
For more information on how to configure and calibrate the pan and tilt hardware module, see Configure and Calibrate Pan Tilt Hardware Using Raspberry Pi Pan Tilt HAT.
Required Hardware
To run this example, you need the following hardware:
Raspberry Pi hardware board
VL53L0X ToF sensor
Two DC motors
Two motor driver hardware such as L298
Batteries
Pan-tilt module with servo motor
Two-wheeled chassis to set up the hardware and make a robot
Obstacles or objects to stop the robot along the path
Hardware Setup
DC Motor Setup
Note: In this example, the connections of the Raspberry Pi hardware are described for the L298 motor driver. For any other motor driver, refer to the hardware connections and configurations in the datasheet provided by the manufacturer.
Use two DC motors to move the robot forward and connect them to driver hardware such as L298 driver. You can power the motor driver hardware with batteries. Link the two DC motors to the two wheels of the chassis and refer to the motors as left and right depending on their connection to the robot.
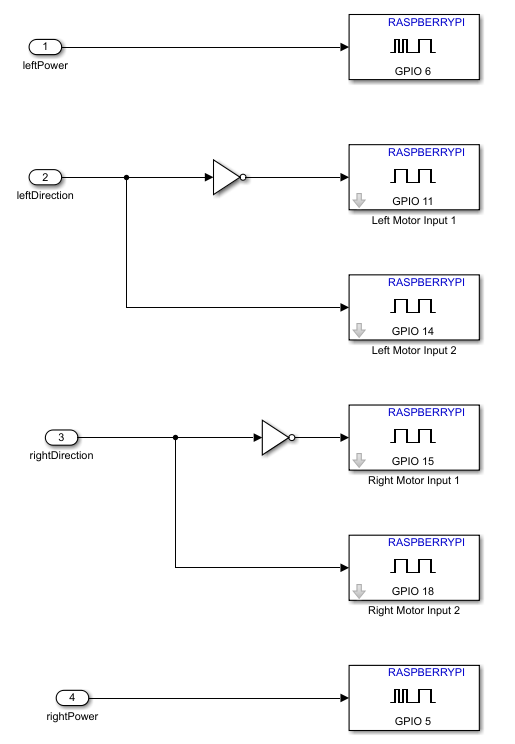
Connect enable pins of the motor driver hardware to GPIO pins 5 and 6 of the Raspberry Pi board and configure them accordingly. The enable pins of the motor driver hardware control the start and stop actions in the left and right motors.
Connect IN1 and IN2 pins of the motor driver hardware corresponding to the left motor to GPIO pins 11 and 14 of the Raspberry Pi board and configure them accordingly.
Connect IN3 and IN4 pins of the motor driver hardware corresponding to right motor to GPIO pins 15 and 18 of the Raspberry Pi board and configure them accordingly.
Mount the Raspberry Pi board onto the chassis with wheels robot setup.
ToF Sensor Setup
Connect the VL53L0X ToF sensor to the I2C 1_SDA and I2C 1_SCL pins of the Raspberry Pi board and configure accordingly. Mount the VL53L0X ToF sensor on the pan and tilt module.
Pan-Tilt Module Setup
Connect the servo motor to GPIO pin 5 of the Raspberry Pi board and configure accordingly.
Mount the pan-tilt module on the Raspberry Pi board.
Configure Simulink Model and Calibrate Parameters
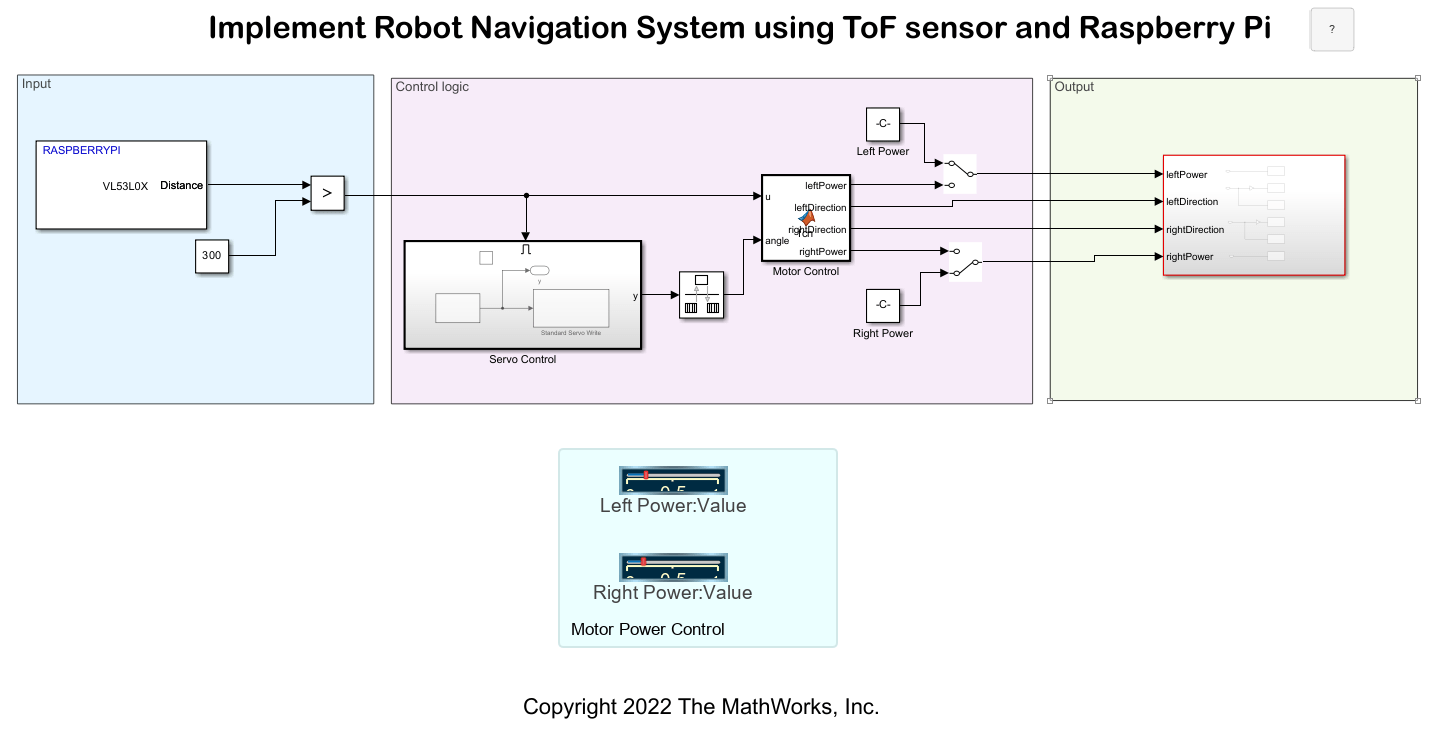
This example uses a preconfigured Simulink model from the Simulink Support Package for Raspberry Pi Hardware that enables you to develop an obstacle detection system. The robot stops when it detects an obstacle within the 0.3m range and moves forward once the distance between the sensor and the obstacle increases.
Open the raspberrypi_robotics_tof_obstacle_detection Simulink model.

Input
The VL53L0X Time of Flight Sensor block receives the distance information from the sensor on the 0x29 I2C address of the Raspberry Pi board. The block measures distance of the obstacle from the sensor. Only when the distance between the robot and the obstacle is greater than 0.3m, the Servo Control subsystem is enabled and the Motor Control MATLAB® function receives an input signal.
Control Logic
The algorithm in the Servo Control subsystem rotates the pan-tilt module from 0 to 180 degree. You can operate the Simulink model in two modes, manual and automatic.
In the manual mode of operation, the switches in the Control Logic area receive inputs through the Left Power and Right Power Constant blocks. These blocks are further connected to the dashboard slider in the panel. You can increase or decrease the power to the DC motors using these sliders. For more information on how to connect the Slider block to the Constant block in the Simulink model and adjust its value during simulation, see the Connect Dashboard Blocks section in the Slider page.
In the automatic mode of operation, the switches in the Control Logic area receive inputs through the Motor Control MATLAB function block. In this mode of operation, the DC motors receive constant power and the sliders in the dashboard panel are inactive.

Output
The left and right motor direction and power are given as inputs to the subsystem in the Output area to control the direction of the motors and its proximity to the obstacle in the path, respectively. To open the motors subsystem, run this command in the MATLAB Command Window.

Dashboard Deployment
On the Hardware tab of the Simulink model, in the Prepare section, click Hardware Settings to open the Configuration Parameters dialog box. In the Hardware Implementation pane, under the Target hardware resources section, select Dashboard properties > Enable deployment of Dashboard blocks. For more information, see Dashboard properties.
Deploy Simulink Model on Raspberry Pi Hardware
Manual Mode of Operation
1. Ensure that the position of the manual switches in the Control Logic area are set to receive inputs from the Left Power and Right Power Constant blocks.
2. On the Hardware tab of the Simulink model, in the Mode section, select Run on Board and then click Build, Deploy & Start. The generated code is built on the Raspberry Pi hardware and runs automatically.
3. If you are using a display viewer such as VNC viewer connected to the Raspberry Pi hardware board, the default browser opens with the dashboard panel for motor power control. You can control the power to the left and right motors by adjusting the slider values.

4. Once the robot begins to move, place an object in front of the robot and observe that the robot stops moving once it is 0.3m away from the object. Increase the distance between the robot and the object and observe that the robot starts moving again.
Automatic Mode of Operation
1. Ensure that the position of the manual switches in the Control Logic area are set to receive inputs from the Motor Control MATLAB function block.
2. Deploy the model on the Raspberry Pi board once again. Observe that the robot moves forward at a constant speed. Place an object in front of the robot and observe that the robot stops moving once it is 0.3m away from the object. In this mode of operation, the dashboard on the VNC viewer is inactive.
See Also
Get Started with Sensors for Robotics Applications Using Raspberry Pi and Simulink Online
Get Started with Motor Drives for Robotics Applications Using Raspberry Pi and Simulink
Detect Stop Signal Traffic Sign Using Raspberry Pi and Simulink
Develop Path-Following Robot Using Raspberry Pi and Simulink
Develop Robot Navigation System Using Raspberry Pi and Simulink