Set Up and Upload Arduino Simulink Models Over the Air
Deploy or program code over the air on your Arduino® board.
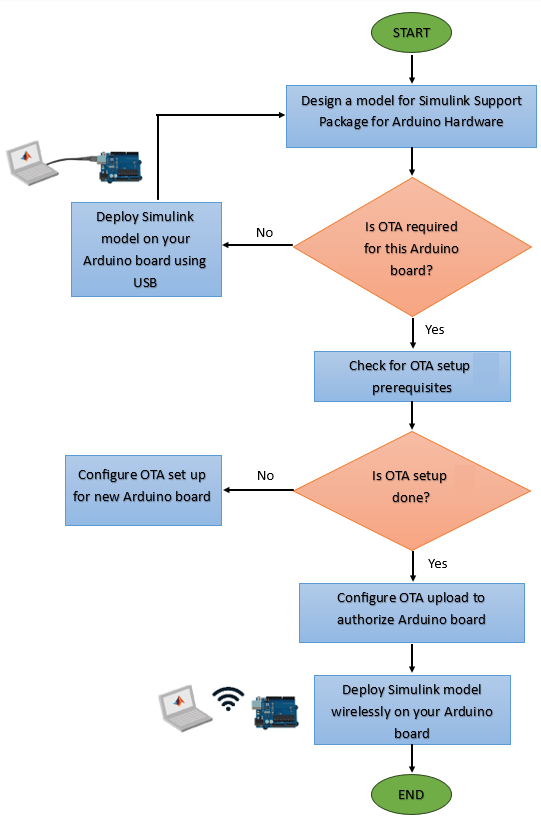
Prerequisite
Before you begin with over-the-air programming for your Arduino board, consider the prerequisites in Implement Over-the-Air Programming with Arduino.
Set Up OTA for Arduino Board
The OTA setup process requires assigning an IP address to your Arduino board to ensure reliable communication between the host computer and the board.
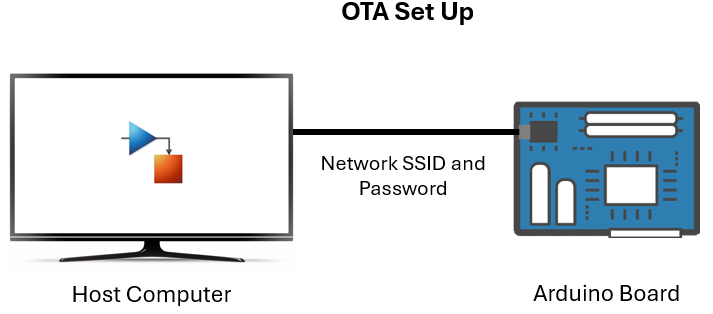
Once the Simulink® model is ready for over-the-air deployment on your Arduino board, connect the board to your host computer using a USB cable.
In the model, go to the Configuration Parameters dialog box and select your Arduino board in the Hardware board list. For more information on the Arduino boards that support OTA, see Supported Arduino Boards.
In the Configuration Parameters dialog box, select Target hardware resources > Host-board connection and in the Application download section, set Select upload method to
OTA Setup.Enter a device name and password for your Arduino board in the Set OTA device name and Set OTA device password parameters, respectively. For more information, see Host-board connection.
The Arduino board credentials you set in these parameters are used to authenticate the device when you deploy the model in the OTA upload process.

In the Configuration Parameters dialog box, navigate to Target hardware resources > WiFi properties and configure your Wi-Fi® network. For more information, see WiFi properties.
Click Apply and then OK.
On the Hardware tab of the Simulink model, in the Mode section, select Run on board and then click Build, Deploy & Start. The setup is now complete and an IP address is assigned to your Arduino board.
Verify OTA Setup for Arduino
After you complete the OTA setup, you can verify the Arduino board properties for your Simulink model.
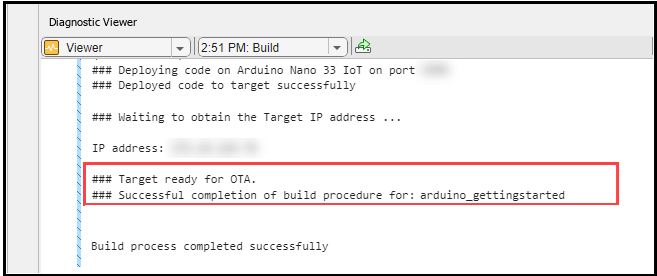
For example, consider the arduino_gettingstarted model on an
Arduino Nano 33 IoT board. After Simulink successfully deploys the model to the board, the software displays
this message in the Diagnostic Viewer section of the
model.
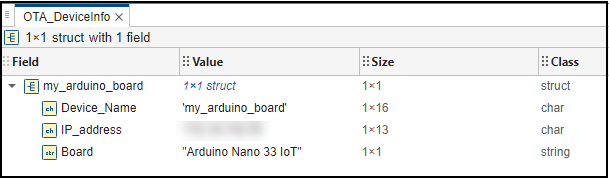
In the Workspace window of your MATLAB® session, Simulink creates a structure OTA_DeviceInfo that contains the Arduino board properties, which you configure in the Configuration Parameters dialog box.
Perform OTA Upload for Arduino Board
The OTA upload process involves uploading the code generated for the Simulink model onto your Arduino board.
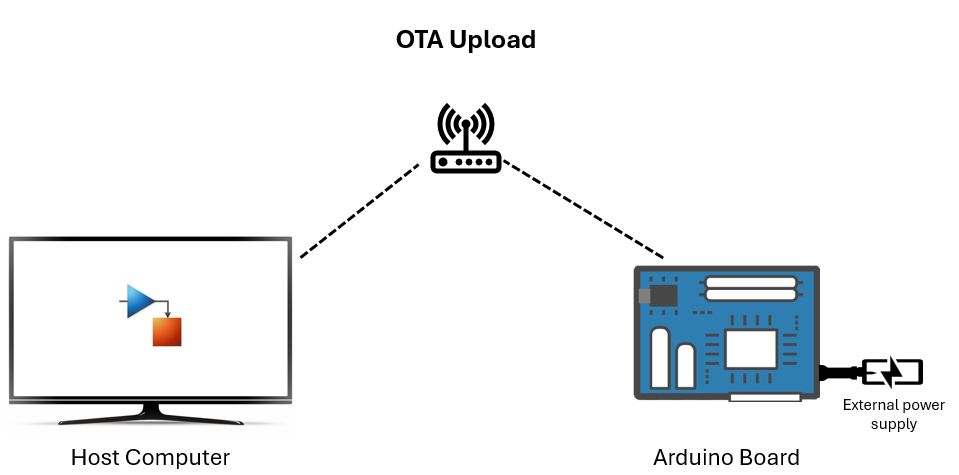
After you complete the OTA setup, disconnect your Arduino board from the host computer. Use an external power supply to turn on the Arduino board.
In the model, go to the Configuration Parameters dialog box and select Target hardware resources > Host-board connection. In the Application download section, set Select upload method to
OTA Upload.Select your Arduino board from the Target device list. If the name of your Arduino board does not appear in the list, click Refresh or manually enter the IP address of your Arduino board. The IP address assigned to your Arduino board is autopopulated by default.
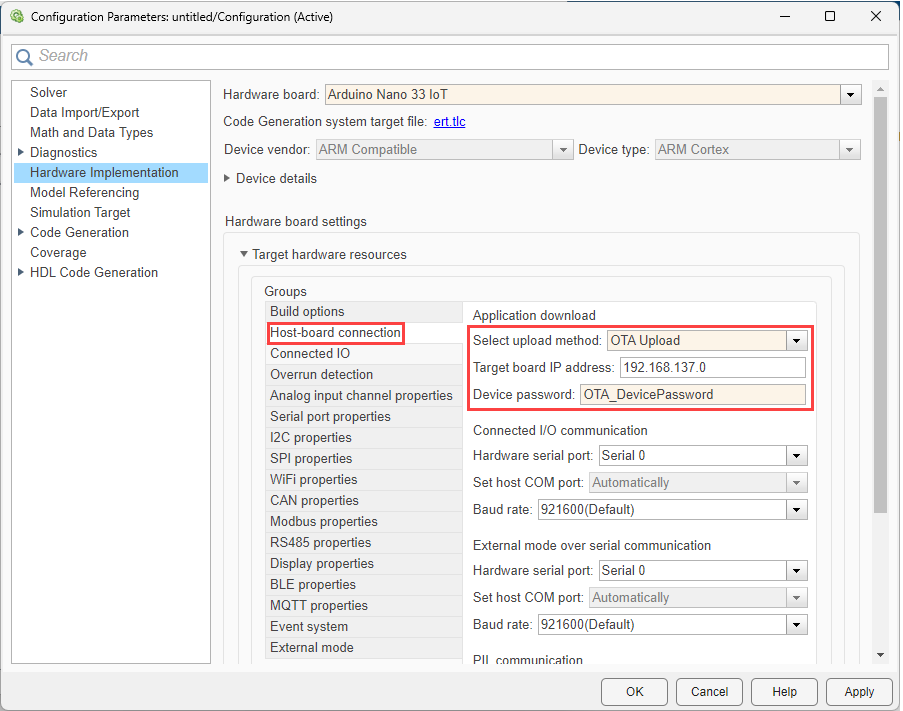
Note
During the OTA upload, if you manually enter the IP address of your Arduino board in the Target device parameter, ensure that you connect the same Arduino board to your host computer as the board name you select in the Hardware board drop-down list.
Enter the Arduino board device password in the Device password parameter. This step authenticates the upload process to allow only authorized users to deploy code on the board.
Click Apply and then OK.
On the Hardware tab of the Simulink model, in the Mode section, select Run on board and then click Build, Deploy & Start. The code generated for the Simulink model is now deployed onto your Arduino board.
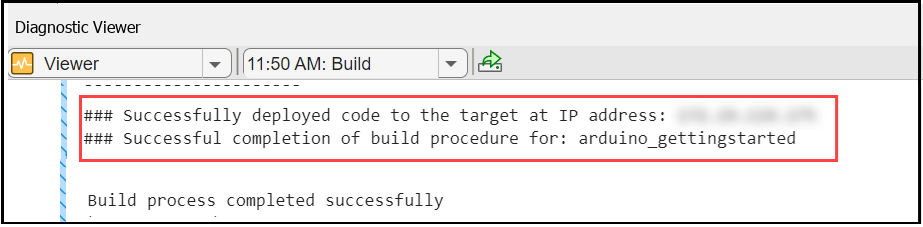
Verify Code Deployment on Arduino for Over-the-Air Programming
You can verify whether Simulink has successfully deployed the code generated for a model on your Arduino board by using the Diagnostic Viewer.
For example, consider the arduino_gettingstarted model deployed to a
Arduino Nano 33 IoT board. After Simulink successfully deploys the model to the board in the OTA upload
environment, the software displays this message in the Diagnostic
Viewer section of the model.
See Also
Host-board connection | WiFi properties | Implement Over-the-Air Programming with Arduino