Develop Multi-Sensor Dashboard Using Arduino
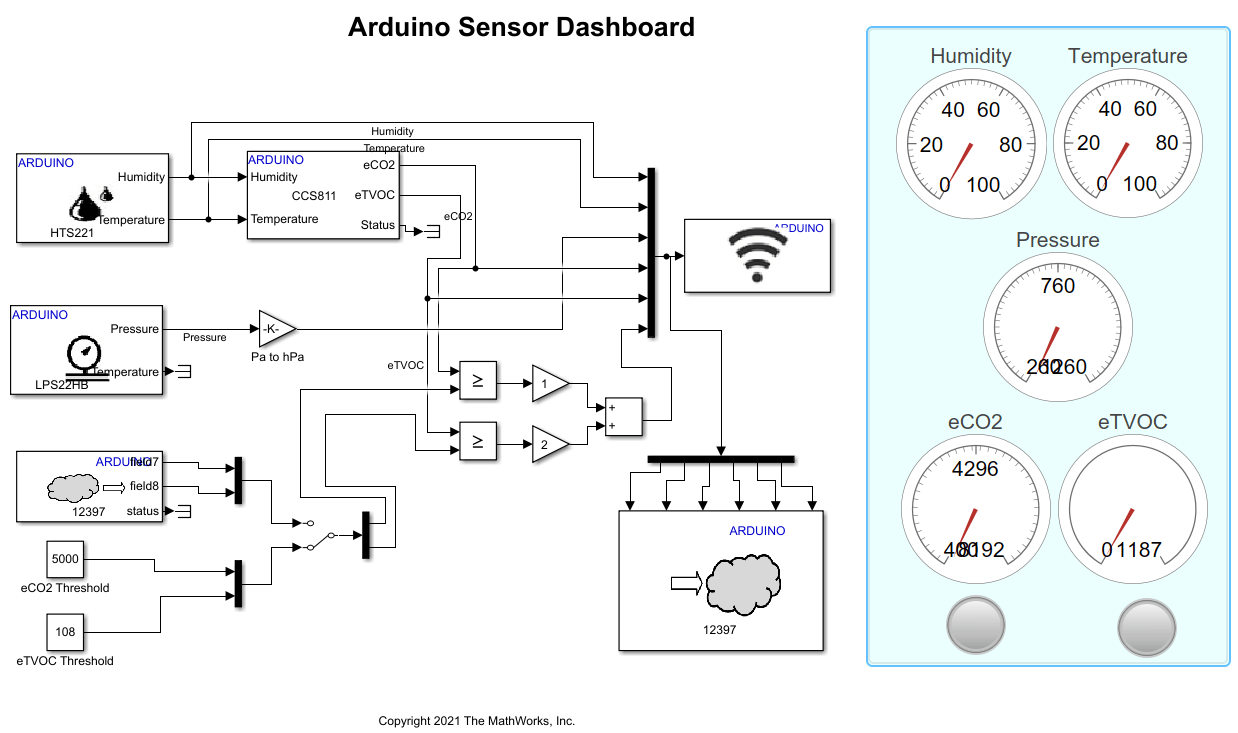
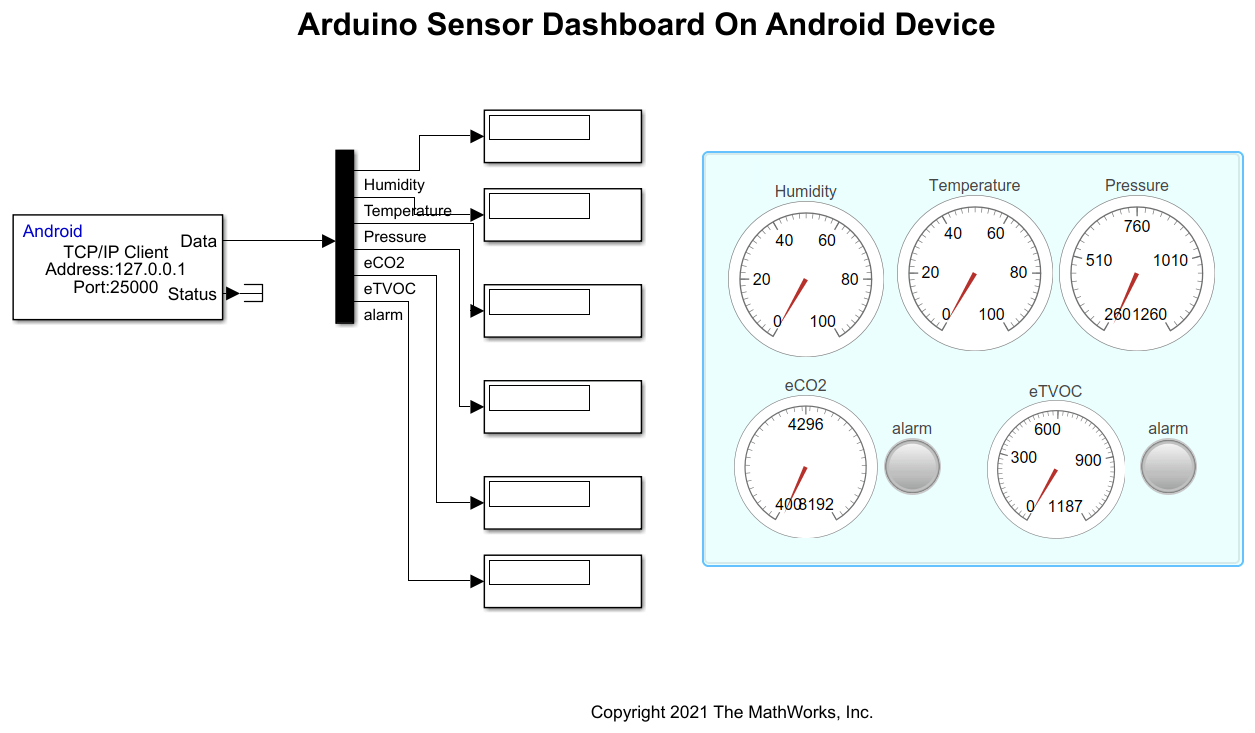
This example shows how to measure equivalent carbon dioxide (eCO2) concentration levels and equivalent total volatile organic compound (eTVOC) concentration levels using the CCS811 Air Quality Sensor block from the Simulink® Support Package for Arduino® Hardware. The model notifies you when the eCO2 and eTVOC levels cross the acceptable thresholds through an alarm lamp on the dashboard. You can publish the eCO2 and eTVOC concentration levels on a ThingSpeak™ channel. You can also display the sensor data on an Android® application using dashboard display. In the latter case, the Arduino hardware board acts as a host that sends the sensor data while the Android device acts as a client that accepts this data over the TCP/IP network and displays the data on the application dashboard.
Prerequisites
For more information on how to run a Simulink model on Arduino hardware, see Get Started with Arduino Hardware.
For more information on ThingSpeak, see Get Started with ThingSpeak (ThingSpeak).
Required Hardware
This example uses the Arduino compatible ESP32 hardware board. You can use any Arduino hardware board with Ethernet or a Wi-Fi® shield.
Android device such as a phone or tablet
CCS811 sensor
HTS221 sensor
LPS22HB sensor
Two USB cables
Breadboard
Jumper cables
Hardware Setup
To connect the CCS811 sensor, HTS221 sensor, LPS22HB sensor to your Arduino board, refer to the datasheet of the sensor and your Arduino hardware board.
Connect the Arduino board to your host computer using the USB cable.
Connect your Android device to your host computer using the second USB cable.
Create and Set Up ThingSpeak Channel
Create a new ThingSpeak channel to store the threshold values for eCO2 and eTVOC and to store the sensor data. For more information, see Collect Data in a New Channel (ThingSpeak).
Enable field 1 to 8 in the Channel Settings section to store the following data.
Field 1 — Humidity data from the HTS221 sensor
Field 2 — Temperature data from the HTS221 sensor
Field 3 — Pressure data from the LPS22HB sensor
Field 4 — eCO2 value from the CCS811 sensor
Field 5 — eTVOC value from the CCS811 sensor
Field 6 — Alarm status
Field 7 — Threshold value for eCO2
Field 8 — Threshold value for eTVOC
Configure Arduino Sensor Dashboard Simulink Model and Calibrate Parameters
This example uses a preconfigured Simulink model from the Simulink Support Package for Arduino Hardware.
Open the arduino_sensor_dashboard Simulink model.

For more information on how to set the ESP32 board properties and set the serial communication port and the baud rate between your Arduino board and host computer, see ESP32 board properties and Host-board connection.
Configure Sensor Blocks
The CCS811 air quality sensor measures the indoor eCO2 and eTVOC levels. The CCS811 sensor uses the humidity and temperature values from the HTS221 Humidity Sensor. The LPS22HB Pressure Sensor block measures the barometric air pressure.
The Arduino I2C peripheral addresses to communicate with the CCS811 and LPS22HB sensors are 0x5A and 0x5C, respectively.
Configure these parameters in the Block Parameters dialog box of the CCS811 Air Quality Sensor block.
Set I2C address to
0x5A.Set Specify environmental conditions to
External sensor. This allows the CCS811 Air Quality Sensor block to receive humidity and temperature inputs from the HTS221 Humidity Sensor block.
The LPS22HB Pressure Sensor and HTS221 Humidity Sensor blocks are configured to their default values. The pressure output from the LPS22HB Pressure Sensor block is converted from Pascal to Hectopascal.
Configure ThingSpeak Blocks
ThingSpeak lets you store, view, and understand the sensor data and build Internet of Things (IoT) systems. Use the WiFi ThingSpeak Read block to store the threshold values for eCO2 and eTVOC and the WiFi ThingSpeak Write block to send the sensor output data to the ThingSpeak channel.
Ensure to set the Channel ID parameter of the WiFi ThingSpeak Read and WiFi ThingSpeak Write blocks with the channel ID of the ThingSpeak channel.
Configure these parameters in the Block Parameters dialog box of the WiFi ThingSpeak Read block.
Set Channel access to
Public. You can decide to keep the ThingSpeak channel private or public based on your requirement. For more information, see Private, Shared, and Public Channels (ThingSpeak).Set Fields to read to
[7 8]to read threshold values for eCO2 and eTVOC from the ThingSpeak channel fields 7 and 8, respectively.
Configure these parameters in the Block parameters dialog box of the WiFi ThingSpeak Write block.
Provide the API key of the ThingSpeak channel in the Write API key parameter.
Set Fields to write to
[1 2 3 4 5 6]to store the sensor output and alarm data.
Configure Wifi TCP/IP Block
The WiFi TCP/IP Send block is configured as a server to send dashboard data to the Android device on the IP port number 25000. The Android device is configured as a client to receive the data and display it on the sensor dashboard. The data communication between the Arduino and Android hardware is carried over the TCP/IP channel. This block is configured to its default parameters.
Set Threshold Values for eCO2 and eTVOC
High eCO2 indicates higher concentration of greenhouse gases. High eTVOC indicates high amount of gases from toxins and chemicals. The threshold values for eCO2 and eTVOC concentration levels are stored in the ThingSpeak channel in fields 7 and 8. Manually set these concentration levels in the Constant blocks. For the purpose of this example, the eCO2 and eTVOC threshold values in the Constant blocks are set to 5000 ppm and 108 ppb, respectively.
Set Alarm State for eCO2 and eTVOC
For eCO2 and eTVOC concentration levels below the threshold, the alarm lamp turns green. For eCO2 values above the threshold, the alarm lamp turns red. For eTVOC values above the threshold, the alarm lamp turns brown.
             Alarm state  |   eCO2   |   eTVOC
            ------------------------------------
                0         |   Low    |   Low
                1         |   High   |   Low
                2         |   Low    |   High
                3         |   High   |   High
Configure Android Sensor Dashboard Simulink Model and Calibrate Parameters
This example uses a preconfigured Simulink model from the Simulink Support Package for Android Devices.
Open the androidArduinoSensorDashboard Simulink model.

Configure TCP/IP Blocks
The Android device acts as a client and receives the sensor and alarm status data over TCP/IP network from the Arduino hardware board.
Configure these parameters in the Block Parameters dialog box of the TCP/IP Receive block.
Set Connection mode to
Client.Set Remote IP address to that of the Arduino board. For more information, see the Deploy Arduino Sensor Dashboard Simulink Model on Arduino Board section in this example.
Set Data type to
Double.Set Data size (N) to
6. This value represents humidity and temperature data from the HTS221 sensor, pressure data from the LPS22HB sensor, eCO2 and eTVOC data from the CCS811 sensor, and the alarm status. This data is then displayed individually on the Display blocks.
Run Arduino Sensor Dashboard Simulink Model in External Mode
Position the manual switch to receive the eCO2 and eTVOC threshold data from the Constant blocks.
On the Hardware tab of the
arduino_sensor_dashboardSimulink model, in the Mode section, select Run on board. In the Run on hardware section, click Monitor & Tune.Observe the real-time sensor data displayed on the dashboard on the Simulink model.
Change the threshold values while the Simulink model runs and observe the status of the alarm lamp on the Simulink model.
Deploy Arduino Sensor Dashboard Simulink Model on Arduino Board
Position the manual switch to receive the eCO2 and eTVOC threshold data from the Wifi ThingSpeak Read block.
On the Hardware tab of the
arduino_sensor_dashboardSimulink model, in the Mode section, select Run on board. In the Deploy section, click Build, Deploy & Start. In the Diagnostic Viewer dialog box, note the remote IP address of the Arduino board. Populate this value in the Remote IP address of the parameter in the TCP/IP Receive block in theandroidArduinoSensorDashboardmodel. Observe the data displayed in real-time on the ThingSpeak channel.
Deploy Android Sensor Dashboard Simulink Model on Android Device
On the Hardware tab of the
androidArduinoSensorDashboardSimulink model, in the Mode section, select Run on board. In the Deploy section, click Build, Deploy & Start. The androidArduinoSensorDashboard application launches on your Android devices automatically.On the Info tab of the application, ensure that the TCP/IP connection is established between the Arduino board and your Android device.
On the App tab of the application, you can observe the sensor and alarm data.