Track Pre-Computed Trajectory of Kinova Gen3 Robot End-Effector Using Inverse Kinematics and KINOVA KORTEX MATLAB API
This example shows how to solve inverse kinematics problems using Rigid Body Trees and move the Kinova Gen3 7-DoF Ultralightweight Robot arm to follow the desired trajectory.
Clear all output in the live script by right clicking anywhere in the live script and then clicking ‘Clear All Output’ or navigate to VIEW > Clear all Output.
Required Products
Robotics System Toolbox™
Simulink®
Create the Robot Model
Create a Rigid Body Tree for Gen3 robot, set the home configuration and calculate the transformation at the home configuration:
gen3 = loadrobot("kinovaGen3");
gen3.DataFormat = 'column';
q_home = [0 15 180 -130 0 55 90]'*pi/180;
eeName = 'EndEffector_Link';
T_home = getTransform(gen3, q_home, eeName);
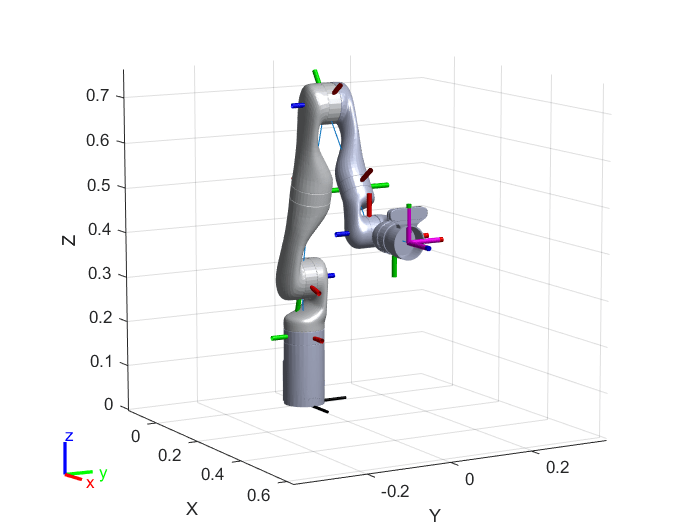
Visualize the robot at home configuration.
show(gen3,q_home);
axis auto;
view([60,10]); 
Create Inverse Kinematics Solver and Set Parameters
The inverseKinematics System object™ creates an inverse kinematic (IK) solver to calculate joint configurations for a desired end-effector pose based on a specified rigid body tree model.
ik = inverseKinematics('RigidBodyTree', gen3);Disable random restarts for inverse kinematic solver. AllowRandomRestart parameter indicates if random restarts are allowed. Random restarts are triggered when the algorithm approaches a solution that does not satisfy the constraints. A randomly generated initial guess is used.
ik.SolverParameters.AllowRandomRestart = false;
Specify weight priorities for pose tolerances, as a six-element vector. The first three elements correspond to the weights on the error in orientation for the desired pose. The last three elements correspond to the weights on the error in xyz position for the desired pose.
weights = [1, 1, 1, 1, 1, 1];
Since the desired trajectory is selected to start near the home position, define initial guess for solver as the home position of the robot.
q_init = q_home;
Define Waypoints from the Desired Trajectory
This section helps you is to create a circular trajectory for the end effector to track. Keep the orientation of the end effector as constant for the whole range of motion. Define center and radius of the circular trajectory.
center = [0.5 0 0.4]; %[x y z]
radius = 0.1;
Define total time and time step, and based on that generate waypoints for the circular trajectory.
dt = 0.25;
t = (0:dt:10)';
theta = t*(2*pi/t(end))-(pi/2);
points = center + radius*[0*ones(size(theta)) cos(theta) sin(theta)];
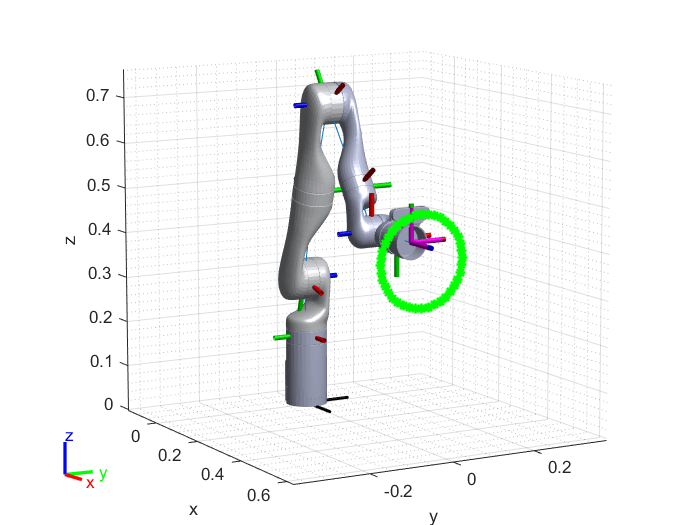
Plot the waypoints along with the robot at home configuration.
hold on;
plot3(points(:,1),points(:,2),points(:,3),'-*g', 'LineWidth', 1.5);
xlabel('x');
ylabel('y');
zlabel('z');
axis auto;
view([60,10]);
grid('minor');

Solve the Inverse Kinematics for Each Waypoint
The inverse kinematics solver finds a joint configuration that achieves the specified end-effector pose. Specify an initial guess for the configuration and the desired weights on the tolerances for the six components of pose. The inverse kinematics solver returns information about its convergence and it is recommended to check the status of the solution.
This section helps you to find a joint configuration for a fixed end effector orientation and variable position defined by waypoints calculated in the previous sections. The current solution is used as the initial guess for the next waypoint to ensure smooth and continuous trajectory. Uncomment the display command to see the status of each inverse kinematics iteration.
numJoints = size(q_home,1);
numWaypoints = size(points,1);
qs = zeros(numWaypoints,numJoints);
for i = 1:numWaypoints
    T_des = T_home;
    T_des(1:3,4) = points(i,:)';
    [q_sol, q_info] = ik(eeName, T_des, weights, q_init);

    % Display status of ik result
    %disp(q_info.Status);

    % Store the configuration
    qs(i,:) = q_sol(1:numJoints);

    % Start from prior solution
    q_init = q_sol;
end
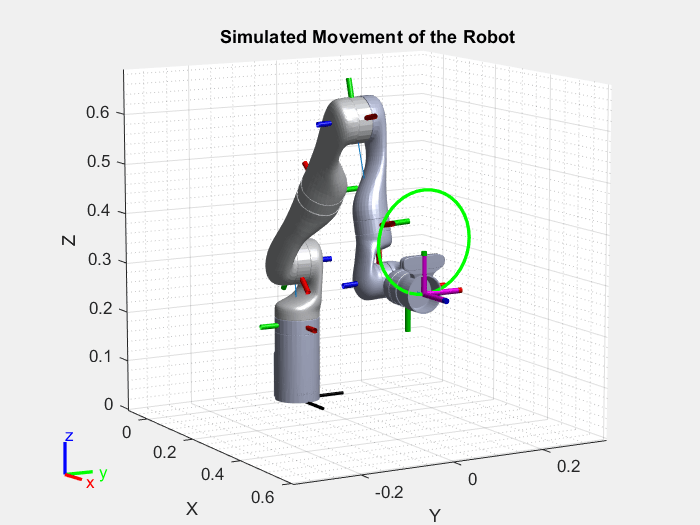
Visualize the Animation of the Solution
figure; set(gcf,'Visible','on');
ax = show(gen3,qs(1,:)');
ax.CameraPositionMode='auto';
hold on;

% Plot waypoints
plot3(points(:,1),points(:,2),points(:,3),'-g','LineWidth',2);
axis auto;
view([60,10]);
grid('minor');
hold on;

title('Simulated Movement of the Robot');
% Animate
framesPerSecond = 30;
r = robotics.Rate(framesPerSecond);
for i = 1:numWaypoints
    show(gen3, qs(i,:)','PreservePlot',false);
    drawnow;
    waitfor(r);
end

Send the Trajectory to the Hardware
Expected Motion of the robot (Assuming you start from the retract position)

Press ‘y’ and press 'Enter' key on the keyboard if you want to send commands to the Kinova Gen3 robot to track the calculated trajectory or press 'Enter' to finish the example.
prompt = 'Do you want to send same trajectory to the hardware? y/n [n]: ';
str = input(prompt,'s');

if isempty(str)
    str = 'n';
end

if str == 'n'
    clear;
    return;
end
Command Kinova Gen3 Robot to Track the Pre-Computed Trajectory
As explained in the example Connect to Kinova Gen3 Robot and Manipulate the Arm Using MATLAB, the MATLAB API for Kinova Gen3 robot supports multiple modes to command the robot. The high-level commands to reach a desired joint configuration or Cartesian pose cannot be used to follow a smooth trajectory as the robot always reaches the destination before processing the next command. Hence, the end-effector velocity between the successive commands reaches to zero, which results into a choppy motion. The pre-computed joint trajectories can be used to command the robot to track set of waypoints ensuring smooth motion.
A valid pre-computed joint trajectory is a set of timestamp, angular position, angular velocity, and angular acceleration for each joint at each waypoint. You must adhere to certain constraints while calculating the trajectory. For more information, see SendPreComputedTrajectory and Precomputed Joint Trajectories.
Calculate joint velocity and acceleration at each waypoint using the numerical differentiation
qs_deg = qs*180/pi;
vel = diff(qs_deg)/dt;
vel(1,:) = 0;
vel(end+1,:) = 0;
acc = diff(vel)/dt;
acc(1,:) = 0;
acc(end+1,:) = 0;
Interpolate the joint position, velocity and acceleration to ensure the 0.001 seconds time step between two trajectory points
timestamp = 0:0.001:t(end);
qs_deg = interp1(t,qs_deg,timestamp);
vel = interp1(t,vel,timestamp);
acc = interp1(t,acc,timestamp);
Connect to the Robot
Simulink.importExternalCTypes(which('kortex_wrapper_data.h'));
gen3Kinova = kortex();
gen3Kinova.ip_address = '192.168.1.10';

isOk = gen3Kinova.CreateRobotApisWrapper();
if isOk
   disp('You are connected to the robot!');
else
   error('Failed to establish a valid connection!');
end
Visualize the Actual Movement of the Robot
title('Actual Movement of the Robot');
[~,~, actuatorFb, ~] = gen3Kinova.SendRefreshFeedback();
show(gen3, ((actuatorFb.position)*pi/180)','PreservePlot',false);
drawnow;
Send Robot to Starting Point of the Trajectory
Note that the valid range of input for SendJointAngles is 0 to 360 degrees while the computed angles are in a range of -180 to 180 degrees. Hence the joint angles must be wrapped around 0 to 360 degrees.
jointCmd = wrapTo360(qs_deg(1,:));
constraintType = int32(0);
speed = 0;
duration = 0;

isOk = gen3Kinova.SendJointAngles(jointCmd, constraintType, speed, duration);
if isOk
    disp('success');
else
    disp('SendJointAngles cmd error');
    return;
end
Check if the robot has reached the starting position
while 1
    [isOk,~, actuatorFb, ~] = gen3Kinova.SendRefreshFeedback();
    show(gen3, ((actuatorFb.position)*pi/180)','PreservePlot',false);
    drawnow;
    if isOk
        if max(abs(wrapTo360(qs_deg(1,:))-actuatorFb.position)) < 0.1
            disp('Starting point reached.')
            break;
        end
    else
        error('SendRefreshFeedback error')
    end
end
Send Pre-Computed Trajectory
isOk = gen3Kinova.SendPreComputedTrajectory(qs_deg.', vel.', acc.', timestamp, size(timestamp,2));
if isOk
    disp('SendPreComputedTrajectory success');
else
    disp('SendPreComputedTrajectory command error');
end
Check if the robot has reached the end position
while 1
    [isOk,~, actuatorFb, ~] = gen3Kinova.SendRefreshFeedback();
    show(gen3, ((actuatorFb.position)*pi/180)','PreservePlot',false);
    drawnow;
    if isOk
        if max(abs(wrapTo360(qs_deg(end,:))-actuatorFb.position)) < 0.1
            disp('End Point reached.')
            break;
        end
    else
        error('SendRefreshFeedback error')
    end
end
Disconnect from the Robot
Use this command to disconnect from Kinova Gen3 robot Robot.
isOk = gen3Kinova.DestroyRobotApisWrapper();
Clear workspace
clear;