Hydraulic Axial-Piston Pump with Load-Sensing and Pressure-Limiting Control
Warning: This example uses the hydraulic domain, which will be removed in a future release. Find an equivalent example model that uses the isothermal liquid domain here: Hydraulic Axial-Piston Pump with Load-Sensing and Pressure-Limiting Control. To convert models to the isothermal liquid domain, use the hydraulicToIsothermalLiquid tool.
This example shows a test rig designed to investigate interaction between an axial-piston pump and a typical control unit, simultaneously performing the load-sensing and pressure-limiting functions. To assure required accuracy, the model of the pump must account for such features as interaction between pistons, swash plate, and porting plate, which makes it necessary to build a detailed pump model.
Model

Figure 1. Test Rig Schematic
Test Rig Description
The pump model is represented by the subsystem named Axial-Piston Pump. The prime mover rotating the pump is simulated with the Ideal Angular Velocity source. The pump output passes through a pipeline, control unit, and a variable orifice that acts as a load. To test control unit response to variable load, the orifice changes its area during simulation. The change profile is implemented by the Spool Pos subsystem.
The control unit in the test rig is represented by the subsystem named Pressure/Flow Control Unit. The load-sensing function of the pump control uses a fixed orifice. The control unit keeps the pressure differential across this orifice constant, regardless of pump loading. The control unit receives signals on pump output pressure and load pressure, measured after the flow control valve. Based on these pressures, the unit produces yoke displacement, which affects the angular position of the angled swash plate in the pump. This helps maintain the specified pressure differential across the flow control valve and prevent pump pressure from exceeding the preset value.
Test rig basic parameters:
Pump maximum displacement                        7.8877e-6 m^3/rad
Pitch radius                                     0.04 m
Piston area                                      1.77e-4 m^2
Number of pistons                                5
Maximum piston stroke                            0.06 m
Swash plate maximum angle                        35 deg (0.6109 rad)
Arm length between the actuator
  and the swash plate pivoting point             0.055 m
Swash plate actuator stroke                      0.04 m
Diameter of the orifice at the bottom
  of the piston chamber                          0.007 m
Pump maximum rated speed                         260 rad/s (2482 RPM)
Maximum pressure                                 270 bar
Rated flow                                       1.1e-3 m^3/s
All basic parameters are specified through the Model Properties > Callbacks > InitFcn option.
Axial-Piston Pump Model
The pump under investigation is an axial-piston pump with five pistons.

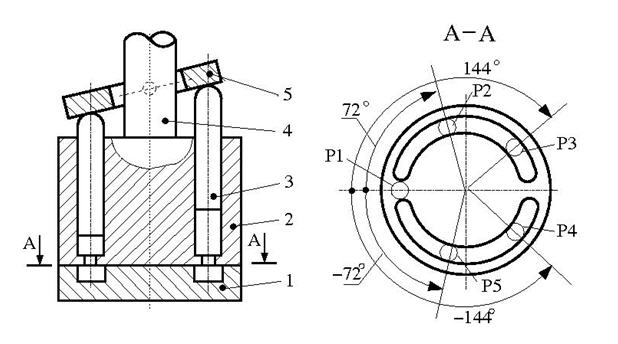
Figure 2. Axial-Piston Pump Schematic
The pump schematic diagram is shown in Figure 2, where:
1 - porting plate
2 - cylinder block (rotor)
3 - piston
4 - driving shaft
5 - swash plate
The block diagram of the pump model is shown in Figure 3.

Figure 3. Pump Model
Every piston of the pump is represented by a subsystem called Piston. These subsystems are identical and are connected to the following external ports of the pump model:
S - pump driving shaft
Y - yoke connected with the inclined plate of the swash mechanism
P - pump discharge
The suction ports of all pistons (ports A) are connected to the output of a low pressure booster pump, which is simulated with the Ideal Hydraulic Pressure Source block. The output pressure of the booster pump is set to 5e5 Pa.
The yoke is connected to the Y ports of all pistons, thus acting on the angled plate of the swash mechanism. The displacement of the yoke is limited by the hard stop.

Figure 4. Piston Model
The model of the piston (Figure 4) is based on the Single-Acting Hydraulic Cylinder block, which is mechanically connected to the drive shaft through the Swash Plate block. The cylinder is also hydraulically connected to ports A and B through the Porting Plate Variable Orifice blocks. Ports A and B represent pump discharge and intake ports, respectively.
The port assignment is performed on the basis of the following considerations:
The pistons are evenly spread along the pitch circle of the piston cylinder, as shown in Figure 2. This makes the angle between pistons 360/5 = 72 degrees.
Let us assume that the first piston (marked P1 in the schematic) is located exactly at the reference point that corresponds to the lowest piston position. Let us further assume that port A represents the intake outlet of the pump. In other words, the piston moving along slot A in positive direction (clockwise in this case) goes up, and its chamber is filled with fluid by a booster pump. This means that the Phase angle parameter of the Porting Plate Variable Orifice A in Piston 1 must be set to zero. The same parameter of the Porting Plate Variable Orifice B in Piston 1 must be set to 180 degrees, because it starts interacting with slot B (pump discharge port) only after rotation by 180 degrees.
In the piston model, parameters Phase angle of each Porting Plate Variable Orifice block are denoted as Phase angle A and Phase angle B, respectively. The values of the phase angle for all five pistons are computed in the initialization section of the Axial-Piston Pump subsystem mask editor. The following table shows their values in degrees, with the corresponding values in radians given in parenthesis:
---------------------------------------------------------------------
 Piston name in | Phase angle A | Phase angle B | Phase angle in
 the pump model |               |               | Swash Plate block
---------------------------------------------------------------------
   Piston_1     |   0           | 180   (pi)    |   0
   Piston_2     |  72  (1.2566) |-108 (-1.885)  |  72   (1.2566)
   Piston_3     | 144  (5.5133) | -36 (-0.8029) | 144   (5.5133)
   Piston_4     |-144 (-5.5133) |  36  (0.8029) |-144  (-5.5133)
   Piston_5     | -72 (-1.2566) | 108  (1.885)  | -72  (-1.2566)
---------------------------------------------------------------------
The Swash Plate block in the piston model also requires phase angle to be assigned, to specify the position of a piston with respect to the inclined surface. With the selected reference point, the values of the swash plate phase angle coincide with the Phase angle A values, as shown in the table.
The Porting Plate Variable Orifice blocks require angular position of the respective piston at their input. This function is performed by the Angle Sensor block.
Other important parameters are the stroke of the cylinder and the initial position of the piston with respect to the cylinder cap. The stroke must be large enough to allow the piston to reciprocate even at the maximum angle of the swash plate
Stroke > 2 * _PitchRadius_ * |tan|(MaxAngle),
where PitchRadius is the radius of the cylinder block pitch circle, and MaxAngle is the maximum allowed angle of the swash plate.
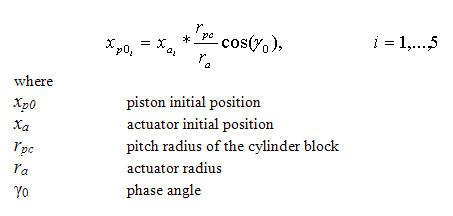
In the model, the maximum angle is set to 35 degrees (0.6109 rad) and pitch radius is set to 0.04 m, which makes the stroke to be greater than 0.056 m. The stroke is set 0.06 m. The piston initial positions must be equal to half of the stroke at zero initial swash plate angle. But the initial angle changes its value depending on the initial position of the actuator. As a result, the piston initial positions are computed with the equation

The calculation of the piston initial positions is performed in the initialization section of the subsystem mask editor.
Pressure/Flow Control Unit
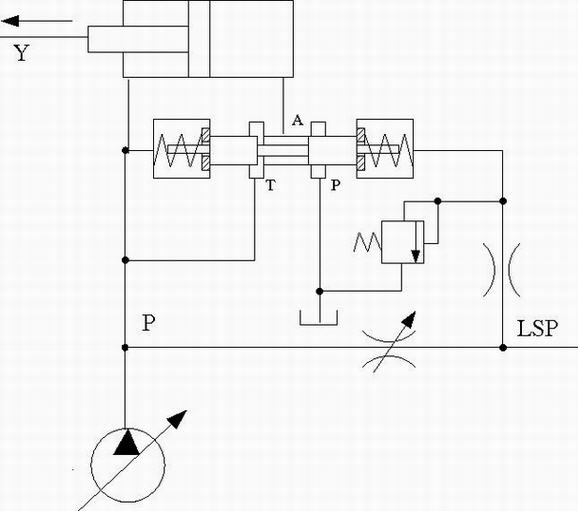
The purpose of the control unit is to implement two functions: load sensing and pressure limiting. The load sensing is implemented by maintaining specified pressure differential across the flow control valve. In the model of the test rig (Figure 1), the flow control valve is simulated with the Orifice with Variable Area Slot block. Pressures upstream and downstream of the valve are conveyed to the Pressure/Flow Control unit via ports P and LSP (Figure 5).

Figure 5. Pressure/Flow Control Unit Schematic
These pressures act on the side faces of the 3-way directional valve and shift the valve proportionally to the pressure difference and setting of the centering springs. The valve connections are selected in such a way that increased pressure differential opens path A-P and closes path A-T. The actuator is arranged as a single-rod differential hydraulic cylinder with rod connected to the pump yoke. The pump displacement is increased if the rod moves in the direction of the arrow shown in the schematic. Due to difference between cylinder effective areas, the displacement is increased if both cylinder chambers are connected to the pump, and decreased if the chamber without rod is connected to tank. As a result, increased pressure differential across the valve causes the pump to decrease its displacement until it returns to preset value. The spring preload of the valve is determined with the equation

The purpose of the pressure limiting function is to prevent pump pressure from exceeding the preset value. It is implemented with the pressure-relief valve and the orifice in the LSP line. The pressure-relief valve is set to the desired maximum value. When pump pressure builds up to this value, the valve opens and causes pressure in the right chamber of the valve to decrease opening path A-P. The actuator shifts to the right until the pressure returns to the preset value.
The model of a load-sensing valve is built using the 3-Way Directional Valve, Hydraulic Double-Acting Valve Actuator, Pressure-Relief Valve, and Fixed Orifice blocks, as shown in the model diagram (Figures 6 and 7).

Figure 6. Pressure/Flow Control Unit Model

Figure 7. 3 Way Valve Pressure Controlled Model
The pressure differential is set to 20 bar. The 3-Way Directional Valve path A-T must be initially open, to force the pump to increase its displacement at the start of operation. To perform the load-sensing function, pressure increase at the B port (load-sensing port) must open the A-T path and close the A-P path. These are the reasons that determined the valve port connections to the system. The remaining load sensing control valve parameters, such as spring stiffness, valve stroke, valve orifice area, and so on, are tuned in the model to ensure required accuracy, stability, and numerical effectiveness.
The pressure-limiting function is implemented with the combination of the Fixed Orifice and Pressure-Relief Valve blocks. The valve is set to 250 bar. At this pressure, increased flow through the fixed orifice causes pressure at port Y of the Hydraulic Double-Acting Valve Actuator (block Valve Actuator in Figure 7) to drop, which eventually decreases the displacement of the pump.
Cycle Description
The simulated cycle consists of six elements characterized by different load conditions with the Variable Area Slot block.
The cycle starts with zero opening signal, followed by opening of 2.8, 5.2, 1, -0.8, and, finally, 2.45 mm. At the start of the cycle, the pump shaft starts rotating at 260 rad/s (~2500 RPM) with the pump yoke initial position set to 5 mm. The servo cylinder starts increasing pump displacement, pump pressure slowly builds up, and the process settles down at ~0.35 s after the pressure differential across the flow control valve becomes close to preset value of 20 bar. The load-sensing valve is opened at this moment by ~1.2 mm.
During next three portions of the cycle, the pump maintains practically the same delivery despite changes of the load valve opening.
At 1 s, the load valve is practically fully closed, causing pump pressure to rise. The load-limiting function becomes dominant as the pressure reaches 270 bar. The pump returns to the load-sensing mode after the pressure falls below the preset value.
Simulation Results from Simscape Logging
The plot below shows the flow rate within the pump pistons and at the load. The cyclic nature of the piston pressures can be seen, as well as the overall behavior of the pump which stays close to its rated flow rate.

The plots show the load sensing and pressure limiting control. The pump maintains its rated flow rate of 1.1 m^3/s even as the load changes, as shown on the pump output pressure plot. However, as the pump output pressure rises to its maximum rated pressure, the pressure limiting control adjusts the yoke position is and the flow rate drops below its rated flow rate.
