Use FMU Builder Wizard to Generate FMU from Simulink Models
You can export Simulink models as Functional Mockup Units (FMUs) using the FMU Builder wizard. Use the FMU Builder to specify configurations and customizations for the generated FMU.
To open the FMU Builder wizard, in the Simulink toolstrip, on the Simulation tab, click the down arrow button next to Save and click Standalone FMU....
On the Welcome page, specify the FMI Version and FMU Type. You also specify the model solver type or click the Configure model parameters link to open the Configuration Parameters dialog box.
Click Browse to specify existing configuration JSON file that contains export specifications.

Click Next to continue.
On the Configure page, specify the tunable parameters, internal variables, inputs, and outputs for the FMU. You must configure your model to enable these variables to be identified by the wizard. For more information on configuring the model, see Generate a Basic Standalone FMU from Simulink Model.
Click the Refresh button to compile the model and populate the variables in the respective tables. You can mark a tunable parameter or internal variable for export by selecting the Exported check-box. You can also specify the exported name of tunable parameters, internal variables, inputs, and outputs in the corresponding Exported Name field.

Click Next to continue.
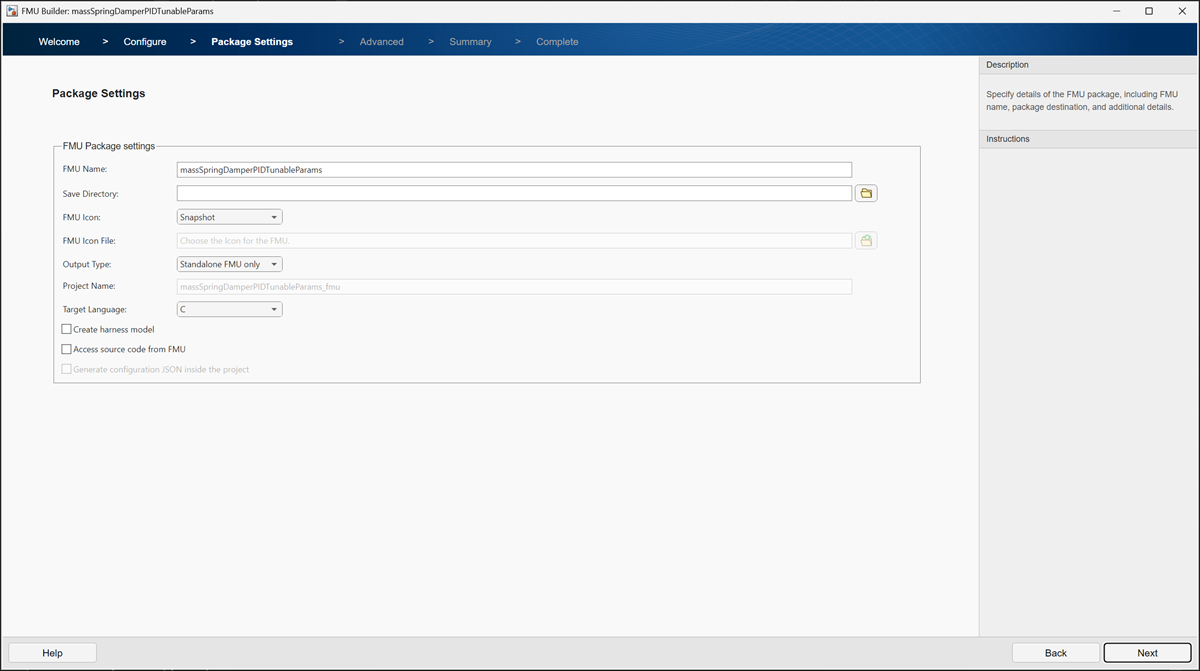
Specify the package customizations for the FMU in the Package Settings page. You can customize the following settings.
FMU Name: Specify the name of the generated FMU.
Save Directory: Specify the location of the generated FMU.
FMU Icon: Select the block mask for the generated FMU. You can choose between model snapshot, icon file, or none.
FMU Icon File: Specify location of the icon file if FMU Icon setting is set as
Icon File.Output Type: Select the format of the generated artifacts. You can specify it to be a standalone FMU or a project containing the FMU and all the dependencies.
Project Name: Specify project name if Output Type is set as
FMU + archived project with dependencies.Target Language: Select the language of the generated FMU files.
Create harness model: Choose if you want to create a harness model containing the generated FMU.
Access source code from FMU: Choose if you want the FMU package to contain the source code in the specified target language. You must install Simulink Coder for this feature.
Generate configuration JSON inside the project: Specify if you want the configuration file to be stored inside the project if you set Output Type as
FMU + archived project with
                  dependencies
.
Click Next to continue.
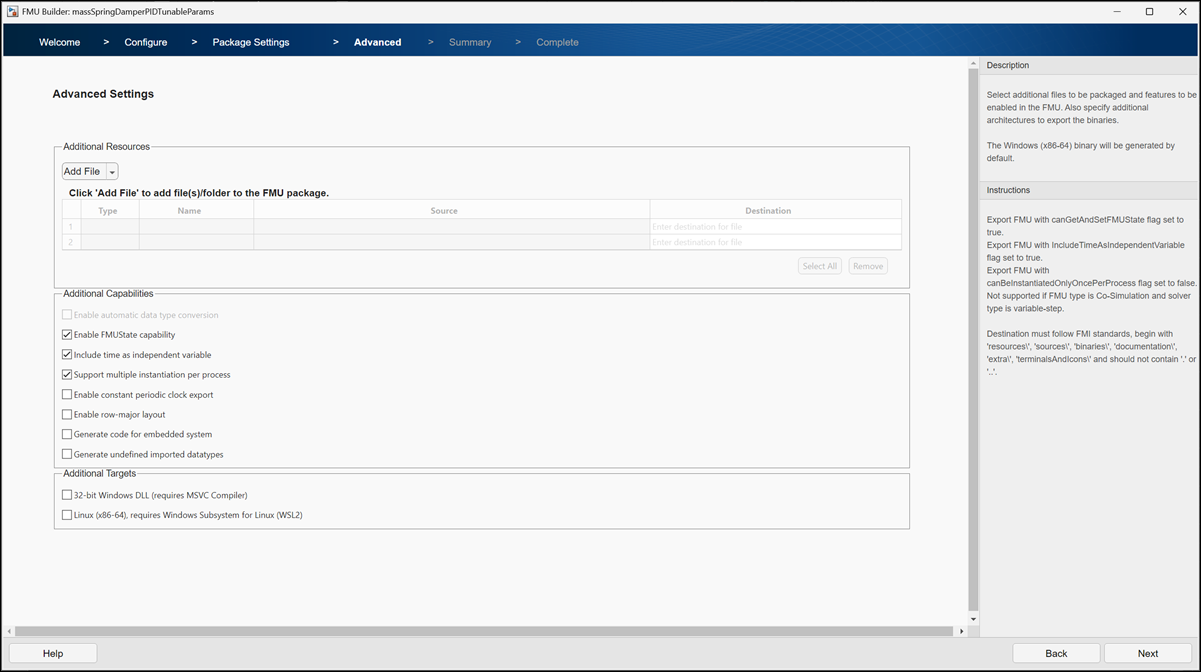
Specify additional FMI options on the Advanced Settings page. You can customize the following settings:
Additional Resources: Specify additional files or folders that should be included in the FMU package. The Destination for specified artifacts must follow the folder structure specified in the FMI standard. For more information on exporting FMU with additional files, see Export Simulink Model to Standalone FMU with User Specified Files and Archived Project with Harness Model.
Enable automatic data type conversion: Specify if data types of the variables should be converted to comply with FMI 2 standards if FMI Version is set as
2.0.Enable FMUState capabilities: Choose if the FMU must contain
FMUState. You can enable this option for co-simulation FMUs that have fixed-step solvers and are compatible with FMI 2.0 and 3.0 standards.FMUstateenables you to use simulation options like fast restart, model operating point, and simulation stepping with the FMU. For more information, see Capture Simulation State, Fast Restart, and Step Through Model Containing FMU.Include time as independent variable: Choose if time should be included as an independent variable in the FMU.
Support multiple instantiation per process: Specify if you want the FMU to be compatible for multiple-instantiation in a process. This option can be enabled for co-simulation FMUs that have fixed-step solvers and are compatible with FMI 2.0 and 3.0 standards. For more information, see Use Multi-Instance FMU for Simultaneous Simulations.
Enable constant periodic clock export: Select if the exported FMU must contain constant periodic clocks. For more information, see Export Model as FMU with Constant Periodic Clocks.
Enable row-major layout: Specify if the FMU must adhere to row-major convention.
Generate code for embedded systems: Select if you want to generate ERT-based code for the FMU.
Generate undefined imported data types: Specify if you want to include definitions of custom data types with the
AutoDataScope property in the generated code. When specified as'on', FMU export generates the type definitions for these data types instead of relying on imported header files.32-bit Windows DLL (Requires MSVC Compiler): Specify if 32-bit Windows binary should be generated.
Linux (x86-64) requires Windows Subsystem for Linux: Specify additional Linux binary generation on Windows. For more information, see Export Model as FMU with Linux Binary on Windows.
Click Next to continue.
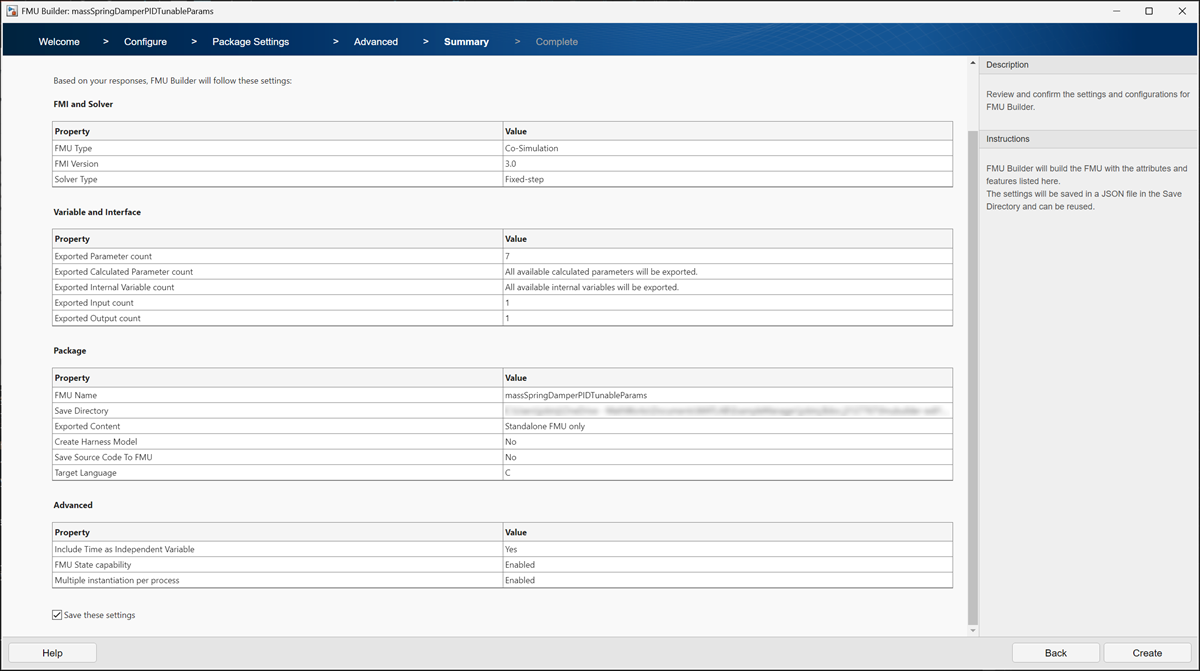
The Summary page lists all the selected settings. Select the Save these settings check box to generate a configuration JSON file in the current working directory for the specified export settings.
Click Create to generate the FMU.
You can open the harness model, navigate to the FMU save directory, or open the saved configuration file on the Complete page.
