Generate and Deploy Optimized Code for Digit Classification Deep Learning Network on ARM Cortex-M Target
This example shows how to generate optimized code for a digit classification deep learning network and deploy the generated code on an ARM Cortex-M™ target. You create an image data set and load a pretrained digit classification deep learning network. Then, you create a digit classification Simulink® model using a Classify block, which uses the pretrained network to classify the input image. Additionally, you deploy the generated code to an ARM Cortex-M target and compare the performance of the generated code with and without the code replacement library (CRL).
Prerequisite
Complete the hardware setup by running stm32setup to configure your system for use with STM32™ Microcontroller Blockset. For more information, see Hardware Setup for STM32 Microcontroller Blockset (STM32 Microcontroller Blockset).
Create Image Data Set
This example uses a digit classification network trained with the Digits data set. For more information on which data sets you can use to train a deep learning network, see Data Sets for Deep Learning (Deep Learning Toolbox). This image data set contains 10000 sequential images for each digit class (0-9). It is divided into three parts: 7000 images (70%) for training, 2000 images (20%) for validation, and 1000 images (10%) for testing.
The following data set was used to train the digit classification network. For an example showing how to process this data for deep learning, see Data Sets for Deep Learning (Deep Learning Toolbox).
dataFolder = fullfile(toolboxdir('nnet'),'nndemos','nndatasets','DigitDataset');
imds = imageDatastore(dataFolder, ...
    'IncludeSubfolders',true,'LabelSource','foldernames');
classNames = categories(imds.Labels);
% Display classification labels.
disp(classNames);
Load Pretrained Digit Classification Network
This example uses a pretrained digit classification network, digitClassificationNet.mat, stored in a MAT file. The network is trained on the Digits data set. Load the pretrained digit classification network to view its architecture.
load('digitClassificationNet.mat');
disp(net.Layers)
The pretrained digital classification network consists of an imageInputLayer (Deep Learning Toolbox), fullyConnectedLayer (Deep Learning Toolbox), reluLayer (Deep Learning Toolbox), and softmaxLayer (Deep Learning Toolbox). You input a grayscale image of a handwritten digit into the digit classification network. The network classifies the image and outputs the probability for each possible digit class (0-9).
Read Image from Data Set
To classify an image, randomly select a number between 1 and 10000 to choose an image from the data set.
randomImageNumber =5046; im = single(imread(imds.Files{randomImageNumber})); imshow(im, 'InitialMagnification', 'fit');

Import Image
To input the image to the digit classification Simulink model, you must load the image as a variable to the MATLAB® workspace. Create a structure variable InputImage by adding fields. The InputImage variable contains both the image and an empty time vector.
InputImage.time = [];
InputImage.signals.values = im;
InputImage.signals.dimensions = size(im);
Open Digit Classification Simulink Model
The DigitClassification.slx model contains a Classify block and a From Workspace block.
The InputImage Data From Workspace block loads the image from the workspace variable. Then, the Classify block predicts the class label for the input image using the pretrained digit classification network.
modelName = 'DigitClassification';
open_system(modelName);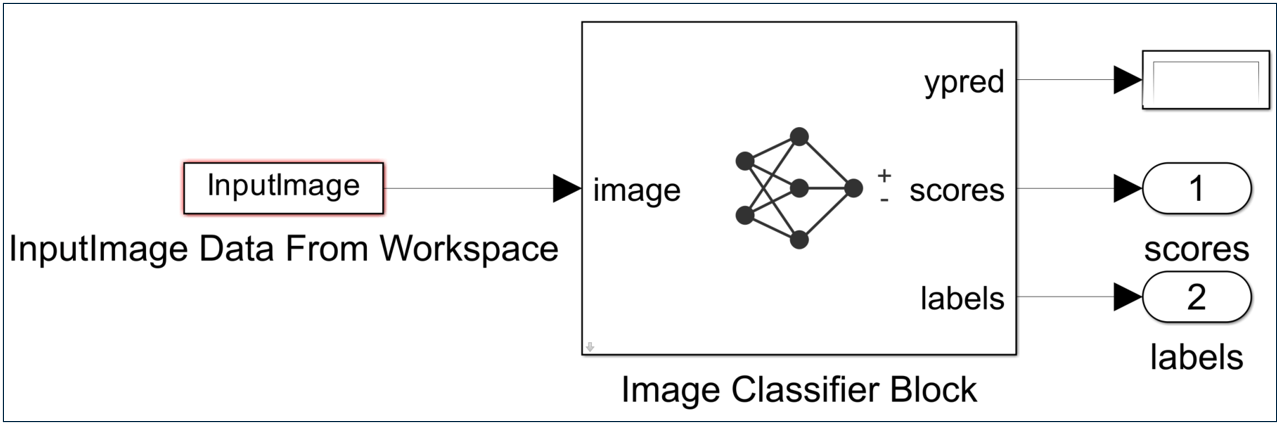
To configure the Classify block, open the block parameters. Browse for the digitClassificationNet.mat file and set it as the File path. Set the Class names workspace variable to classNames. To get the class label and the corresponding probabilities, enable Classification and Predictions in the Outputs section.

Configure Model and Deploy on ARM Cortex-M Target
You can configure the model either interactively, using the Configuration Parameters dialog box in Simulink, or programmatically, using the MATLAB programming interface.
Interactive Approach
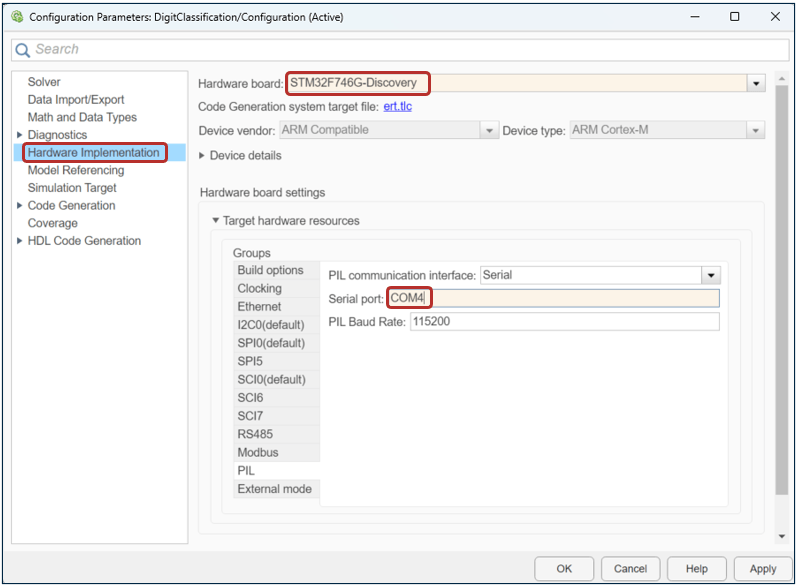
Cilck the Modeling tab on the Simulink toolstrip and select Model Settings to open the Configuration Parameters dialog box.

Set the Hardware board parameter to STM32F746G-Discovery.
Under Hardware board settings, navigate to Target hardware resources and enter the serial port number to which your ARM Cortex-M hardware is connected. To find the serial port number on a Windows computer, open Device Manager and go to Ports (COM & LPT). Locate the entry labeled STMicroelectronics STLink Virtual COM Port (COMx). Use COMx as the serial port number.
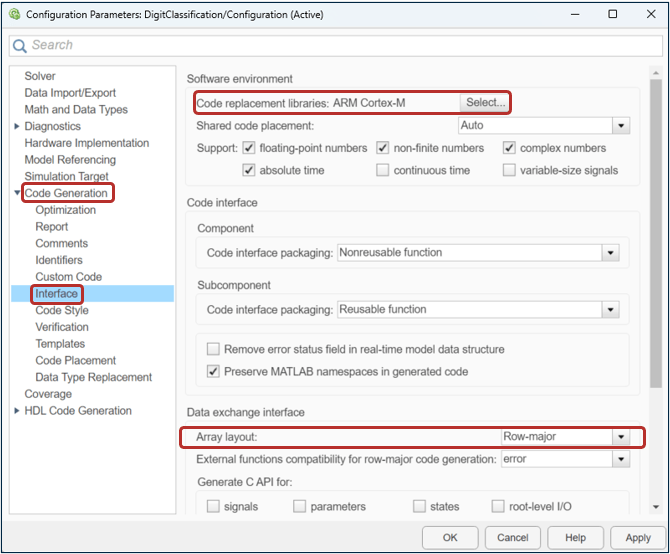
To generate optimized code for your ARM Cortex-M hardware, set the CRL to ARM Cortex-M. For enhanced CRL performance, set the Array layout parameter to Row-major.
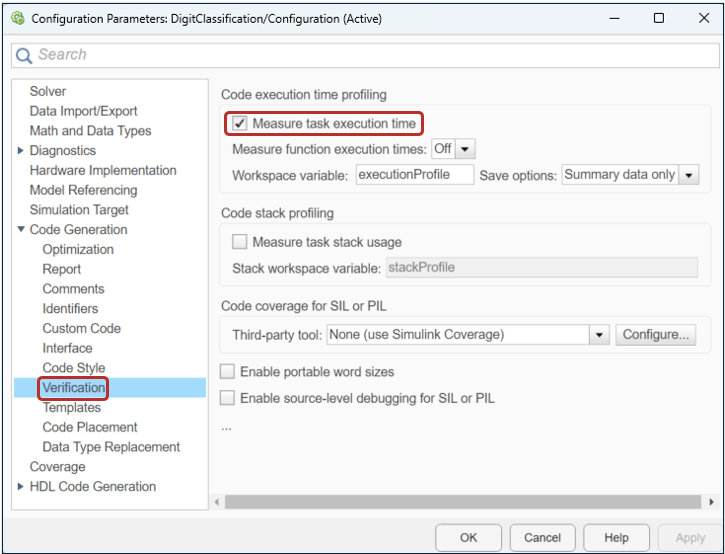
To profile generated code on the hardware, enable Measure task execution time.
Programmatic Approach
To configure the digit classification model programmatically and to delpoy the model on the STM32F746G-Discovery board, execute these commands.
Set the hardware board to STM32F746G-Discovery.
set_param(modelName, 'HardwareBoard', 'STM32F746G-Discovery');
Set the CRL to ARM Cortex-M.
set_param(modelName, 'CodeReplacementLibrary', 'ARM Cortex-M');
Set the array layout to Row-major.
set_param(modelName, 'ArrayLayout', 'Row-major');
Enable code execution profiling.
set_param(modelName, 'CodeExecutionProfiling', 'on');
Run Verification on Target
To verify the accuracy of the generated code against the simulation output, use the SIL/PIL Manager app or programmatically, use the MATLAB programming interface.
Interactive Approach
On the Simulink toolstrip Apps tab, click SIL/PIL Manager. Set SIL/PIL Mode to Processor-in-the-Loop (PIL). Click Run Verification.

Once the verification is complete, use the Simulation Data Inspector tool to verify the numerical accuracy of the generated code.
Programmatic Approach
To verify the numerical accuracy of the generated code programmatically, run the model in PIL mode. Set the simulation mode to processor-in-the-loop.
set_param(modelName,'SimulationMode','processor-in-the-loop');
output_withCRL = sim(modelName);
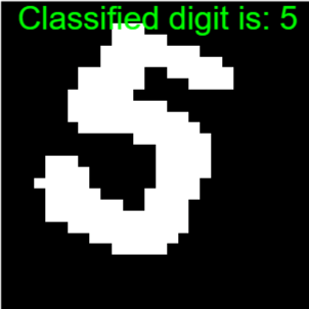
Display Predicted Classification Label
Run the displayClassifiedLabelHelper function to obtain the classified labels. To view the classified label see the variables scores and labels from the MATLAB workspace. You can also view the execution time for the generated code in the output_withCRL variable.
displayClassifiedLabelHelper(im, output_withCRL)
Compare Generated Code Performance
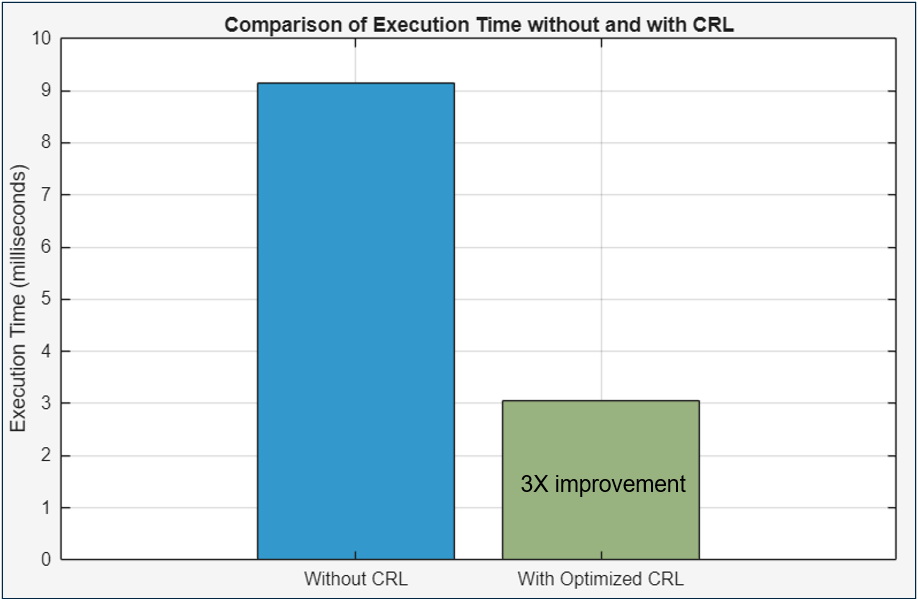
Compare the execution time of the generated code with and without the ARM Cortex-M CRL. The execution time of the generated code with ARM Cortex-M CRL is stored in the output_withCRL variable. Use this variable to extract the profiling information and compare it with the generated code performance without the CRL.
To get the execution time of the generated code without the CRL, set the Code replacement libraries parameter in the Configuration Parameters dialog box to None while configuring the digit classification model and run the model.
Alternatively, you can execute these commands to configure and run the model programmatically. Save the execution time in a variable named output_withoutCRL.
set_param(modelName,'CodeReplacementLibrary','None');
output_withoutCRL = sim(modelName);
To compare the execution time of the generated code with and without ARM Cortex-M CRL, run the plotExecutionTimeComparisonHelper function.
Using the CRL improves the generated code performance by three times compared to not using it.
plotExecutionTimeComparisonHelper(output_withoutCRL, output_withCRL)