Simulate and Generate Code for Depth Anything V2 PyTorch Model in Simulink
R2026bThis example shows how to simulate and generate deployable code for the Depth Anything V2 [1] PyTorch ExportedProgram model. Depth Anything V2 is a monocular depth estimation (MDE) foundation model that provides both zero-shot relative and metric depth-estimation. Monocular depth estimation is useful in autonomous driving [2] and navigation [3] scenarios.
In this example, you load the ExportedProgram file named Depth-Anything-V2-Small-Exported-Program.pt2 into the PyTorch ExportedProgram block in Simulink. Then you simulate the model and generate deployable CUDA code.
Download Pretrained Model
Download the pretrained Depth-Anything-V2-Small.zip from the MathWorks website, then unzip the file. The file is approximately 100MB in size.
zipFile = matlab.internal.examples.downloadSupportFile("coder","Depth-Anything-V2-Small/v000/Depth-Anything-V2-Small.zip");
filepath = fileparts(zipFile);
unzip(zipFile,filepath);
Load the Simulink Model
Open the DepthAnythingV2Demo Simulink model.
modelName = "DepthAnythingV2Demo";
open_system(modelName);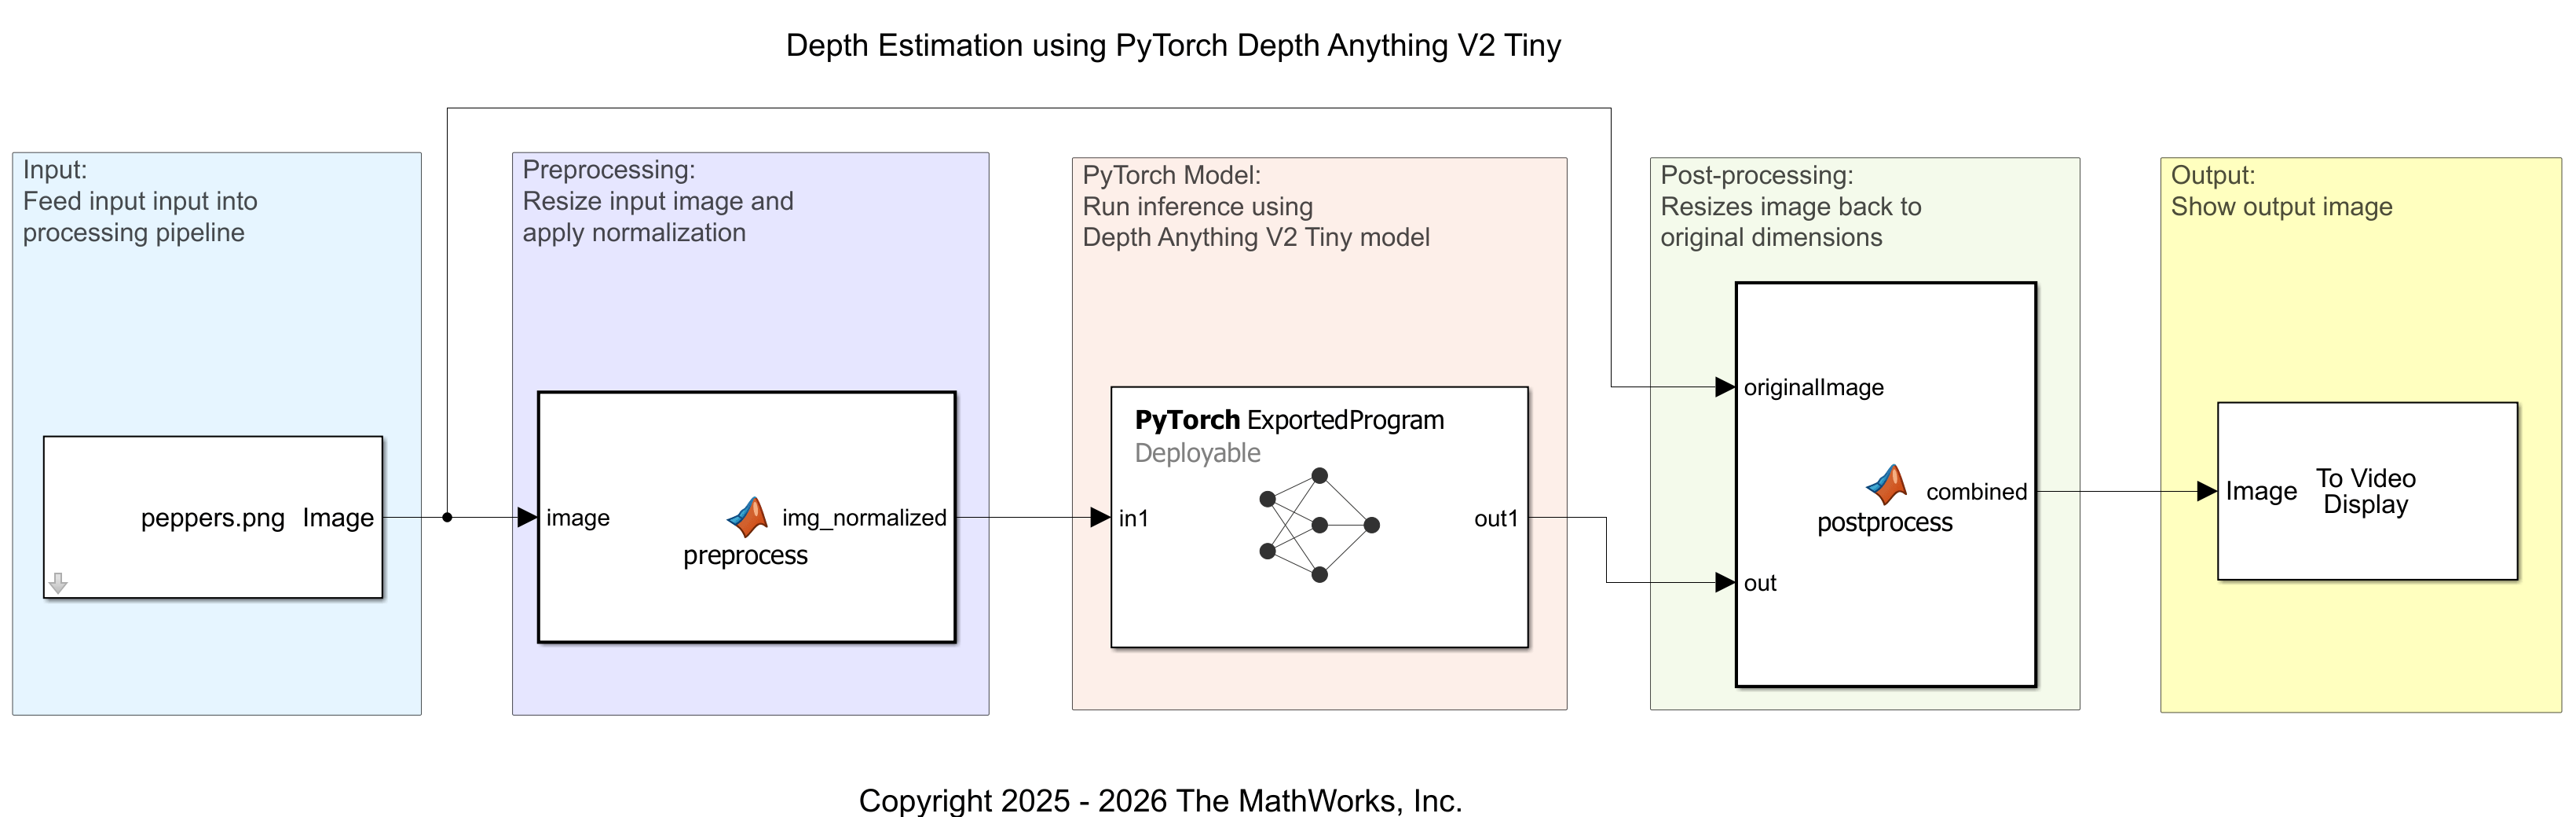
First, load an input image by using an Image From File block.
Next to prepare the input to the PyTorch ExportedProgram, the MATLAB Function preprocesses the data by performing these steps:
Cast the input to single precision and rescale it to the range
[0,1]because the original PyTorch model referenced in [1] expects the inputs to be of typesingleand in the range of[0,1].Resize the input to 518-by-784-by-3 to match the input size of the
ExportedProgramobject when it is converted from a PyTorch model.Apply zero-center normalization by using the ImageNet statistics for mean and standard deviation because the original PyTorch model expects zero-center normalized based on ImageNet's statistics.
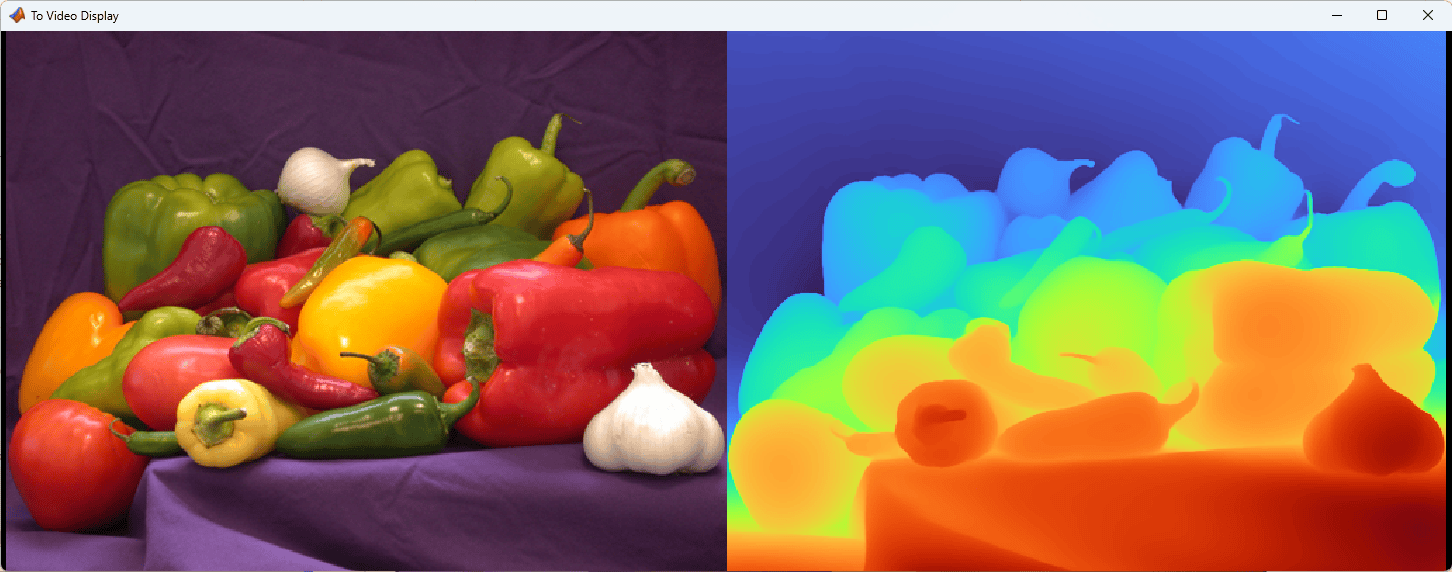
The PyTorch ExportedProgram block then performs forward inference on the data and outputs it to a second MATLAB Function block, which performs these steps:
Resize the size of data to 384-by-512-by-3.
Rescale the value of data to [0, 255].
Use the
ind2rgbfunction to convert the indexed data to RGB format that usesturbocolormap.Concatenate the original image and depth map image together.
Configure the PyTorch ExportedProgram Block
Specify the file path in the PyTorch ExportedProgram block dialog box by setting ExportedProgram model file to the downloaded Depth-Anything-V2-Small-Exported-Program.pt2.
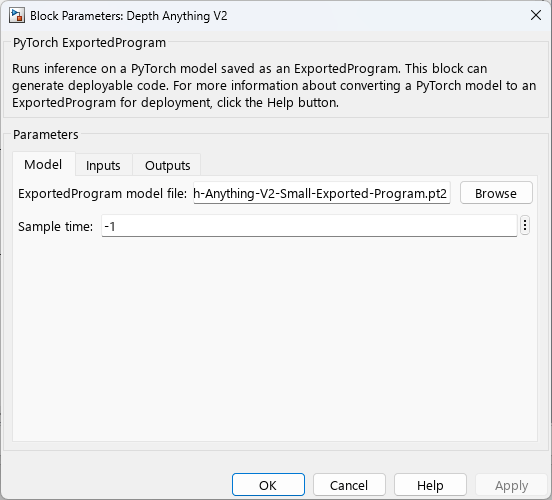
Alternatively, you can use this code to specify the path to the Depth-Anything-V2-Small-Exported-Program.pt2 file in the PyTorch ExportedProgram block.
blockName = "Depth Anything V2";
blockPath = modelName + "/" + blockName;
exportedProgramFileName = fullfile(filepath, "Depth-Anything-V2-Small-Exported-Program.pt2");
set_param(blockPath,'ModelFilePath', exportedProgramFileName);
Permute the Input and Output
By default, MATLAB stores input data in arrays, where the elements are in the order [Height, Width, Channel, Batch]. However, the PyTorch ExportedProgram block requires the elements of the input array to be in the order [Batch, Channel, Height, Width]. To ensure compatibility, in the block dialog box, in the Inputs tab, set the Permutation to apply column to [4 3 1 2].
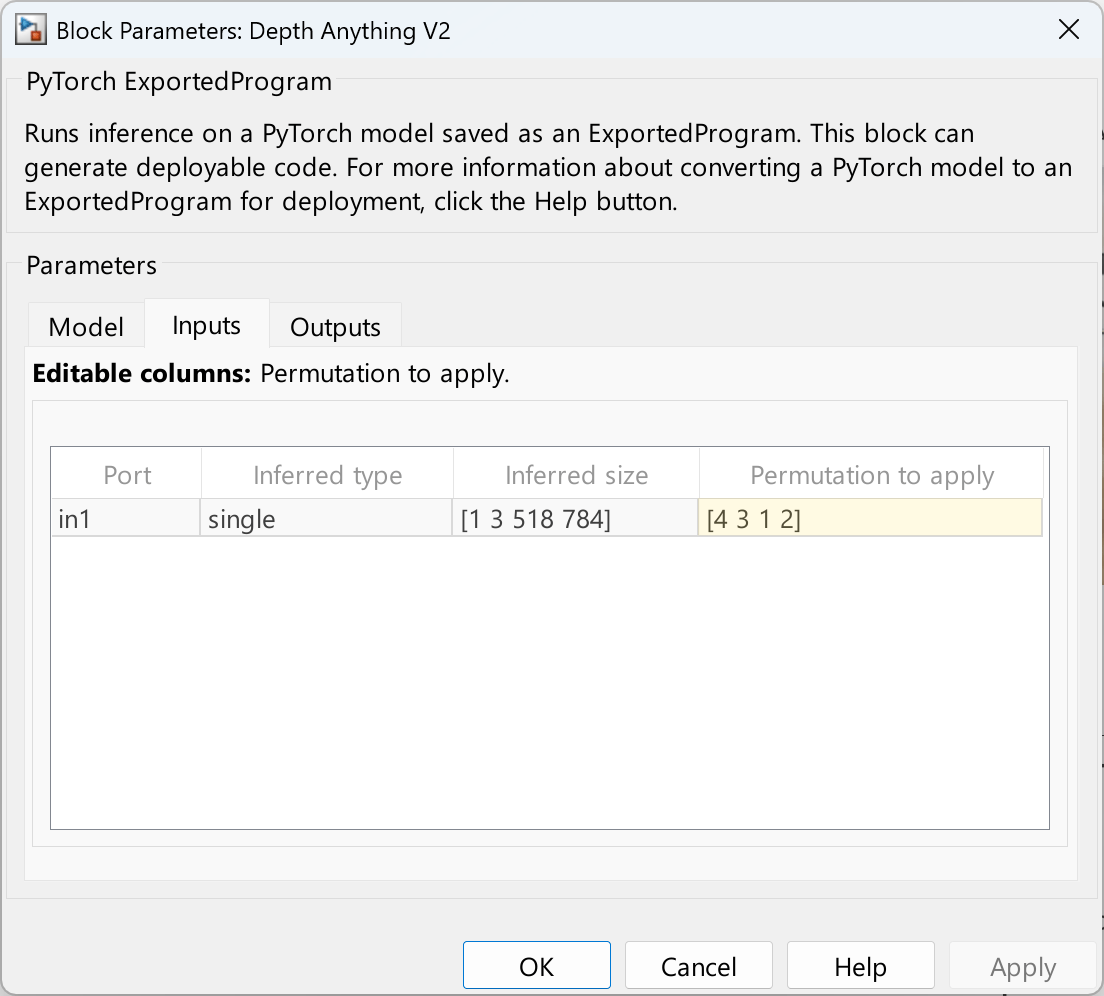
Alternatively, apply a permutation order of [4 3 1 2] to the input array elements by using this code.
set_param(blockPath, "InputsTable", ...
    "{'in1','single','[1 3 518 784]','[4 3 1 2]'}");
The PyTorch ExportedProgram block outputs an array where the elements are in the order [Channel, Height, Width]. However, the MATLAB Function block for post-processing expects the array elements in the order [Height, Width, Channel]. In the block dialog box, in the Outputs tab, set the Permutation to apply column to [2 3 1].
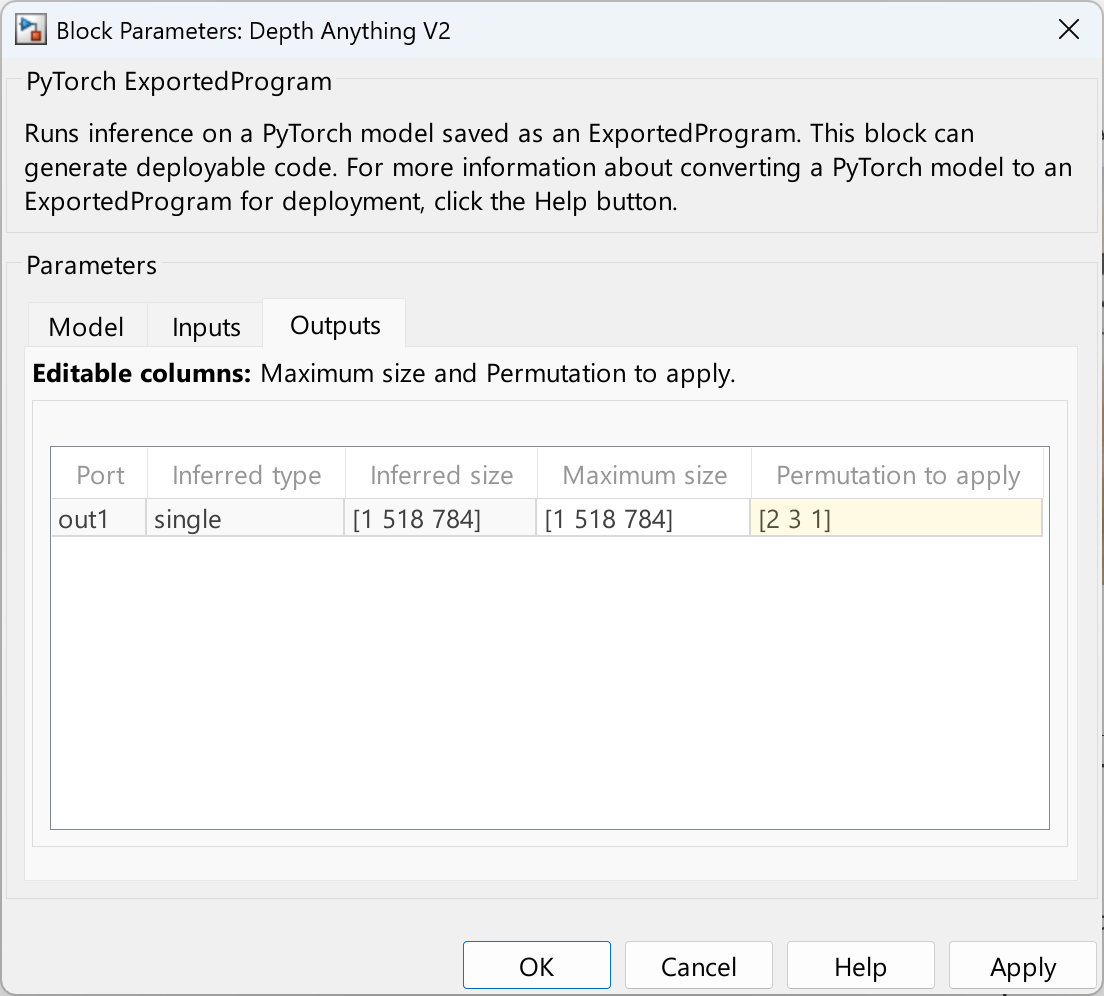
Alternatively, apply a permutation order of [2 3 1] on the output data by entering this code.
set_param(blockPath, "OutputsTable", ...
    "{'out1','single','[1 518 784]','[1 518 784]','[2 3 1]'}");
Configure the Model for GPU Acceleration
To speed up simulation, in Simulink Toolstrip, click Model Settings to open the Configuration Parameters dialog box. In the Simulation Target pane, select GPU Acceleration. Alternatively, enter this code:
set_param(modelName,'GPUAcceleration','on');
Simulate the Model
sim(modelName);
The model displays the original input image and the estimated depth map.
Generate Code
Configure the model and generate CUDA code by using this code.
set_param(modelName,'TargetLang','C++');
set_param(modelName,'GenerateGPUCode','CUDA');
slbuild(modelName);
References
[1] Yang, Lihe, Bingyi Kang, Zilong Huang, Zhen Zhao, Xiaogang Xu, Jiashi Feng, and Hengshuang Zhao. “Depth Anything V2.” arXiv, October 20, 2024. https://doi.org/10.48550/arXiv.2406.09414.
[2] Wang, Yan, Wei-Lun Chao, Divyansh Garg, Bharath Hariharan, Mark Campbell, and Kilian Q. Weinberger. “Pseudo-LiDAR from Visual Depth Estimation: Bridging the Gap in 3D Object Detection for Autonomous Driving.” arXiv, February 22, 2020. https://doi.org/10.48550/arXiv.1812.07179.
[3] Wofk, Diana, Fangchang Ma, Tien-Ju Yang, Sertac Karaman, and Vivienne Sze. “FastDepth: Fast Monocular Depth Estimation on Embedded Systems.” arXiv, March 8, 2019. https://doi.org/10.48550/arXiv.1903.03273.

