Model Risk Management with MATLAB
Adherence to regulations is critical, but how do you ensure compliance when regulations keep evolving? Traceability, reproducibility, and reusability are the three pillars upon which models should be constructed to meet regulatory requirements. Doing so will naturally reduce operational costs and provide the agility necessary for the risk team to adapt. A platform is necessary to address key challenges around model implementation, validation, governance, and review. The environment must have automation capabilities like documentation generation and model validation automation. It must also provide complete model lineage to ensure adherence to regulatory standards such as SR11-7, Basel, CCAR, CECL, and FRTB. Finally, making use of existing models and providing programming language interoperability is crucial given that we now live in a polyglot world. All this information must be summarized in customizable dashboards to be consumed on demand by key stakeholders. In this session, see a demonstration of MRM capabilities in MATLAB® through model development (advanced AI and deep learning), model lineage, documentation automation, model review, and monitoring examples, all tracked within MathWorks Model Inventory.
Published: 12 Sep 2021
Hello, everybody, and welcome to this session. My name is Paula Poza, and I'm part of the engineering team within MathWorks. Today I will be providing some insights of our model risk management solution.
In other words, we have been creating a platform to help you manage model risk. And we have been doing this using a set of underlying technologies. The solution, what it does, you can see the graph on the right speaks by itself. You see words like governance, reproducibility, transparency, traceability, automation, monitoring. And in fact, the solution covers all these aspects. It covers model governance, how the model moves through the lifecycle, automation and documentation, offering total transparency in all the actions. This solution takes you all the way from developing a model and taking it to production as well as monitoring it.
There are many stakeholders involved in taking a model through the lifecycle. This includes first line of defense with model developers, model owners, and the second line of defense including model validation and audit. Our solution aims to bring together all those stakeholders so they can coordinate and collaborate on all these activities in any point of the lifecycle. This solution lets you do modeling faster, better, and cheaper.
If we look at the different stages of the model lifecycle, the initial state, the starting point, is the inventories. This is where all the models are. It is where the models enter the lifecycle. We can think of a centralized platform which will allow you to model traceability for compliance and automate the whole workflow.
When we talk about the model development environment, a model needs to be developed and documented. It needs to be automated and be reusable and efficient. Also models need to be reviewed independently. And if necessary, to go back to the developers. Models need to be tested against a production implementation to make sure things work as expected and they do what they meant to do and the users understand it.
A model needs to be deployed. No need for IT to refactor or recode models. Once all that has happened, it is also necessary to monitor the model to see if it still behaves as it is supposed to. And we have built some dashboards to help you understand and monitor this.
Since the model inventory is the heart of a robust MRM solution, I will dive into this first. MathWorks model inventory is not just a database with a shiny interface. First, it has multiple stakeholder views at varying levels of granularity. Taking a look at those views, we can see first a dependency viewer which allows you to focus on the interconnection of models and data. You can focus the view on upstream model dependencies as well as downstream models which are impacted. The diagram is bidirectionally linked. So you can easily identify the specific model you want to review details about in the model panel. And of course, you can edit the dependency diagram by just clicking on two entities that you would like to connect or remove a connection from.
Let's move to MATLAB. OK, this is the entry screen for the model risk management for the MRM tool. I'm going to enter with a user. And depending on the user I enter, I will have privileges to see a list of models in the inventory, which might be different from the list another user might see. I choose Model Inventory. If I am a model developer or if I am in validation, maybe I am in the credit risk group or in the model risk group and so on. These accesses will be determined by your entity as you wish.
Here at the bottom, let's say this is the list of models so far in your entity or at least the models that me as a user with my privileges can see. And here on the right, the dependencies amongst them. It is not just a list. It is like a time machine where you can go to at any point in time and find any possible information regarding each model. Who developed it, what were the assumptions, why, when. We cover all the model lineage. Everything is here instead of having to look around. We have risk of some document maybe getting lost or some people might have left, the info gets lost, et cetera. But this way with this tool, that won't happen because everything is concentrated here. We'll see more of this later.
So we may wonder, how did each model get here? How do I enter a model in this list? You could have developed a model in MATLAB or you may also have developed in SaaS or R or whatever. How do I make those models appear in the inventory? Let's assume I log into the MRM tool as a user who is a model developer. I hit the New Model icon. And I'm going to see a series of fields that I will be filling in. Of course, these fields can be customized as you wish according to your entity or whatever you think is relevant.
So you can see the model name, model type, who is the business owner, who is going to validate this, the repository. This is a very important field. Whatever you put here is the URL of the location where all the files for this model are located. So if it is in MATLAB, for example, .mlx or groups of data, et cetera.
OK. So let's go and see one that I have already created. This one for a credit card. It's taking quite a while. Let's click here and see if it makes any-- it was just loading. OK. It's an alternative to go on the top, but it was just loading. It took a little while.
OK, so here we can see the fields are filled in. And you can see in the repository the URL corresponds to a GitLab location. So I mentioned at the beginning that we're going to make use of different technologies. So you can also reflect the model platform. So whether the program is in MATLAB, Excel, et cetera, you can indicate it here. As I said, this is a language agnostic platform.
And here the state, you can see the graph of the different stages. Of course, for each of you, I mean, for each of entity or group, it can be a different graph. So it depends how many stages you want to consider for each model. So you will go from one model-- sorry, from one state to the next one. And at each point, you select at which state the model is.
So let's say, for instance, you may be a developer who has developed a model and wants the validator to know about it and wants the validator to come here and validate it. It's a simple setting here that is to be validated. And because already in the fields up here chose who was going to be the validator when he chooses this stage and submit, automatically the validator will receive an email to say, you've got something to look at. So he just clicks on it, and you will find the model straightaway. So that's why the inventory serves as a communication between both. Not only the emails and letting them know, but also the stages and where the information is, et cetera. We're going to carry on seeing all this.
There is the possibility as well of launching, because this platform, although it's language agnostic, it is based on MATLAB. So you have the advantage that MATLAB is shipping with it. So you can make use of the programming power and you can program some actions. So you say go on and assign this person the sort of task and let him know. And so you can make use of some programming underneath. I will show you in a minute an example of that programming.
OK. So let's say the developer, the validator, whoever is looking at this has found something and he wants to reflect it here. So that person can come to this tab. And you can see there are already a few findings. So if I select one of them and I come here and say Launch Issue, it will take me to the page where the issue is described with all sorts of details. Again, I'm talking about the underlying technologies that take part of the solution. There you go. Here is where you could enter all the comments that you want regarding the issue.
We could consider those findings before the model has gone to production or we can call the exceptions for the issues when the model has already gone to production. It would work exactly the same way. So here by new issue, you enter it and then you see the list and you can launch it. So one person would enter it, and then when another one looks in here, he can view them and check them to it. OK.
Also the Documents tab. The idea is that each model has all the assets about it here all centralized and being able to find it quickly. So if I come to Documents, here there is one attached. And if I want to launch it, I will upload. You will upload documents. So you go to a location and upload it. And if you found it uploaded by somebody, you can just launch it and it will open it up. The same as with the issues before. There you go again. That was SharePoint. So you can see all the technologies.
OK. So here I mentioned the different fields and I launched the issues. You can also launch the model. So let's say you have come here as a validator and you want to find where all the code is. You position yourself in the model where we are. And when I came here, Launch Model, Browser. And it will take me to this would be the model. Here is an app and .mlx, et cetera. So this is the code of my model itself.
OK. So this is paying attention at each model individually, what happens with it and all the assets around it. But what happens if I want to have a global view of all the models in the repository? Then I would come here. I'm going to make this smaller. I would come here to this ledger. And you can group by business group. I only want to see the models that belong to treasury, for instance, or to commercial banking or whatever. So this is a higher level view when you see all the models belonging to different groups.
We can also see the model dependency view. This shows all the dependencies between the models and which models are affected if I modify one. If I select one model from the list, it will be reflected in my graph. I can create dependencies by clicking. If I click here and then Control and click on the other one, a dependency will be created.
Another view is this. The dashboard. We call this the dashboard executive view, because for somebody who just wants to have a very high level view of what's going on, this has been created with a MATLAB app. So you go with the App Designer. You create by dragging and dropping. You create an app and you assign functionality to it. All you have to do here is come and import it.
And with this, you can access to all the data and all the programming that MATLAB has. So for somebody who doesn't know MATLAB, who doesn't use it, it can come and use these apps pointing and clicking, select some parameters, and then the visualization will show up and all the statistics and all the metrics that are available. So this is very useful.
And another point that have been mentioned here is the audit trail. We were talking about reproducibility or transparency. Everything that happens here has been logged. So if I change the state of a model, if I create a new model, et cetera, whatever I do, the actions get logged. And you can see at least here in this window when it happened. And if you want, you can export it. Once you've got exported, you could, of course, go into the analysis with it and obtain reports or whatever you want. Or even you can if you want connect it to external server packages to do further analysis or visualization.
OK, this is the main things I wanted to show you regarding the inventory. So far I have shown you the inventory solution within my desktop. But I would like to show you that you can also come here to a web browser. And I'm going to paste a URL. So let's say each of you from your own place, you want to access the inventory, but an inventory that is in a remote location. It can be in the cloud or any server. So you don't have to have it locally. And in fact, in your day to day, you won't have it locally, because everybody will want to access in a centralized way somewhere accessible for everybody. So they will give you the URL. You enter the user. Enter the password.
And then you will see MATLAB, but it is a remote MATLAB, which is in the cloud in this occasion. If I type, it's going to take you to the initial window exactly the same as when I ran this in my local desktop solution. All the rest of the steps is the same. So you can see how you will be running in your day to day the inventory solution remotely in the cloud or your cluster or whatever.
OK. So if we recap what we have been seeing about the model inventory, we have seen it is a centralized solution where all the models are there. And we have all the assets related to each model to be found within the inventory. When something happens, a model changes or we add to something, an alert gets triggered. I guess into the log do an an email get sent, et cetera. We also have the possibility of accessing MATLAB programming. So we can trigger actions in a programmatic way.
We have seen all the dependencies between models and different views. One of them the executive view, which is an app which is very easily used by somebody who doesn't know MATLAB. Then we have seen that you have full traceability in each model and its line of business. And also you can provide some automated model risk scoring. There is something which I didn't show you. I would like to show you that before we go.
OK. Here we have this Open Risk Questionnaire. OK. So what it is is this is a MATLAB program. It's a .mlx. You can just click on it, all these controls. You can just select the values that you wish. And after all, it's just programming.
So depending on what you choose here, for instance, if I say here high, when I close this, it's going to run that program and it will tell me that as a result it's going to update the record for that model. So if I say OK, it's going to update it. If I refresh this, I will find the update value. So just to let you know, I was mentioning before how you can access the MATLAB power. And this is one of the ways you can do it.
OK. And also I showed how you can add documentation, all the findings. You can access the code itself and the inventory is like a time machine where you can go back in time and reproduce everything that happened at the time.
OK. Now my colleague is going to talk about the model review. So we were showing in the lifecycle the whole wheel. We step into the next stage. And I want to link the inventory with the model review. I showed you before how you could launch the model and see the code. In this occasion, what I would do is to go into review, and you will see how you get launched into the model review environment.
So the next description will be the model development before getting to the review. And I now hand off to my colleague Ian to discuss automation and best practices in ensuring regulatory compliance and traceability for the entire model lifecycle.
Thanks, Paula. I tend to notice that most MRM solutions out there in the marketplace that tend to stop at the model inventory. But there's so much more than just the model inventory. For example, not only creating your model, but also validating it, testing it, deploying it, and also monitoring it and eventually sunsetting it. And so how do we facilitate automation of those different workflows to make our lives easier?
First we're going to talk about the model development environment. So what is the model development environment? On the right hand side here, you see a picture of what the model development environment looks like. It's effectively just a notebook view of your analytics where you see the results on the right hand side and your code, your images, and so forth on the left hand side.
Now, some things that are unique about this is that it's effectively interactive in that you can also embed not just images but also lightweight apps inside here we call live tasks, which I'm going to show you and take advantage of a little bit later on. But you're going to also be able to put in things like controls inside here so that if someone wants to take a look at the model that you've developed and they're not technical but they want to give you some feedback, maybe in an agile MRM way, they're a business user, you can easily take the view and make it more of a presentation layer view, which hides all the code and just shows you just the buttons and the dropdowns and all the controls that are inside there. So I'm going to show you an example of that later on as well.
On top of that, the model development environment also contains a bunch of apps. Apps are utilities, graphical interfaces, that allow you to do a variety of different things. But at the end of the day, the two key things they provide you to do is automation of some sort of task, whether it's connecting to a database, building reports, or deploying applications to also generating code for you as well so that you don't have to build the code from scratch. And the apps actually span many different locations. So not only connecting to databases, but doing things like deep learning, building out a ARIMA or GARCH model, distribution fitting, curve fitting, and so much more. So a lot of apps inside MATLAB.
And then the last thing I want to mention, and I'm going to show you an example of the model development environment in action, is the live tasks I was talking to you about from before. You can actually customize them too. So we have an example here of this live app called Scriptlets. And so this Scriptlets live app here allows you to build out your applications very rapidly with a dropdown list of different types of actions that you might want to do for a particular type of model.
So Scriptlets are well behaved for models and, for example, credit risk model or a market risk model or maybe a operational type of risk model where you might have a particular set of steps that you might have to take over and over and over again. And so this helps organize that into a selection of tasks you might want to do, steps you might want to take, to build out your model. So I'm going to give you an example of that. We're going to build out a credit scorecard.
So let's take a look at this in action here. All right. So here's MATLAB. We're going to open up one of our Scriptlets here. And you notice that inside this notebook, I've just embedded a live task or a lightweight app inside here. So instead of having to write the code from scratch, instead I can select from a dropdown list box the action I want to take and then embed that within the script here by clicking a button like Insert and Run.
So you notice that when I click that, it effectively copied and pasted a block of code directly into my script for me. So allows me to build out a model very rapidly. So in this case here, let's say that I want to build out a scorecard on my variable called data. This dropdown list box here, by the way, shows you all the different variables in your MATLAB workspace that are supported. So in my workspace here in MATLAB, you can see I've got three variables that are shown and reflected inside my Scriptlets here. And then when I choose the variable here, you notice that the dropdown list box here changes as well.
So now let's go ahead and build out our scorecard. So I'm going to insert another block of code here. And this is creating our scorecard. And then you notice in our workspace here, we have a new variable, which is now reflected in the Scriptlets here. So that we choose this, and the dropdown list again, once again, changes. So in this case here, let's go ahead and perform some binning on this. And then maybe let's go ahead and fit a logistic regression model to that.
And so you see here that at the end of the day, what I've done is I've just effectively built out a scorecard very, very quickly inside MATLAB without having to write the code from scratch. There's a couple of benefits for this. First off, you have consistency. You notice that the naming convention here that's being used is going to be consistent so that the validation team that's reviewing the models, or if you have multiple people who are developing a model, don't have to spend the time to figure out what's SC mean. Is that scorecard or is it some other variable name?
The second thing you notice here is this is more of a document as you go type process. So that these little annotations inside here, if I need to customize them, I can do that very easily right within the notebook view here. So I can do that. But at the end of the day here, I don't have to put in all of the baseline commands and comments inside here. It's all done for me, again, saving me some time.
And finally, the last thing that you notice here is that this dropdown list box, it provides a workflow for folks who may not necessarily have built credit scorecards, have the deep knowledge of building credit score cards. Maybe they're more junior. So helps them figure out what steps to take necessarily or if you may forget some particular step.
And then finally, I want to mention here that you can also run apps from within MATLAB too. So this will open up a binning explorer inside MATLAB, which allows me to then further fine tune my model. And so this is an example of an app that's inside MATLAB. And you can see here from the app that it shows all of the different features within my scorecard here and how they've been binned, what the weight of evidence looks like. And again, if I further want to fine tune this manually, I can do that using a nice interactive tool like this. So I don't have to do it from scratch.
And so this type of app is not just the binning explorer app, but actually there's a tab here dedicated to all the different apps within MATLAB. So again, from doing things like machine learning and deep learning optimization, image processing, and so much more here. So I recommend if you haven't seen MATLAB in a while, take a look to see if there's an app to do the type of task that you're interested in.
And finally, we may want to take this script here that we've just created and then publish it. And so there's a couple of different ways you can do that. One way is that you can take this and you can save it. And you can save it as a Word document or you can save it as a PDF or LaTeX. So if you do that, here's what the report looks like. So you can see it's taken all the inputs, the outputs, any images that are inside there, and it's just embedded all of that in here for us so that we have this all nicely formatted and we can archive this for purposes later if we need to review.
All right. So we've seen a little bit about Scriptlets here and how that works. Now let's talk a little bit about being able to document the models that we've just created here and how to automate that process. All right. Going back to MATLAB here. Let's take a look at an example document here that we may want to create automatically. So I'm going to open up a document here, a Microsoft Word document outside of MATLAB.
So here's what the document looks like. So I've only taken a couple of pages of this just for illustrative purposes here. But you can see that it contains multiple chapters and subsections here, some tables that are nicely formatted, and maybe some equations, as well as some figures here. And what I'd like to do is I would like to just simply embed the most latest and greatest images, tabular data, whatever it is that I want to have inside this document here.
And so to do that, it's actually pretty straightforward using the model development environment in MATLAB. The first thing that you need to do is just ensure that the template has been created correctly by just putting in some content placeholders. So you notice here, for example, that I put in a couple of content placeholders. One's called AgeBinFigure here for this image. Another one here called Portfolio Distribution for this table. So I put in a few of these here, for example, when this was issued, who's the document owner, and so forth. And so once you've defined those content placeholders, you can then push into that using MATLAB.
So let's take a look at an example here of doing just that. All right. So say, for example, I want to update that same document that I just showed you here. And I want to update these particular fields here. So the portfolio distribution, the document owner, and then maybe update the image as well. So you notice here that to do that, I only have to define some data inside the MATLAB workspace on the right hand side, and it can be of various types here. So in this case, you see a string, a date time object here. This is a tabular data set here you see on the right hand side. And I can take this, update inside MATLAB, and then just simply push it in by assigning it to the appropriate ID inside the Word document. So you notice the doc owner and port distribution were the names inside the Word document that I assigned.
So say, for example, I want to change this to something else. And I want to adjust the portfolio data inside here as well. So I want to change this tabular data to something different. All right. So we're going to change the portfolio data here. So we're going to change it to something different. So let's say, for example, I want to change this value to something unique. And changes to a different section here. So maybe we'll do, I don't know, credit. And now take this and we're going to push this new data set directly into that Word document and keep all the formatting as well. So let's just run the rest of this here .
All right. So it just finished. So let's open up that document now. OK. So you notice that the fields here have changed. So in this case here, you notice that the values down here in our table have also been updated. But yet the style of the table here has been preserved. So that's one of the nice things about the automatic report generation here is that you can define what type of styles you want, and it's easy to keep them without having to make major changes to the underlying code. And then here's the updated figure, which just happens to be the same as the previous one. OK. So it's really that simple here.
So as far as document management goes using MATLAB, you've seen two approaches right here, which provide automation capabilities around the documentation. So Scriptlets is one way from a code perspective to provide that documentation. And then from a document perspective, to create nice templated documents that have a certain look and feel. That's where the automatic documentation we just saw comes into play.
Now, there's a third thing that is necessary to have a robust governance around your documentation. And that is the ability to not only take a look at your code and link it to a document but link documents to documents as well. So for example, if a regulator comes to you and says, this particular regulation here, I don't see it reflected in your documents here. Can you show me where that's being reflected? You can go back to your document from that standard, and it's linked to it.
So you can take a look at where that standard is reflected in your document. And then you can even link that directly to the code and go drill down to the code level view. So that type of linking is extremely important for the lineage perspective so that you can see exactly where from a traceability where things lie. But also you may want to track the status of your documents as they're being developed too, not only from an implementation perspective to make sure that the standards are being implemented in your model document, but also from a validation perspective. So the validators may have a different opinion on how much has been actually implemented. And so you want to be able to see if there are any discrepancies and be able to address those as quickly as possible.
So let's take a look at how you can provide governance around the documents and also link that back to the underlying code using MATLAB. So say, for example, you have some standards, so some model development standards that need to be implemented into a specific model. Now, I've already done the first step of importing those standards from a document directly into this tool. I'm going to show you that with the model itself and link them together.
So you'll see the entire workflow using the next step. But basically, I want to take that and link it to an individual model, a specific model that I've developed here. And so you can see in this case, the development standards have all these different chapters here with sub chapters and sections inside here. And maybe I want to take some of these and link them together.
So now I want to pull in my specific model here and link it back to those standards. So we're going to import that Word document. In this case, that Word document is going to be a credit card model. OK. And we've just imported that. And so if we take a look at what that document looks like before we imported the structure of it, here is what that document looked. Like. So this is the document we just loaded into that tool.
And so you can see here in this case, this is a credit scorecard with a couple of different sections inside here, data preparation subsections inside here, some risk drivers. So you can see that this is a document that we're still in the process of developing, and we want to load this in and track the status as we develop things out and link it back to the standards in that document.
So you can see here that it's automatically figured out the different subsections inside here and defined them for us so that we have a structure of the document. And let's say, for example, the data sources section here is directly related to addressing the section associated with the standard, which is data availability and quality. So you can link these different sections between the two different documents together here by just simply selecting for linking with the requirement. So in this case here I'm going to link with this one.
And now I've established a link between these two. All of those links which, of course, are being managed from within the tool. So I can see them very quickly. But also if I want to take a look at the links related view, I can also see all the links that have been connected here and what type of link they are. So in this case here, if I'm a developer, I may want to say this is going to be an implementation as opposed to a verification down here. So in that case, I'm going to choose implementation.
And now if I take a look at my requirements view, you notice that the data availability and quality section has now been fully satisfied based on the data sources section here. So now we have one of our standards has now been satisfied based on what we've implemented in our particular document. And so the same process would then be repeated from the validation perspective. And if they agree, then they would do the same thing where they go take the data sources here, create a link with the data availability and quality, and then they would use their link here and associate that with the verified.
And then if we take a look at the requirements view here, you can see from the verified perspective this now matches identically. So you can easily see from a graphical view how these models are being developed and making sure that the documentation is satisfactory from a validation perspective as well. You can even go one step further and create things like traceability matrices with this too. We can add a traceability matrix between the development standard and the actual individual document.
And we can see here where they have been satisfied. And we can even roll this up or down and see what sections in particular have been satisfied. So on the top here, this is the structure of the individual model. And then on the left here, this is the structure of the standard. And you can see that we satisfied this particular section here. So if you wanted to roll this all the way up, we can see that this particular section here has been satisfied. And of course, we can take this and export it out as a report.
All right. So we've seen three different ways of managing your documentation here, the last one being around the governance aspect. So now we're going to move on to the model review environment. So now that you've developed the model and you've documented it, how do you ensure that the validation team can quickly take a look at that, get their feedback to you as quickly as possible, make comments, and also try out the model and execute it very quickly?
So in this case here, we're going to show you the model review environment, which is web hosted. It can also be done from a desktop as well. But the benefit of being hosted on the web is that it's effectively publishing a document that's executable. So some other team can just simply go to the URL, try it out, execute it, test things, and leave comments and also upload information to make the case of maybe why those comments were made in the first place, all without needing to install a single thing on their machine, which makes their lives a lot easier.
And so this, at the end of the day, provides much more faster communication development cycle where you're making sure that you're not only looking at the most up to date models, because that's also a whole other issue in general, but also that the feedback and everything is being captured also within that centralized system and that alerts are happening. Because every time that a validator leaves back a comment, an alert is then triggered to the development team. And likewise, when the development team has published a new code, that code is then-- the alert is then sent over to the corresponding validation team and stakeholders.
And finally, but definitely not least, one of the most important things about this review environment is that it does not require someone to necessarily be technical to use it. So if you want to have folks like the owners of the model, the business owners, try the model before they actually get a model that they may not necessarily like, this provides a nice environment for them to quickly provide feedback in that this is what they were expecting the model to do or how to behave with a particular data set when they're doing their what if analysis or scenario testing.
So say we have a fleshed out scorecard here that we have created inside MATLAB. And you can see here, it has a lot of these different dropdowns and live controls inside here. It's got various different live tasks that we've embedded inside here. So it's a pretty complete example. And what we'd like to do is maybe just make some changes. Say, for example, the validation team has identified there's an issue of some sort. And so we need to go back and make some changes. For brevity here, I'm going to show you how the process works if they needed to make some changes without getting too technical here.
So say I want to just make some very minor changes to my corresponding document. So say, for example, in this case, I've updated it and now it's model version 1.2. We've maybe made some cosmetic changes too. So we want to reflect that here as well. And so we've made other changes to this document too. Let's assume that for this particular case. And now we want to take this document and publish it up to the URL so the validation team can then take a look at the changes that we've made.
So that's pretty easy to do inside MATLAB, because I can just take this. And since it's a MATLAB project, I can take that and just commit the changes that I've made right here, because it's linked directly to version control systems like Git and also can be leveraged inside things like GitLab and GitHub as well. Here I'm just going to simply put in my comment. Push the new update here to my repo. And now you see it's being pushed right here and it is completed.
So if we took a look, in this case, it was GitHub, if we took a look at GitHub in this case, you will see that the code's been updated there. But instead we can take a look at it and execute it directly from the model review environment here, which looks like this. So there is typically some sort of portal into the model review environment here. This is just showing you a schematic of what it might look like beforehand. Again, this is all customizable depending upon what your portal would look like and what you would need. This is just a very bare bones example.
But now we're going to start up the model review environment. And what you've noticed here is that it has then taken those different models here and they are available in a dropdown. So you might have multiple models that are associated with that MATLAB project. And so in this case here, I've got one that we just created called the complete version of the credit scorecard.
And you can see the scorecard that I just pulled here. It turns out that I pulled in the wrong repo here in this case accidentally. The repo that I pushed to was actually this one, which we just pushed to. But I accidentally pulled a different repo here. So let's just try to pull in the appropriate repo here and make the push for that instead.
OK. So we're just going to do the same type of thing here. Save this. And then push that up as our new commit. All right. Now that's been pushed up. Now if we take a look at our model review environment.
All right. Now we see the model review environment again. Let's open up our model. And there you go. Now we have the updated changes reflected here in our URL. Just make sure that you pull from the right repo.
So again, the nice thing about the model review environment here is that you cannot not only take a look at the underlying code here, make changes to things if you wanted to, try things out, basically like a sandbox for you here, and then execute that directly from this environment. So say, for example, I want to change the model status here to Approved.
You can see here it's been executed on the right hand side here, and now it's been set to approve. But not only that, I can also change this to a form view, hide the code, and now I only have the controls, the outputs, the inputs, and text here. So again, it's more like a form view for someone who just wants to try things out, doesn't want to get into the technical weeds of everything.
And then finally, assuming this passes muster, you can then submit a review here which will then have more additional fields for comments and annotations here. So for example, if you want to do a sign off on this, you can see we can put in additional comments inside here. And all of this is also customizable as well depending upon what metadata you need to have saved along with the approval or the rejection of the model for the review. And so that's the model review environment. Effectively acts like a communication platform to facilitate the back and forth between the different team and stakeholders.
All right. So now we're going to talk about performing model testing. So how do you facilitate and automate that process to make it as quick and as agile as possible? So the first is using automated testing frameworks which are built directly into MATLAB. So showing you a quick example on the bottom here of how you can write a unit test and interopt with different languages as well. So you can reuse existing code. You don't have to build things from scratch.
The second thing is the source control integration, which we've already shown to some extent already. And the fact that when you have your code and you check it into a source control system, you can have it trigger the execution of these automated tests. And then finally, being able to do a impact and dependency analysis test on your underlying code to identify if there's any orphaned functions inside there that may not need to be used or missing things. In this case, here on the bottom right hand side, you can see this is doing a dependency analysis and sees that a particular data set is missing, which is going to lead to an issue.
So let's take a look at the automated testing component here, building out a suite of tests to test a model over and over again. OK. So here's that same example that you just saw on that PowerPoint slide. So there's actually three different tests here that I've defined, each one an individual section inside the script. It has some sort of setup stage or step. It does some sort of validation metric of some sort, has a threshold set necessarily, and then an assertion at the bottom.
So there's really kind of three steps. One, setup. Two, do your computations. And then three, perform an assertion, whether it's going to be true or false. So in this case here, these are all threshold based. And we're seeing whether or not the threshold that we've defined is exceeded or not. And if it's been exceeded, then we're going to put a failure in there. And so that's really all it comes down to. And you can then, again, take this and interopt with other tools.
So for example, this is showing you how I can pull in some underlying Python code. I have a Python model called scorecard.py if you take a look here in this directory. Here's my Python model here, scorecard.py. And I'm calling that, which actually has-- let's just pull in here so you can see what this looks like. Has a couple of different functions inside here. And it's using an object to create the scorecards called a scorecard class. And so I want to be able to call these different methods, create and get scores directly from MATLAB.
And so I can do that just simply by using the py dot the name of the Python library followed by the, in this case, the function or the method and then any inputs that need to be passed in here. And so you can see here this creates a Python scorecard that's actually been embedded inside my MATLAB environment. And I can pass that back into corresponding Python code and use the Python code within MATLAB.
And they eventually get some data. In this case, a NumPy array. And I can convert that over to the corresponding MATLAB data type, which in this case is a table, and then use the MATLAB built in commands for doing validation. One nice thing about MATLAB in general is that it's really good for building out your benchmark models and also just facilitating a bunch of different built in commands to do things from pricers to Monte Carlo simulations.
In fact, if you weren't aware of all these additional toolboxes, I'm just going to show you here real quickly some of them that are available that you would definitely have some value from. So in the computational finance suite here, we have a variety of different tool boxes for doing things like pricers and risk management, which we've been using some of today, to doing things like data science and deep learning and text analytics. So no matter what domain it is that you're interested in, likely we have a whole suite of functions that you can leverage without having to build everything from scratch. And so that's one way that you can save time is just using those toolbox built in functions.
The other way is for a lot of statistical tests, we actually have a lot of Scriptlets just for that purpose. And so if I went back and took a look at the example from before, and now when I choose sc_binned here, you can see that the dropdown list changes. And so now if I want to do a lot of statistical tests here for validation perspectives, you can see that the Scriptlets actually becomes a tool not just for the development team but also for the validation team. So let's say I'm going to start my model validation processes now. So let's insert that block of code here.
And now we can start performing our validation metrics. So maybe I want to pull in a Bayesian error rate. And you can see here on the right hand side, we've got our corresponding plots. We've got our annotations inside here again. And all of that information is being saved. So we can go through and build out all our different plots really quickly by just simply clicking a button and embedding all of that. So maybe I'll do one more, like a KS test here as well. And so in fact, we actually have all of the Basel working paper 14 statistical tests for PD models available right out of the box.
And so you may want to take all of these statistical tests that are relevant for your model and then build out a script for that using the Scriptlets technology and then take that and create tests from that. And so that would actually be the next step here is then taking all of that, putting it all together in a single document, kind of like what I did using the Scriptlets here. So I've got here you can see the KS test, ROC. So I've got a bunch of different tests here.
And really the next thing that I need to do to refactor this to make it into unit tests that can be run over and over again is to simply write test in front of the name at the top here. They've already been formatted in a way that you just need to put test here and then an assertion at the bottom and what your threshold is that you want to test against and fail or pass against. And so that's pretty much all you need to do. And then you are ready to create your entire suite and run that with a single command.
And so in this case here, I'm going to take the three tests that we just did hear from this. So these three different tests here. And run them all with a single command here. And so if I do that, let's just clear this out. This is now running through and capturing all of the new results, executing those three different tests. At the end of the day here, I have my array matrix of all the three different tests. They've all passed here. No issues how long it took for it to execute, and so forth. And so that's what it's like to perform testing within MATLAB.
And so now you have these tests, the next step is then just linking it back to a version control system. So every time you check in your code, these tests are being run in an automated fashion and creating reports for you that you can take a look at and see how the model behaved. So let's just take a look here at what that next step might look like. I'll come back to this in just one second here.
So here, again, we can perform integration with continuous integration systems. In this case, it's showing you a Jenkins here where you can then create a variety of different test artifacts from testing results, code coverage, and other different types of tests here like tap tests. And all of that stuff is being generated any time there's been a change to the underlying code.
OK. And I said I wanted to go back one step here and talk a little bit about this too. So I talked real quickly about Python interoperability. But you can also interrupt with Jupyter as well. So if you want to connect to any Jupyter kernel, you can do that using MATLAB. So in this case here, I'm showing example of connecting to R using a Jupyter notebook. So let me show you that in real time here.
All right. And so for Jupyter here, I'm going to use binder here and load one up from a URL, from a web page. But it also would work just the same from your local desktop if you have Jupyter installed on your local machine here. All right. So now I'm going to link to this environment here. OK. Now I have the URL of that location. And so now what I can do is create the connection from within MATLAB here by using the syntax and defining the workspace, the Jupiter workspace. So let's do that.
OK. And so you can see here the Jupyter workspace has a couple of built in commands to allow me to push and pull data between the two different environments here and also execute code remotely if I wanted to. So in this case here, if I want to call R code from within the MATLAB environment and execute that within the Jupyter environment, it's as simple as just using the eval in command here. So I'm passing in, in this case, some R code to install some additional packages. So this is R code that I'm calling from MATLAB, not MATLAB code. So let's just go ahead and execute this.
All right. Now we're going to define some data sets. So now inside the Jupyter environment, there's two data sets. There's two variables, one called credit, one called defaults. So if we take a look at the Jupyter notebook here. So going back to our Jupyter notebook. All right. So if I wanted to take a look at one of those, let's take a look at defaults, for example. Here's the data, the defaults data. And so I want to take this data and maybe pull it into the MATLAB environment, make some changes, push it back into R.
So to do that, let's just load that data into the MATLAB environment first. So again, just using the load command here will allow us to pull that data in. So here's that same data. So you can see here now it's been pulled into MATLAB as in MATLAB data type. So now you have all the advantages of the MATLAB environment like being able to do things like sort or pivot the data, be able to peruse the data very easily, that type of stuff. But you can see here at the end of the day, all the data is the same. So 729, 817. If I compare those to the R code or R data, 729, 817, 1,074 and so forth, you can see the data is identical.
OK. So now maybe we want to do some additional stuff like transfer PMML models over. Likewise, it's the same type of thing where you're evaluating the code and then maybe at the end of the day taking some new data and pushing it back into the R environment, the Jupyter notebook environment in this case. So let's just take that and run this section of code.
OK. So we've just created in MATLAB a new variable called new default data. So this is the variable name in the MATLAB environment. Now in the Jupyter environment in R, we are now calling this new data. So if I go to the R environment, I should see the same data here that's new default data in the MATLAB environment. So I'm going to call new data in R. And I should see the same values. 969, 282, 1,053. So let's call new data here. And you can see the data is the same here. 969, 282, 1,053, and so forth. So that allows us to effectively push and pull the data between the two different environments.
The last thing I wanted to mention very quickly about the interconnectivity between the two is that you can even do things like pull images from R or Jupiter directly from that environment into MATLAB. So let's just show you the last example right here. All right. And there you have it. This is, in this case, a R figure or plot that's been pulled into the MATLAB environment here. So you can even push and pull images as well.
So now we're going to move on to the model execution environment. So at this point, we've developed a model and we want to avoid as much as possible the refactoring of the model so that we can just use what we've developed and have it execute at scale.
So to do that, we're going to use a technology called the MATLAB Production Server. This allows you to host a variety of libraries that may be in MATLAB or may be in other languages as well working in harmony that can then be served up to end users through a REST endpoint. So what this means is that it will interface and connect with other systems, other business systems in an agnostic way to the language that was written in the first place. And because it's running on the MATLAB Production Server, there's a robust series of logging and audit history associated with the models that are being run. And you can also define who is able to execute which models.
So at the end of the day here, you have a system that allows you to easily deploy out your functions that you've written inside MATLAB without having to recode anything at all. And so what that looks like and the way it works here is very similar to what you just saw with that little image of those couple of different rectangles here moving into the production server.
So each one of these is an individual library that's then been passed into a directory of the MATLAB Production Server and becomes accessible immediately through a variety of different calling applications. So it's basically your one truth of analytics, your golden truth of models, and then they can be accessed from a variety of different systems. In this case, showing you through Excel or maybe you're using .NET or Python or a database ODBC connection or whatever.
So let's take a look at an example of what it takes in order to deploy the models. So going back to MATLAB, really, it just comes down to using an app inside MATLAB. So here we have an app for deploying out applications here. So we've got one for libraries and Hadoop. We also have one for production. And so this is the one we would use where we just simply take the MATLAB functions that we want to deploy out and use a interface to do that. So this is what the app looks like. Basically, we just add in the MATLAB functions we want to be able to call from that REST endpoint and then click on Package. And that's pretty much.
It basically takes everything, zips it up effectively into a single file, and that single file is then put on the MATLAB Production Server instance. And so what that looks like is this. And so this is what you see here. You see basically one server I got, in this case, set up here. And you have an application tag logs, all different types of IT configuration stuff to make everyone's life a little bit easier here.
But you can just simply upload and deploy an application by using this interface here. And you can see I've got a few that have been deployed already to this production server. And once they're available, then I can define the location using the URL followed by the name of the library itself. And that's it. So again, that's all it is in order to deploy your applications using tools like the MATLAB Production Server.
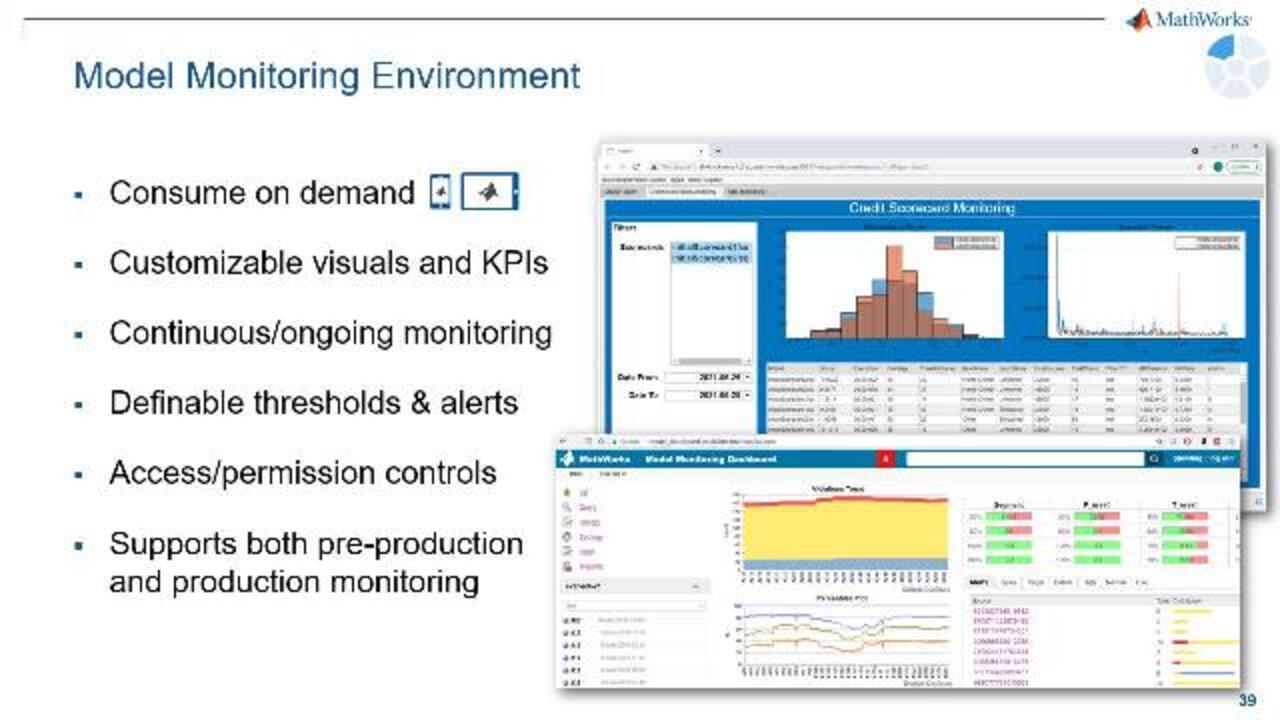
OK. So we're going to move on to the last piece here, model monitoring. So now that you've deployed an application, it can be consumed using a standard interface like REST in JSON. You can then have a app or a dashboard then link back and call those models in real time in continuous environments to make sure the model's behaving the way it should.
So on the right hand side here, you see a couple of different examples of what dashboards could look like. I'll show you one running in real time right now. But basically, the key thing is that you can define things like thresholds and alerts on your models so that when a particular threshold or alert is hit, it's then sent in email to the corresponding stakeholders to take action. And this same technology can be used not only in production but also in the staging environments too.
So before you're in the production environment, you're still in the testing and quality assurance phases, you may want to monitor those models before they go live. And all of this you can make sure that the applications are being used by the right groups of people by putting a robust series of access and permissions around that, which are built into the tools. And all of these dashboards can of course be consumed using modern technologies like, for example, an iPad or a phone as well as, of course, your computer.
So let's take a look at an example of what a dashboard looks like when it's been deployed out. OK. So here is a dashboard that's been deployed out here for monitoring a couple of credit scorecards. Again, this can look like anything you want it to. This is just a simple example here. It's completely customizable. But if we want to take a look at maybe two scorecards that have been deployed and just see what some of those KPIs look like.
So in this case here, you can see that real data is coming in real time here. We can see the distribution of the scores, maybe how long things are being executed, and maybe other KPIs that are of interest to us. So again, we would customize this according to the KPIs that we care about and then monitor those KPIs by defining different thresholds on top of that. And so this is all being powered by the MATLAB App Designer technology. So inside MATLAB, there is a dashboarding tool that allows you to build up these interfaces very rapidly.
So to show you a quick example of how we can build out an interface like this in a quick fashion here, let's just go back to MATLAB one final time here. OK. And we're going to build a new app with MATLAB. So inside MATLAB, there is the App Generation or App Designer. And this is what it looks like here. So we're going to create a new app. Again, you can use this. It works with modern tools like an iPad and iPhone. We can reflow based on the orientation of your device. We're going to build a simple one here, just a basic app.
So to show you what it looks like here, we just simply need to drag and drop the different components to design on a canvas. So it's as simple as just dragging these different components over. And then right here, you just simply create a callback to this. And this is the code that's being executed. So in this case, I'm just going to add some code to write to this particular plot here.
So in this case, I have two different components on my app here. You notice that when I click on the little app layout here, view the snapshot, it highlights the corresponding component that is of interest to me. So if I want to deploy-- or sorry, if I want to plot to this particular axes, I just simply need to click on it. I realize it's called app UI axes. And now when I plot, I just need to say let's plot to that particular axes. So let's get a plot to that UI axes some random data. And let's try this out.
All right. So here is our first little app. Clicking the button, and you can see it's made our little random plot. We can have full interactivity with this. We can pan, we can zoom, we can rotate with this.
All right. And say we want to have the same interactivity, the same experience, but we want to have it deployed on a web page. Well, it's as simple as just clicking a few more buttons. So we go to the Designer tab here. Share. And then choose Web App here in this case. And now what this is doing is it is packaging up our application, it's encrypting it. So it's finding all the dependencies, encrypting it so our intellectual property remains safe, and then at the end of the day, it's creating an archived single file that we can just put into a directory and it becomes accessible.
So in this case here, here's the output. So here's the output here. In this case, app1.ctf. So if I want to make that accessible through a URL, I just simply need to put that into the directory of the MATLAB Web App Server. And so here is the MATLAB Web App Server. All I need to do is just put it inside the app folder, and it becomes accessible. And so in this case here, you'll notice that I have a few apps already available. I'm going to just simply overwrite the one that's called app1. And now when we go to the URL for this, here's app1, and here is our application. You can see it's exactly the same as before, but now it's been deployed out to this URL and it has the same type of interactivity that I would expect from before.
All right. So what did we just see? So we saw the ability to create these dashboards very rapidly and deploy them with a single click. And not only that, you can take the reports or the analytics that you've created with these dashboards and save them back locally offline. So if you want to review them later, you can do that as well.
So finally, I just want to summarize what we've seen here so far. So looking at the top strip at the top here, development, review, validate, execute, and monitor, this is the entire workflow for taking a model through from inception to deployment and eventually sunsetting. And in the darker blue bottom portion here, this is the suite of tools that MATLAB empowers you to go through that process as quickly as possible. And we understand that not necessarily using just a single suite of tools is possible.
So we provide a lot of interoperability between many different systems, whether it's Hadoop, Parquet, Spark, Python, .NET, Tableau, whatever the tool is, we have an interface for it to connect to it. So that you can use the tooling that you need to provide value to your organization. And of course, if you want to do it all with MATLAB, you can do it all with MATLAB as well.
So just to summarize, finally, the entire series of modules that you've seen today here. The model development environment allows us to develop the models. We have a review environment that can be web hosted. You have a series of validation tests through the use of tools like Scriptlets. And then we can take all of these applications that we've created and deploy them out without having to recode anything. And then monitor those, creating dashboards that link back into these systems using REST APIs. And then finally, the model inventory, which again, has all the metadata associated with your models and is the heart of all these different systems and allows you to do the tracking between the code and the corresponding documents and the comments and everything in between.
Finally, if you're interested in learning a little bit more about model risk management with MATLAB, we have a variety of different links here for doing things like building out challenger models with AI and deep learning to doing things like how COVID has really impacted the MRM space. So I encourage you to take a look at these links. And with that, I want to thank you for your time today.

Featured Product
MATLAB
Up Next:


Related Videos:


Select a Web Site
Choose a web site to get translated content where available and see local events and offers. Based on your location, we recommend that you select: United States.
You can also select a web site from the following list
Americas
- América Latina (Español)
- Canada (English)
- United States (English)
Europe
- Belgium (English)
- Denmark (English)
- Deutschland (Deutsch)
- España (Español)
- Finland (English)
- France (Français)
- Ireland (English)
- Italia (Italiano)
- Luxembourg (English)
- Netherlands (English)
- Norway (English)
- Österreich (Deutsch)
- Portugal (English)
- Sweden (English)
- Switzerland
- United Kingdom (English)