SITL Simulation
With UAV Toolbox and the UAV Toolbox Support Package for ArduPilot® Autopilots, you can run software-in-the-loop (SITL) simulations of your flight control models targeting ArduPilot. In SITL simulation, Simulink generates source code from your model, compiles it, and then runs the code on your development computer to verify algorithm behavior and code generation results in a desktop environment.
Why Use SITL Simulation?
With SITL simulation for ArduPilot, you can test and identify defects in your flight control algorithms early in the development process. For example, you can first model and test a system component in normal mode of Simulink®. Then, you can reuse your test suites in a SITL simulation, which runs the compiled generated code on your development computer. By comparing normal and SITL simulation results, you can check for numerical equivalence and ensure that code generation does not introduce errors. All of this can be accomplished without leaving the Simulink environment or setting up additional test infrastructure.
Preparing ArduPilot Host Target Using Hardware Setup Screens
You can use Hardware Setup process in UAV Toolbox Support Package for ArduPilot Autopilots to prepare the support package for using the ArduPilot Host Target and testing the connection with SIH simulator and jMAVSim visualizer.
Perform these steps as part of Hardware Setup to enable ArduPilot Host Target and test the jMAVSim visualizer:
In the Select a ArduPilot Autopilot and build configuration Hardware Setup screen, select ArduPilot Host Target as the ArduPilot Autopilot board. The supported Build Target file is
ArduPilot_sitl_default.Proceed with the subsequent step of Hardware Setup process to build the firmware and verify that the firmware build is successful.
Running ArduPilot Host Target from Simulink Model
After you prepare the flight controller algorithm using the Simulink blocks available in UAV Toolbox Support Package for ArduPilot Autopilots, you can launch the SIH simulator to verify the flight. To do this:
In the Modeling tab, click Model Settings. In the Configuration Parameters dialog box:
In the Hardware board list, select ArduPilot Host Target.
Under Target Hardware resources > Build Options, select the Build action as Build, load and run.
Click Vehicle and select the options for Launch MAVProxy Console and Launch MAVProxy Map. This will automatically launch the corresponding SITL windows when you start the simulation.
MAVProxy Console: This window allows you to interact with and monitor the SITL simulation using command-line commands.
MAVProxy Map: This window displays a real-time map view of the simulated vehicle.
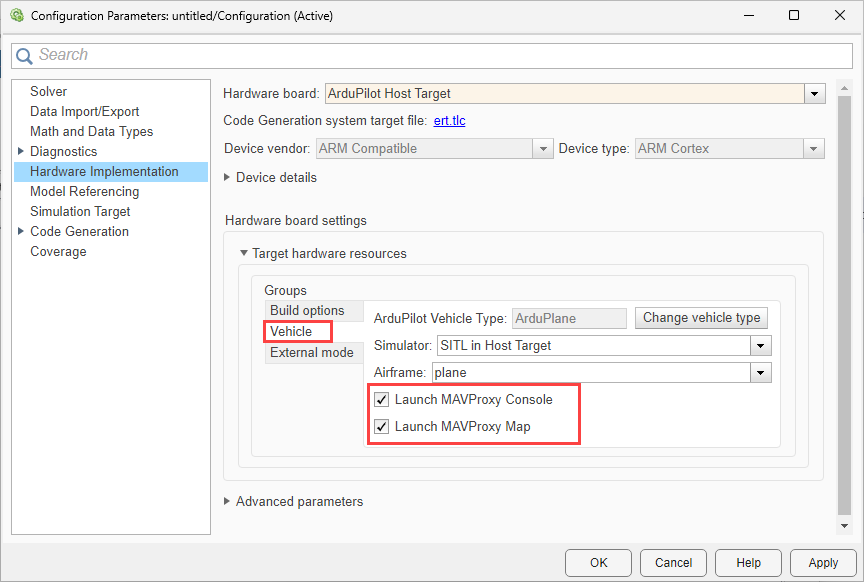
Select
SITL in Host Targetas the simulator.Vehicle type selection is determined by the chosen airframe configuration.
Click Apply and OK.
On the Hardware tab, in the Mode section, click Run on board and then select Run on board (External mode). If you see Connected IO selected instead of Run on board, click on it and choose Run on board (External mode), and then select one of these options to SITL simulation.
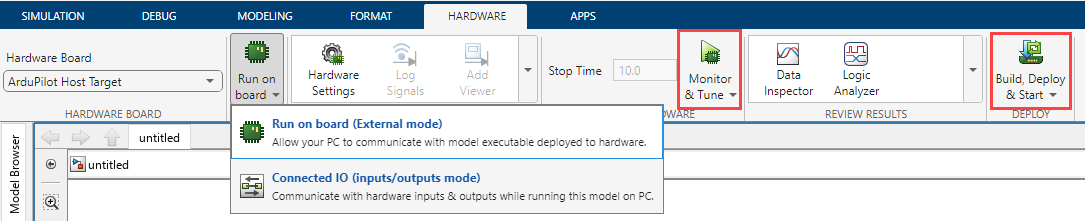
To view the flight of the ArduPilot based flight controller based on the algorithm that is present in the Simulink model, click Build, Deploy & Start. The MAVProxy Console is launched after sometime in a separate window.
To view the flight of the ArduPilot based flight controller based on the algorithm and perform signal monitoring and parameter tuning of the Simulink model, click Monitor & Tune. The MAVProxy Map visualizer is launched in a separate window.