Main Content

Write Data

Update channel data with HTTP GET or POST

Request

HTTP Method

POST or GET

URL

https://api.thingspeak.com/update.<format>

URL Parameters

NameDescription

<format>

(Required) Format for the HTTP response, specified as blank, json, or xml.

Example:https://api.thingspeak.com/update.json

Body

NameDescriptionValue Type
api_key

(Required) Write API Key for this specific channel. You can also send the Write API Key by using a THINGSPEAKAPIKEY HTTP header. The Write API Key is found on the API Keys tab of the channel view.

string

field<X>

(Optional) Field X data, where X is the field ID

any
lat

(Optional) Latitude in degrees, specified as a value between -90 and 90.

decimal

long

(Optional) Longitude in degrees, specified as a value between -180 and 180.

decimal
elevation

(Optional) Elevation in meters

integer
status

(Optional) Status update message.

string
created_at

(Optional) Date when feed entry was created, in ISO 8601 format, for example: 2014-12-31 23:59:59. The date you specify must be unique within the channel. Time zones can be specified using the timezone parameter.

datetime

Content-Type

Content-Type is required only for the POST method, not for the GET method.

application/x-www-form-urlencoded for most updates.

application/json for updates in JSON format.

Response

Success

HTTP Status Code

200 OK

Body

 Text Example

 JSON Example

 XML Example

Error

For the full list, see Error Codes.

Limitations

All timestamps must be unique. You cannot write new data using timestamps that match existing data in the channel.

Examples

expand all

You can use your web browser to complete GET HTTP requests to the RESTful API for ThingSpeak™. Note that for embedded devices or clients that do not automatically URL encode GET requests, you must explicitly URL encode query parameters before making the GET request from the device.

Copy the URL to the address bar of your web browser, changing <write_api_key> to your user API Key, which is found in Account > My Profile.

https://api.thingspeak.com/update.json?api_key=<write_api_key>&field1=123

The response is a JSON object of the new entry, and a 200 OK from the server.

{
    "channel_id": 266256,
    "created_at": "2018-09-10T17:41:59Z",
    "entry_id": 2,
    "field1": "123",
    "field2": null,
    "field3": null,
    "field4": null,
    "field5": null,
    "field6": null,
    "field7": null,
    "field8": null,
    "latitude": null,
    "longitude": null,
    "elevation": null,
    "status": null
}

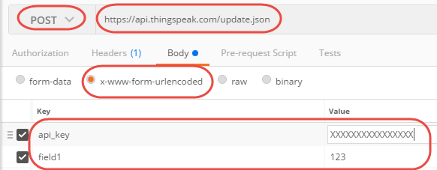
You can use POSTMAN to try out your HTTP requests using the RESTful API for ThingSpeak. This example shows how to write data to a channel using POSTMAN.

Here is the format of the HTTP request.

POST https://api.thingspeak.com/update.json
       api_key=XXXXXXXXXXXXXXXX
       field1=123

  1. In POSTMAN, select POST from the drop-down list of HTTP verbs.

  2. Enter https://api.thingspeak.com/update.json in the address field.

  3. Choose x-www-form-urlencoded under the Body section.

  4. Enter the Parameter api_key and your write API Key, which is found in Channels> API Keys.

  5. Enter the Parameter field1 and the Value 123.

The response is a JSON object of the new entry, and a 200 OK from the server.

You can use JSON format to write data to your channel. This example shows a JSON formatted REST call to write multiple fields and status information simultaneously. The response is also JSON formatted.

POST api.thingspeak.com/update.json
Content-Type: application/json
 
{ 
        "api_key": "XXXXXXXXXXXXXXXX"  
        "created_at": "2018-04-23 21:36:20 +0200", 
        "field1": "John Johnson", 
        "field3": 56, 
        "field4": 555, 
        "field5": 444, 
        "latitude": "", 
        "longitude": "", 
        "status": "Please check in!" 
    
}

The response is a JSON object of the new entry, and a 200 OK from the server.

{
    "channel_id": 12345,
    "created_at": "2018-04-23 21:36:20 +0200", 
    "field1": "John Johnson", 
    "field3": 56, 
    "field4": 555, 
    "field5": 444, 
    "latitude": "", 
    "longitude": "", 
    "status": "Please check in!" 
}